Deployment Guide
Introduction
Organisations utilizing Avaya Communications Manager (ACM) as their telephony platform have a requirement to telephony-enable their CRM users to improve agent productivity.
Desktop Connect for CRM integrates Avaya Communication Manager, Avaya Call Recording, Verint Call Recording systems with Salesforce.com & Microsoft Dynamics to enable CRM users to use the best of both systems.
Purpose of This Document
The purpose of this document is to provide a deployment guide and to define prerequisites for Geomant Desktop Connect for CRM with CTI support for:
- Avaya AE JTAPI Services
Target Audience
This document is intended for two audience segments:
- Customers who are installing, upgrading or updating the Desktop Connect for CRM software for themselves.
- Geomant technicians or Geomant Business Partners who are installing or updating the Geomant Desktop Connect for CRM on behalf of customers who have obtained a technical support contract with Geomant.
Preparatory Steps before Deployment
Before starting to deploy Desktop Connect for CRM, please make sure that all Prerequisites are met.
Solution Description
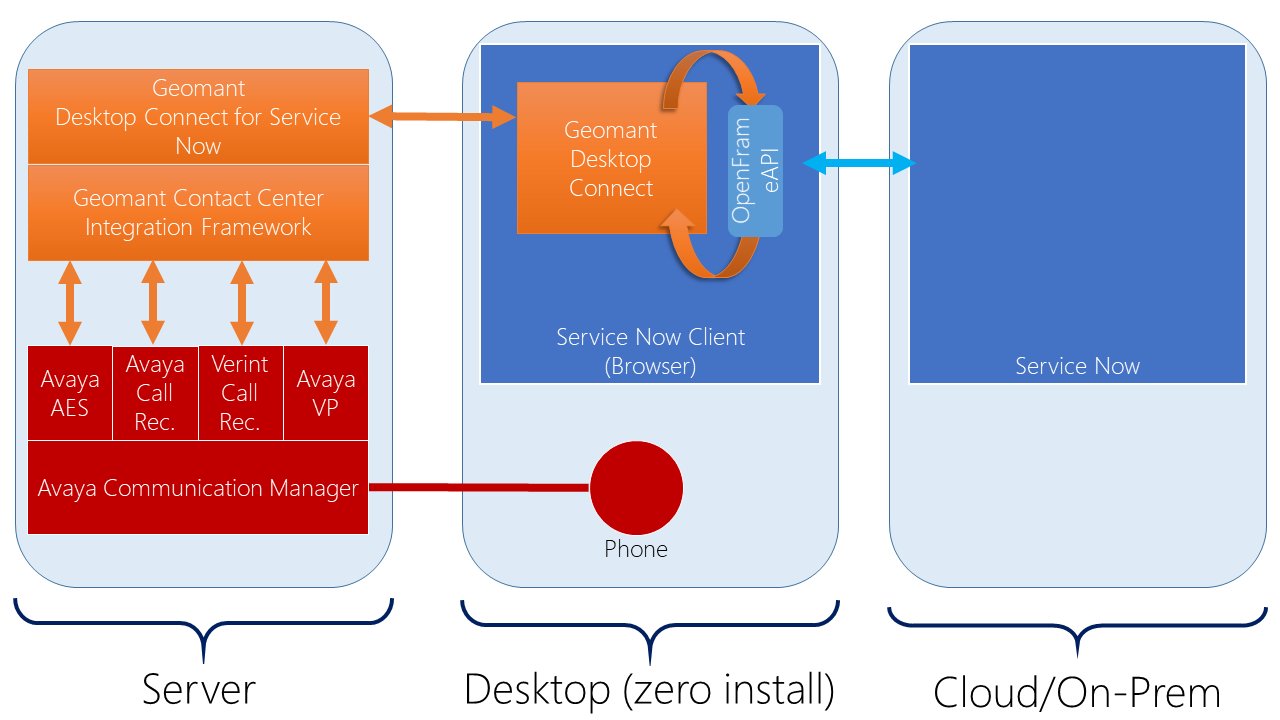
Geomant provides an application that links Avaya telephony platform with Salesforce.com CRM using TSAPI protocol and Open CTI interface supporting classic and Lightning.
Desktop Connect for CRM integrates with Avaya/Verint Call Recording system allowing users to start, stop, pause, resume and tag recorded calls.
Hardware Architecture
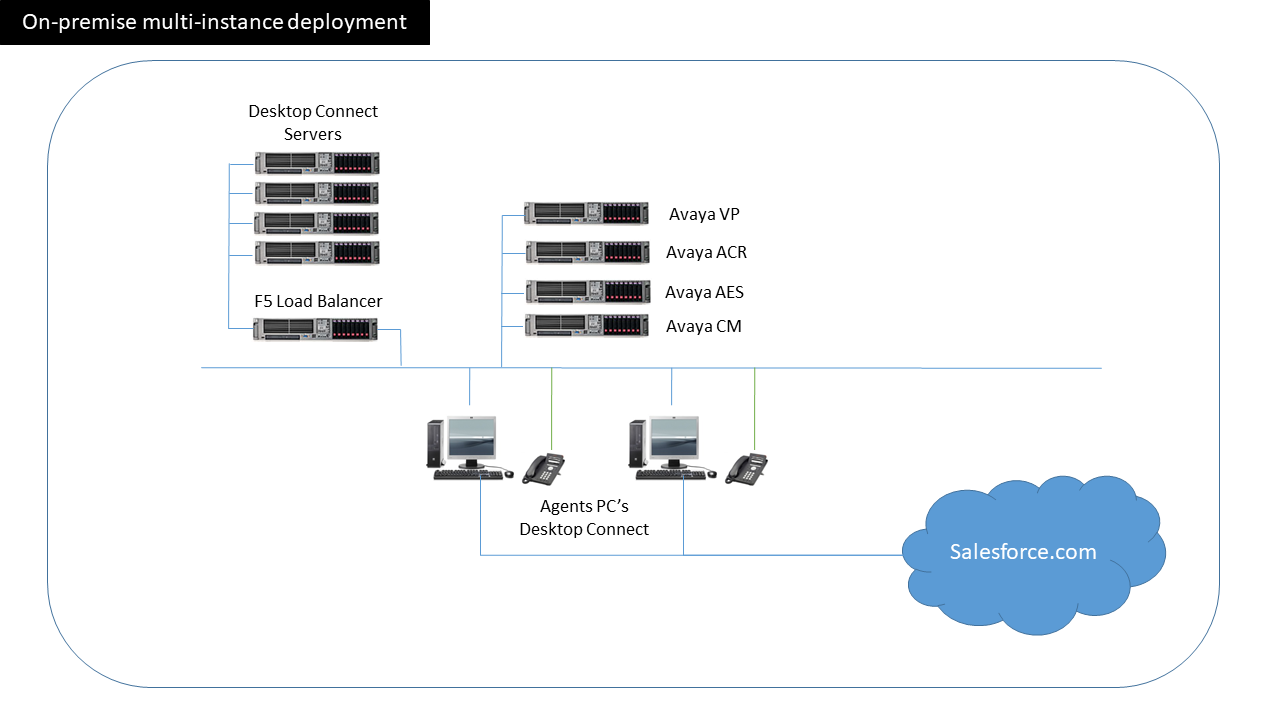
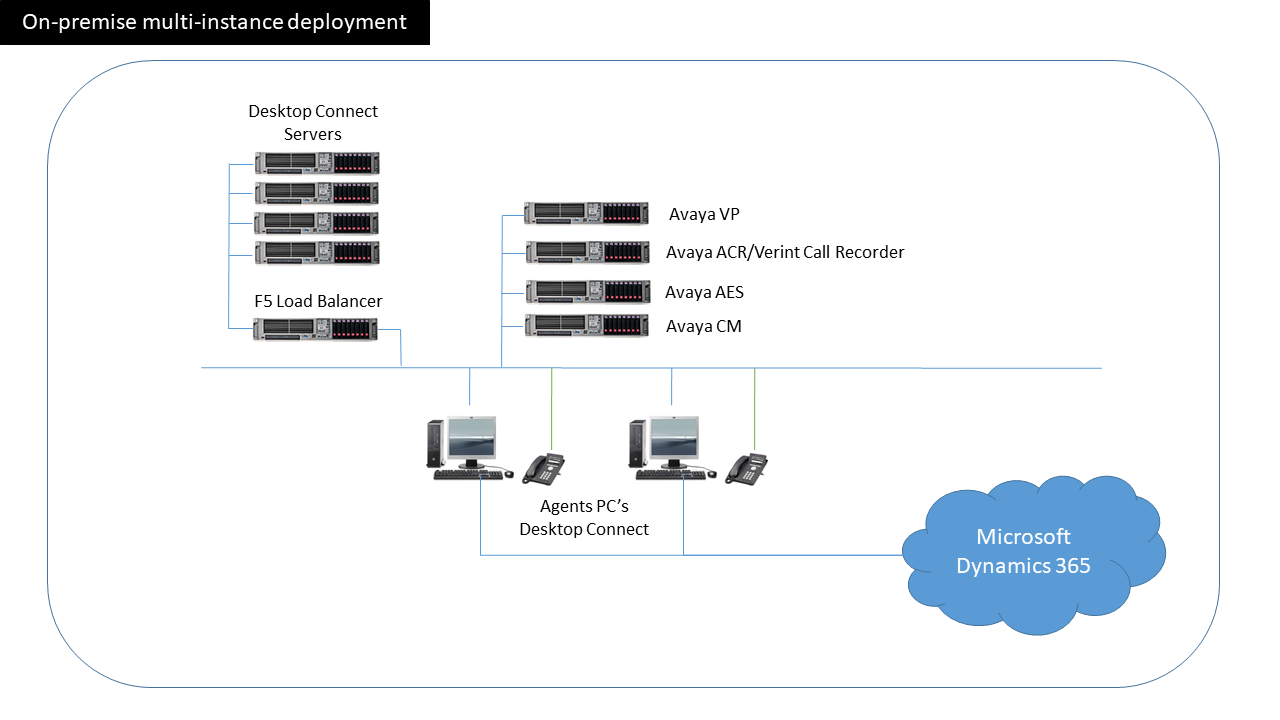
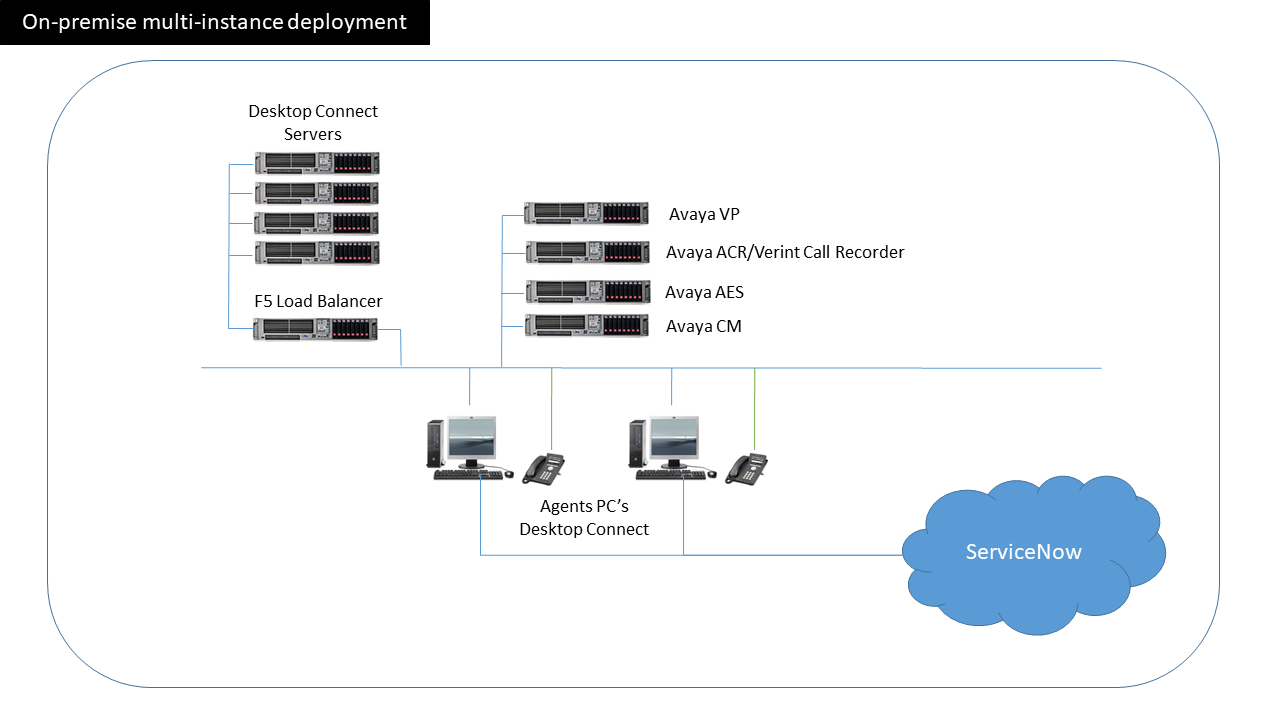
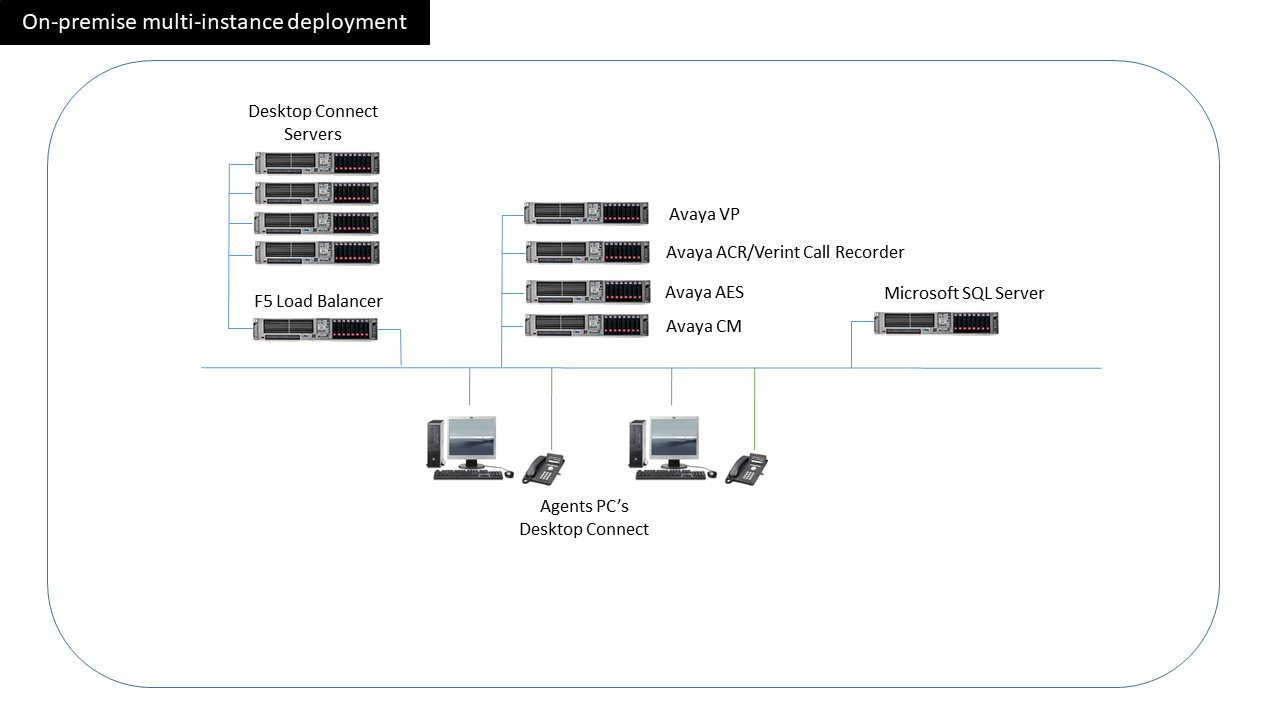
The hardware architecture diagram is outlined on the following figure.
The solution consists of the following components:
- Avaya Communication Manager
- Avaya Application Enablement Service
- Microsoft SQL Server
- Avaya Call Recorder (optional)
- Verint Call Recorder (optional)
- Buzzeasy Connector
- Wallboard Services
- Geomant Data Store
Software Architecture
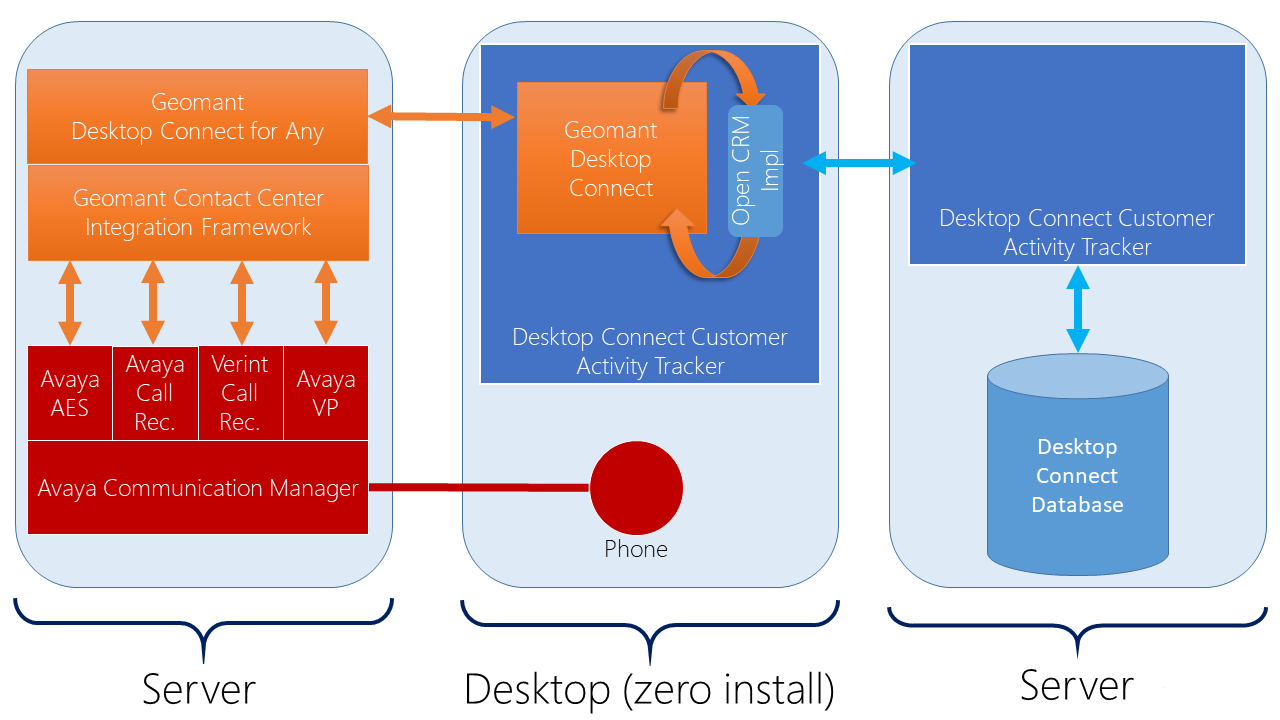
The following diagram shows the high level software architecture.
Installation of Desktop Connect for CRM
This section provides the installation steps of the Geomant Desktop Connect Server for Salesforce.com.
- Installing Geomant Desktop Connect Server
- Configuring Geomant Desktop Connect Server
Desktop Connect Server needs to be published over a secure protocol, please review the General Installation Guide on how to generate and configure SSL/HTTPS for Tomcat.
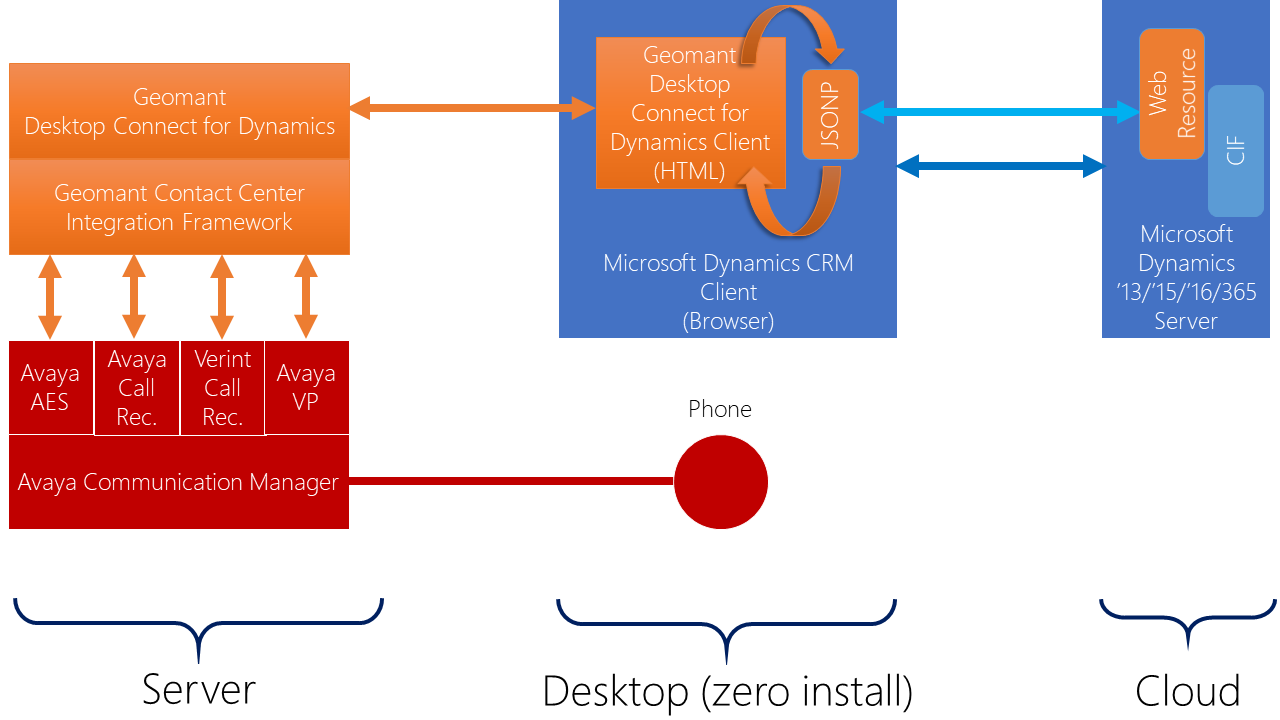
The Desktop Connect for CRM Server is responsible for the communication with Avaya Application Enablement Services (AES) and Avaya Call Recording (ACR)/ Verint Call Recorder (Impact 360 Version 11 SP1+) providing simple JavaScript based JSONP calls for the client interface.
Desktop Connect managed solutions consists of a set of web resources that allow Desktop Connect to inter-operate with Microsoft Dynamics allowing the application to perform entity queries, screen pops and click to dial. The solution contains a custom entity integrated into the Settings menu point that allows CRM administrators to configure Desktop Connect for Microsoft Dynamics dialling and screen pop behavior.
This section provides the installation steps of the Geomant Desktop Connect Server for Microsoft Dynamics CRM
- Installing the Java Runtime Environment
- Installing Apache Tomcat
- Installing Geomant Desktop Connect Server
Installing Geomant Desktop Connect managed solution
Desktop Connect Server needs to be published over a secure protocol, please review the General Installation Guide on how to generate and configure SSL/HTTPS for Tomcat.
Deploying Desktop Connect Server
Tomcat 8 Information
Installing and configuring Tomcat8 is not included in this guide.
Follow the instructions on the Tomcat Setup page.
It is recommended to configure SSL for a connector. Read SSL/TLS Configuration How-to page for details.
- Open the Tomcat webapps folder
- Copy dc4crm.war and GeoDataStore.war to the folder
- Tomcat will automatically deploy the .war files
Wallboard Configuration
Review the instructions described in the Deployment and Installation of Desktop Connect Wallboard for the Geomant Wallboard installation.
Buzzeasy Configuration
Review the instructions described in the Deployment and Installation of Buzzeasy Service for Desktop Connect for the Buzzeasy Service installation.
Deploying Desktop Connect CRM Solutions
Desktop Connect for Microsoft Dynamics contains the following managed solutions:
- Desktop Connect – This package contains web resources, custom entities that allow CRM administrators to configure server location, dialling properties, aux codes required for the integration, with Microsoft Dynamics
Follow the steps described below in order to successfully deploy both packages - Desktop Connect and Call Center.
Deploying Packages
- Login as a CRM administrator.
- Navigate to Settings → Solutions.
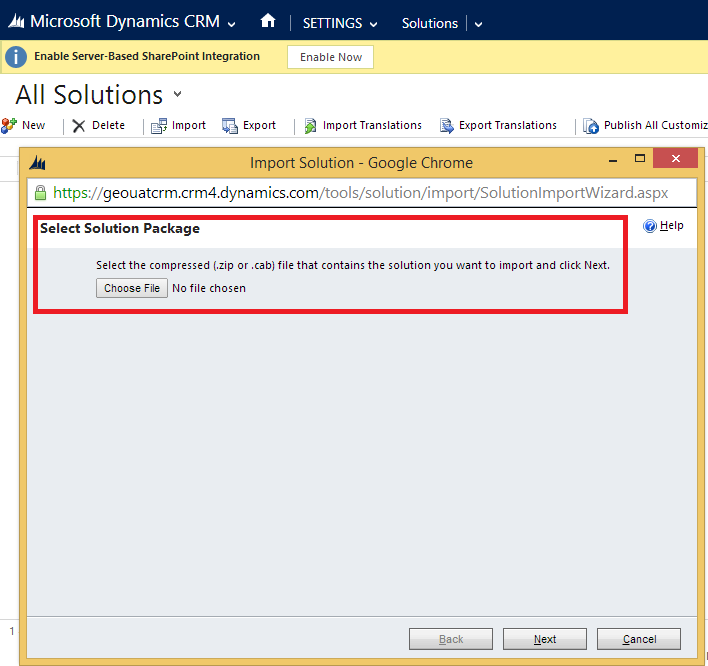
- Use the Import button to Import to have the solution selection page appear.
- Choose the package solution file and click Next.
- This will display basic solution information prior to installing the package, so its content can be viewed.
- Click Next, then Import on the next screen to start installing the solution.
- If successfully imported a report is generated with the installed entities and web resources.
Deploying Desktop Connect in High Availability mode
Please follow the instructions described in the Load Balancing and High-Availability article for HA deployment scenarios.
Configure Desktop Connect for CRM
Proper configuration of Desktop Connect Server is essential after a successful deployment.
Please follow the instructions described in the Configuration Guide article.
