OnCall IVR Designer v7.11.2, part of OnCall IVR Suite v3.3.x
Managing a Flow Using IVR Designer
All the flow life cycle management features and other GUI related settings are provided by the menu ribbon. This chapter presents these menu functions in detail.
Flowchart menu
Open Menu
The Open menu loads an existing flow into IVR Designer.
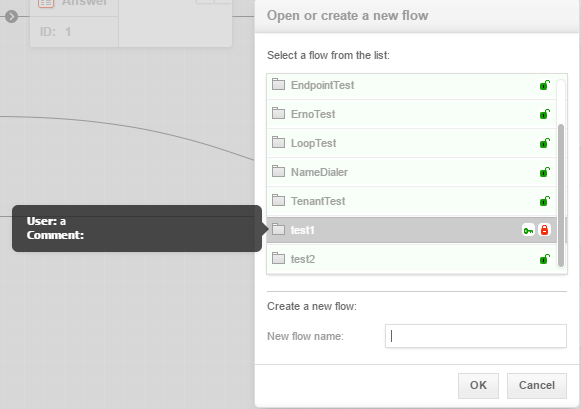
The existing flow versions are listed in a tree structure. Flow names are collapsible, expanding a flow shows all of its previous versions. Each flow name contains a padlock icon, indicating the availability of the flow. The green padlock means that the flow is available, the red one marks an inaccessible flow - it means it is being edited and not yet saved.
Note
Only one user is allowed to edit a flow at a time. If a user has already opened a flow for editing, all other users will see this flow as being locked with a red padlock icon.
Opening a Flow
- Navigate to Flowchart→Open to be presented with the dialog box.
- Hover the cursor over an unlocked flow version to see a hint message containing the name of the creator and any additional comments.
- Click on a flow version to open and check all included versions. Major (published) flow versions are accentuated. Versions of unlocked flows are highlighted in green.
- After selecting the preferred version, click OK to load it to the stage.
- The flow is now open for editing.
Unlocking a Flow
A red, closed padlock icon in the Open or create a new flow dialog indicates unavailable flows, which means that these flows are being locked by another user. A locked flow version will be highlighted in red. A green key icon shows up next to the red padlock when the user possesses the right to unlock.
- Navigate to Flowchart→Open to be presented with the dialog box.
- Select the preferred flow.
- Click the green key icon to have the flow unlocked.
- Click OK to load the flow.

Note
To unlock the flow you work on, please use the Flowchart→Close menu item.
Creating a New Flow
If you wish to create a flow from scratch, follow the steps described below.
- Navigate to Flowchart→Open to be presented with the dialog box.
- Find the Create a new flow section of the dialog box.
- Fill in the New flow name text area with the name of the new flow.
- Click OK.
- You will be presented with a blank stage.
Note
The new flow will not be saved until you explicitly save it.
Save and Publish Menu
This function saves the flow being created or edited, and when successful publishes it to the database of the IVR Engine component.
Each time a flow is saved its version number is increased, creating a new flow version – the old ones are not overwritten, but kept as previous versions.
A flow version has a major and a minor version number separated by a dot. (e.g. version 27.11). The first number stands for the major, and the second one for the minor version.
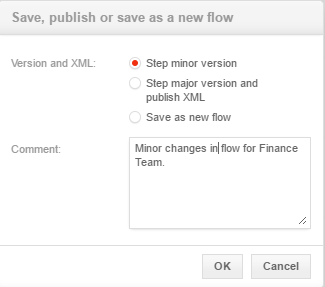
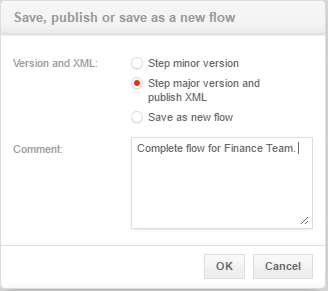
After editing a flow you can choose from 3 options for saving.
| Step minor version | Saving the flow with changing the minor version number only. This version of the flow is not get published into the IVR Engine database. |
| Step major version and publish XML | Saving the flow with changing the major version number and publishing it to the IVR Engine database as well. |
| Save as new flow | The flow is saved as an entirely new item, see below. |
You can also enter a short comment or note for the flow version you will create by saving.
Tip
Saving the flow does not remove it from the stage.
Saving the Flow
- Navigate to Flowchart→Save & Publish.
- Select how to save the flow.
- Step minor version
- Step major version and publish XML
- Click OK.
The flow will be saved: the major version number will be increased by 1, the minor version will be set to 0 and a final flow XML will be generated. Then the flow will be uploaded to the IVR engine with all its announcements. In this case, the flow has to be complete and must not contain errors. Flow comment is optional, but highly recommended.
After saving and publishing a new flow it has to be activated to put into action. Follow the steps described in the IVR Engine Administration - Activate a Tree Version article.


Saving the Flow as New
- Navigate to Flowchart→Save & Publish.
- Select the third option, Save as new flow.
- Enter the desired name for the new flow.
- Add a comment (highly recommended).
- Click OK.
Tip
New flows start with a version of 0.1.
Save Current Flow State Menu
This option saves the current flow state to a temporary location. The flow version will not be changed in this case. The last saved state of the latest flow will be loaded into the GUI at the next user login.
The Autosave feature performs the same task automatically at regular intervals.
Exporting and Importing
Flows can be exported into a file that then can be imported. This is useful to transfer complete flows with variables and announcements between separate environments (e.g. test and production).
Note
You need to save the flow before it can be exported.
Exported flows are downloaded as a zip archive containing a flow.json file and an announcements folder. The JSON file contains the entire logic of the flow including references to all used nodes and templates, and variables used in the flow. The folder contains any WMA type announcements the flow is using.
The format and integrity of the JSON file is critical for the flow to operate properly. The export/import feature is not meant to provide means to change the behavior of the flow. You need to use the Designer or the Custom Node Creator for this.
Note
Any custom nodes or templates used in the Designer from where the flow was exported must also be already available in the target Designer's database!
When importing a flow, it immediately replaces anything that was open in the stage.
Important
Always save changes before importing a flow. Would you have any unsaved changes in your stage at the time of importing a flow, those changes are going to be lost!
Close Menu
Closes and unlocks the current flow. It clears the stage and removes temporary saves. The system requires an explicit confirmation to perform this action.
Warning
The Close menu item does not save the flow currently on the stage. It merely closes and unlocks it.
Delete Menu
This function deletes the current flow including every previous version of it. The flow will no longer be available from the Open dialog.
The system prompts a message when selecting this option to request confirmation from the user about deleting all versions of the selected flow.
Note
Even though neither the deleted flow nor its previous versions show up in the Open menu anymore, these are not removed from the IVR Designer database, but marked for the system to disregard them.
The consequence of this is that these can be 'recuperated' later by an administrator having DB access and skill to perform this.
This also means that these 'deleted' flows keep on occupying storage space.
Logout Menu
Select this menu item to be logged out of the IVR Designer application. Make sure you save the flow manually prior to logging out using the Flowchart→Save Current Flow State function.
Warning
The logout process does not save the flow. It merely closes it.
Logging out while having the flow in a locked status will retain the flow in the temporary storage location, so it can be loaded automatically during the next login.
Note
Logging out while the flow is locked will render it unavailable for others while you are away.
If you wish to have the flow you currently edit to become available for other designers while you are not working with tool, do the followings:
- Use the Flowchart→Save & Publish menu to save the flow into the database.
- Use the Flowchart→Close to unlock it.
Settings Menu
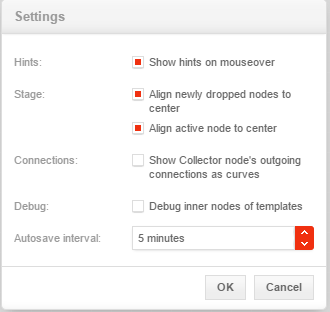
The settings menu opens this dialog window with the following options:

Show Hints on Mouseover
Check this box to enable or disable tooltips. Announcements will show tooltip bubbles even if the hints are hidden.
Align Newly Dropped Nodes to Center
Forces the node or template dropped into the stage to get aligned to the center of the screen automatically. This is achieved by scrolling the visible portion of the stage accordingly.
Align Active Node to Center
The node or template currently opened for editing will be aligned to the center of the screen automatically by scrolling the visible area.
Show Collector Node's Outgoing Connections as Paths
Check this box to remove the path curves (arrows) between Collector nodes and their targets. Collector nodes can have a lot of incoming paths and one outgoing path. Depending on flow complexity such paths can turn pretty long, cluttering the stage, making it difficult to trace. Hiding them removes this clutter without affecting the node behavior.
For more information on the various connection paths and how Collector nodes can help you tracing them even when they are hidden, read the Alternative to Collector Output Paths section.
Debug Inner Nodes of Templates
Inner nodes are components of more complex nodes intentionally hidden from the stage to retain visual order. A debug operation normally performed at every save will not include these nodes, unless this box is checked.
Autosave interval
This setting defines the time elapsed between two automatic temporary save operations. An Autosave operation is every bit the same as a manual process. There are 5 predefined intervals available. These are 1, 2, 5, 10 and 15 minutes.
About Menu
The About dialog shows information about the IVR Designer, e.g. product name, product version, build date, copyright and legal information.
If the information presented is not what you expect it to be, then refresh the page in your web browser, maybe even erase it's cache as well.