OnCall IVR Engine v3.3.4, part of OnCall IVR Suite v3.3.x
IVR Engine Administration
After creating an IVR flow with IVR Designer and publishing it to the IVR Engine's database, it can be activated on the IVR Administration website.
IVR Administration is a web service of the IVR Engine, accessible via the following link:
http://[IVR Engine Host FQDN]/IVRWS/Admin
Replace the <IVR Engine Host FQDN> part with the IP address or domain name of your IVR Engine computer.
The administration site offers the following features:
- Administration – providing the means to map IVR flow versions to TELURIs or SIPURIs, etc.
- Status – providing feedback on license and certification states as well as the list of alarms generated in the system.
- Call History Browser – providing details to every call managed by the system.
- Menu Importer – to allow importing IVR flows from exported files.
- Report – a complex page with real-time and historical views on the calls.

Management of IVR Tree Versions
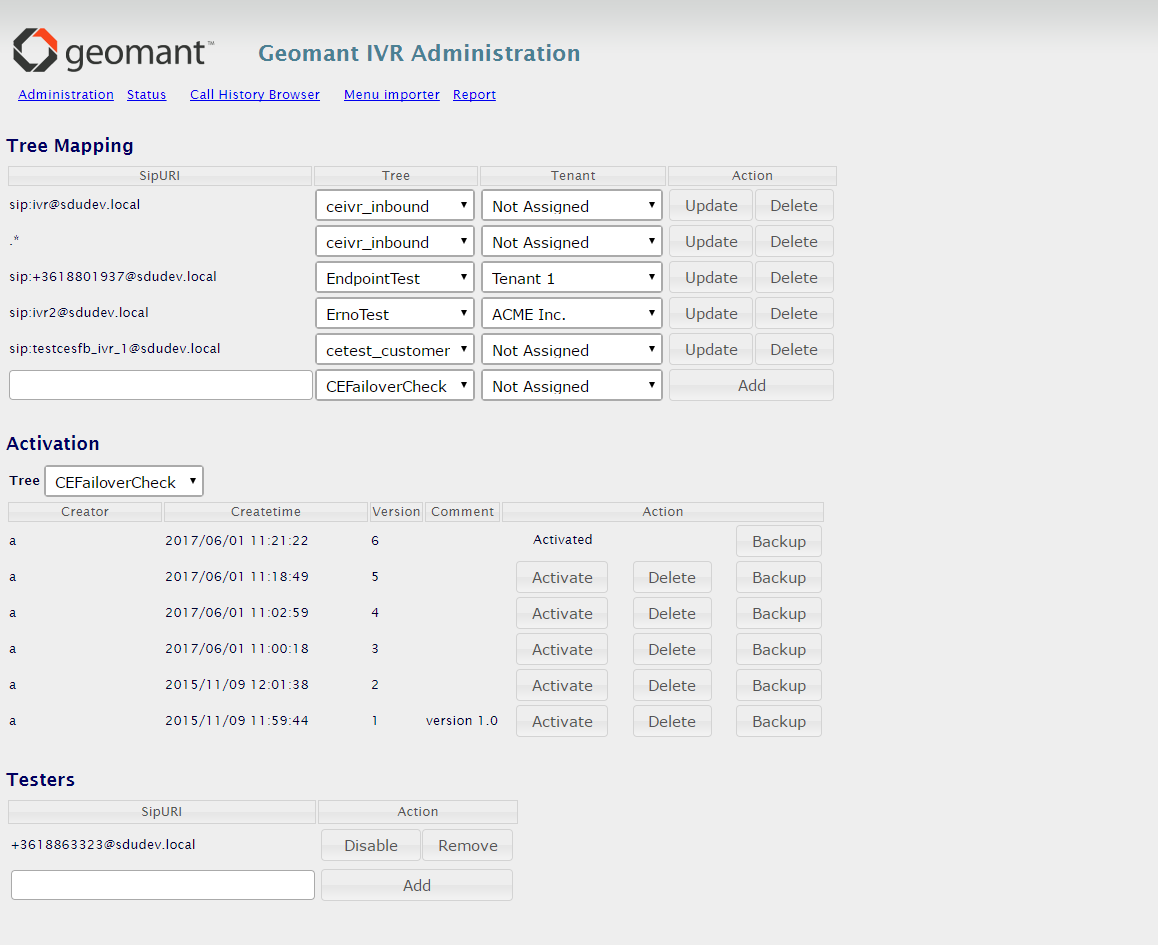
You can manage – activate, delete and backup – multiple versions of the flows or trees in the Activation section of the Administration page.
- Navigate to Administration page and scroll to the Activation section.
- Select the name of the preferred flow from the Tree drop-down list. A list of all of the versions of this flow is presented with action buttons.
| Column | Description |
|---|---|
| Creator | The login name of the person who created the flow. |
| Create Time | Date and time of creation. |
| Version | Version number of the flow. |
| Comment | Any comments added by the creator. |
| Action | Available operations to manage this version of the flow. See the following chapters for more information. |
Activate a Tree Version
Whenever a flow is saved and published in IVR Designer a new version is created and added to the IVR Engine. However, this new version requires explicit activation in the IVR Engine Administration page. Activation is the process to designate which version of the flow should handle the calls mapped to it.
For further details on saving and publishing a flow in IVR Designer, read the IVR Designer - Save & Publish article.
The version that is currently active in the IVR Engine is indicated with the Activated text in the Action column. Only one version of a flow can be active at any given time, thus by clicking Active on another version, this one gets deactivated.
Note
Unless the new version is activated, the previous version of the flow remains in operation in the IVR Engine. Also, activated flow versions cannot be deleted.
Navigate to the Administration page and scroll down to the Activation section.
Select the preferred flow from the Tree drop-down list.
Click the Activate button.
If the activation is successful, the relevant action buttons are replaced with the Activated text.
If you wish to revert to any of the previous version, simply click Activate of the preferred version number.
Tip
All published IVR flow versions – unless explicitly deleted – can be activated and re-activated any time later.
In case a flow was never activated then there is no active version loaded into the IVR Engine.
Important
Please note that once you activate a version, you will always have an active version of this flow. In case you wish to switch a flow off completely, you need to remove the appropriate mappings in the Tree mapping section, see more details on this below.
Back up a Tree Version
Navigate to the Administration page and scroll down to the Activation section.
Select the preferred flow from the Tree drop-down list.
Click Backup in the row of the desired version.
Choose the type of backup:
Download the particular version with the announcements - Entire Menu
Only download the flow itself - XML Only
Save the generated ZIP file.
The generated ZIP file contains the IVR menu definition in an XML format and optionally an "anns" folder with all the announcement files.

Delete a Tree Version
Navigate to the Administration page and scroll down to the Activation section.
Select the preferred flow from the Tree drop-down list.
Click the Delete button in the row of the designated flow version.
A confirmation window pops up. Click Delete if still determined.
Note
When having heavily customized flows depending on each other, deleting a version could affect others.
Tip
Geomant recommends creating backups of flow versions before deleting.
Import a Tree Version
Navigate to Menu Importer page.
Use the Choose file button to locate and select the ZIP file containing the flow version to be uploaded.
Specify the name of the tree you wish to add this version to.
Would you like to replace the latest version of the particular flow stored in the system with the version you are importing, click the Overwrite last version checkbox.
Use the Start import button to initiate the process.
A message will confirm if the operation was successful or failed for some reason.
Tip
The name of the ZIP file does not have to match the name of the flow you wish to import it into.

Mapping IVR Trees
An IVR flow or tree can receive a customer call directly and calls can be transferred between flows. Calls or call transfers can be initiated either via the unique identifier of the designated flow – the SIP URI – or a phone number associated with it (this is also referred to as Line URI or Tel URI). The following sections describe how to assign, modify and delete SIP URIs and Line URIs of the IVR flows.
In order to be able to dial a flow, a SIP URI must be assigned to it at least. In order to dial a flow directly from the PSTN, a phone number (Line URI or Tel URI) must also be assigned to it.
| URI Format | Example | |
|---|---|---|
| A valid SIP URI format: | sip:@ | sip:demouser@domain.com |
| A valid Line URI format: | sip:+@ | sip:+3618860000@domain.com |
Add a URI
Navigate to the Administration page and scroll down to the Tree Mapping section.
The last entry of the list is always a blank one. It is a free-text box in the SipURI column.
Select a tree from the drop-down next to the edit field.
Enter the desired URI for this flow in the text box.
Select the associated Tenant from the list.
Click Add in the Action column. The new URI is added to the list.
The Tree Mapping list contains all assigned URIs – check every one before adding a new entry, it might have already been added previously.
Tip
An IVR flow can have multiple SIP and Line URIs assigned – this flow will be triggered by calling any of these.
Reassign a URI to Another Flow
You might wish to re-assign an existing URI to another IVR flow.
Navigate to the Administration page and scroll down to the Tree Mapping section.
Find the preferred URI (SIPURI or phone number) in the Tree Mapping list.
Select another flow from the Tree drop-down which will be the new flow for the selected URI.
Click on Update in the Action column. The mapping is updated, affecting any new calls immediately.
Delete a Mapping
Navigate to the Administration page and scroll down to the Tree Mapping section.
Find the preferred URI (SIPURI or phone number) in the Tree Mapping list.
Click on Delete in the Action column. The mapping is removed, affecting any new calls immediately.
Warning
Clicking on Delete removes the entry instantly! No confirmation message appears.
Flow Remains Available When Removing a LineURI
In case you have a flow mapped to a LineURI or TelURI and as well as a SIP URI, and you delete the Line/TelURI from the list of mappings, the IVR flow will still remain accessible via its SIP URI – it can therefore be called from within SfB.
Removing a SIPURI Causes the Unavailability of the Flow
If you remove the SIP URI from the list of mappings, the IVR flow will not be accessible for calls originated from SfB or from the PSTN network. In fact it will not be accessible at all, even if you leave one or more Line URIs assigned!
Important
A SIPURI is essential for a flow to be accessible to callers.
Modify an URI
It is not possible to modify the URI part of a previously saved mapping. In case you need to change the URI, please delete the affected mapping and then create it again with the new URI.
Testing IVR Trees
All callers (including the ones arriving from an external PSTN) reach the active version of an IVR flow. However, it is possible to reach a non-activated version, as well!
If you have a non-activated version of an IVR flow, the next step you should consider doing is testing. You can specify a set of SfB accounts in the Testers section.
Users registered here will be able to dial the latest version of the IVR flow – regardless of whether it is activated or not.
Tester accounts are not tied to IVR flows explicitly. Accounts registered here – and having an enabled state – can test the latest (and not necessarily the activated) versions of any IVR flow.

Adding a Tester Account
Navigate to the Administration page and scroll down to the Testers section.
Enter the SIPURI of the SfB account of the tester person into the blank text box.
Click on Add.
Enable or Disable a Tester Account
A tester account can be disabled temporarily. It can be helpful to test the activated – older – and the latest versions alternatively (using the same account). Therefore, if an account is disabled, then a call made to a flow will trigger the currently active version. If the account is enabled, then his/her call will reach the latest version of the flow instead.
Navigate to the Administration page and scroll down to the Testers section.
Click Disable in the Action column.
The button label alters to Enable.
Revert a Disabled Tester Account
Click on the button now labeled Enable to revert a disabled account status.
Remove a Tester Account
Navigate to the Administration page and scroll down to the Testers section.
Click Remove in the Action column for the account.
IVR Reporting
The IVR Engine provides simple real-time and historic reporting to measure, analyze and optimize the IVR service for callers.
Call History
Call history provides detailed information about every single call.
Navigate to the Call History Browser page.
Specify the required date interval.
The table can be sorted on any of the columns. The search filter covers data in all columns.
Set the number of items displayed in the table by choosing one of the options from the Show Entries list.
Check the Show address column checkbox to see the IP addresses of the computers for the various IVR Engine components that handled each call. This is used to help operational maintenance and support work in a distributed deployment scenario (where the IVR components are deployed in multiple instances across multiple computers).
Details of the report include the following:
| Column | Description |
|---|---|
| ID | System generated identifier of the entry. |
| Start Time | The time the call was received. |
| Call ID | A SipURI identifier with a generated number sequence. |
| From | The name and line identifier of the caller. |
| To | The line identifier of the receiver party. |
| Duration | The time the call was in place in seconds. |
| Result | The reason code of the outcome of the call. |
| Tenant | Name of the associated tenant. |
| NodeSvc | The IP address of the computer running the NodeService component. Not visible by default. |
| EndpointSvc | The IP address of the computer running the EndpointService component. Not visible by default. |
| IVRWS | The IP address of the computer running the WebService component. Not visible by default. |

Performance Summary Report
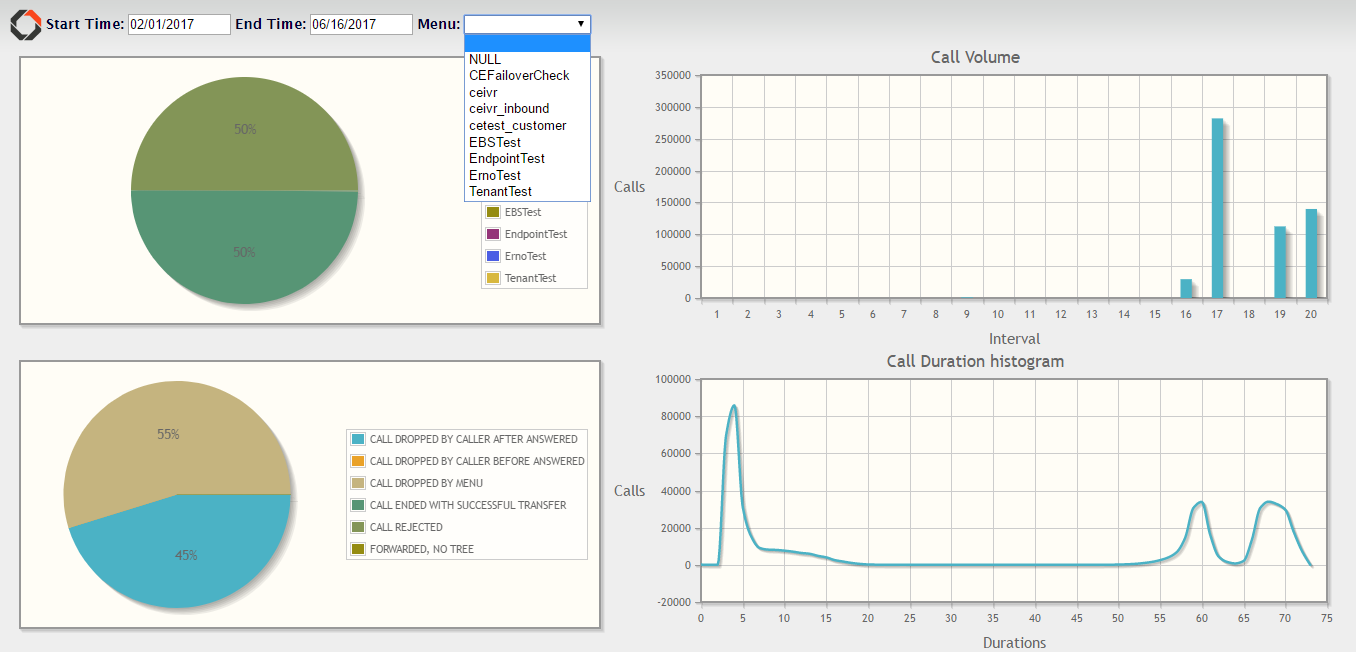
The Performance Summary Report has an all-in-one interface displaying real-time and historical statistics about the most important IVR KPIs. All these reports can be filtered by start date, end date and IVR flow.
The report contains pie charts and histograms visualizing the load share of each IVR flow, the ratio of different call results, the number of calls in different time intervals, call duration and the number of currently running calls.
Navigate to the Report page.
Specify the date interval of the report.
Select the preferred flow from the list or leave it blank to retrieve data from all registered flows.
The reports load automatically.


Node History Report
The Node History Report provides historical call statistics including details about the executed node sequence in the flow. The report can be downloaded in a csv format file:
Navigate to the Report page.
Specify the date interval of the report.
Select the flow from the list.
Click Download history button to download the Node History Report.
After opening the file, the executed node sequence for a call can be found in the NodeHistoryJson column. This column contains a JSON array containing JSON objects with the following properties:
| Name | Type | Description |
|---|---|---|
| Id | number | The ID of the executed node. |
| Name | string | The name of the executed node. |
| Flow | string | Name of the actual flow during the execution. |
| Time | number | Time in milliseconds spent on the node. |
Status Information
Here you can check your License and Certificate information, along with a list of system alarms.
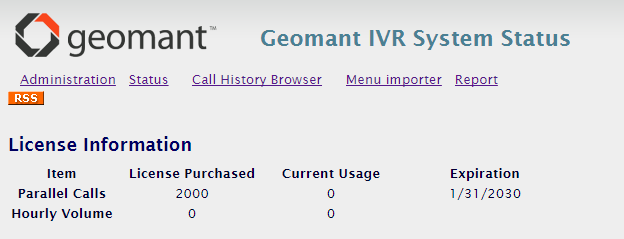
License Information
This section details the specifics of the license purchased.

| Column | Description |
|---|---|
Item |
The type of license acquired. |
License Purchased |
The number of rights acquired for a particular type of license. |
Current Usage |
The number of licenses being used at the time of the inspection. |
Expiration |
The end date of the license after which it will no longer be available for use. |
Important
When a license expires, the IVR Engine reverts to a "trial mode". In this mode a total of 3 parallel calls are handled.
Please check the expiration date of your licenses prior to the termination date and contact Geomant or a certified Business Partner to request a new one.
Certificate Information
This section details the certificate information and credentials acquired.

| Column | Description |
|---|---|
Component |
Identifies the entity that can access the particular IVR Engine. |
Certificate Status |
Displays the current status of the certificate. |
Note |
Notes added to the certificate. It usually describes the expiry date. |
Alarms
This section lists the system alarms generated in the IVR Engine.

The following details are described:
| Column | Description |
|---|---|
ID |
A system generated ID of the alarm. |
Priority |
Severity of the issue. |
Date |
The date the issue occurred. |
Source |
The component from which the alarm was received. |
Message |
A short subject of the alarm description. |
Description |
The alarm description itself detailing the name of the endpoint, the outcome of the alarm and an explanation. |