Management of Agent Related Parameters
Contact Expert v6.1 for Skype for Business Server
Agents
Human Agents
It is possible to configure the entries for human agents or operators per tenant, so they will specifically belong to a particular unit within the organization.
Creating an Agent Entry
Navigate to Operations* → **Agents→Human Agents* in order to manage the list of human operators. You can create a new agent or edit or remove an existing ones.
Use the +New agent button to create a new agent entry.
Specify the details described in the below sections.
Click Submit to save changes to the database.
Specify the following general properties:
| Name | Operator (Agent) name to display in reports. |
| Gateway | Specify the gateway on which the agent is signed in to the voice platform. |
| Login Name | The login credentials used by the agent to sign in. In an SfB environment this should be either a valid AD principal user name (for Windows domain credentials) or an SfB ID (for local Windows credentials). |
| Password | Not used, enter a dummy value. |
| UC identity | The user name used by system in the background to sign in the agent. For SfB this should be set to SfB user ID. |
| UC password | Not used, enter a dummy value. |
| Huntgroup | Select which hunt group the agent should login to. For SfB this property is irrelevant. |
| Recording rule | Specify which rule to apply for call recording purposes. |

Importing an Agent Entry
An alternative is to use the
 button to open the
search window and enter a valid username or SIP URI. Choose one of the
retrieved contacts so the Name, Login Name and* UC Identity *fields
will be filled automatically.
button to open the
search window and enter a valid username or SIP URI. Choose one of the
retrieved contacts so the Name, Login Name and* UC Identity *fields
will be filled automatically.
You must be logged in to Skype for Business to use the import feature
Please note that import feature is only available if Active Directory authentication is enabled and the user had successfully logged in to both CE Portal and the built-in Skype for Business client.

Organizational Details
Specify the following properties:
| Tenant | Choose the tenant associated with the agent. |
| Team | Specify the team associated with the agent. This determines where the agent belongs. |
| Organization Unit | Specify the name of the organization unit associated with the agent. |
| Photo URL | HTTP URL of the user’s picture that is publicly accessible. |
| Disabled | Checkbox for temporarily disabling the agent. |
This is used for reporting purposes only.
The Organization field has no relation to the Organizational Hierarchy functionalities. Read the Organizational Hierarchy And Access Control chapters for more details on the Hierarchy.

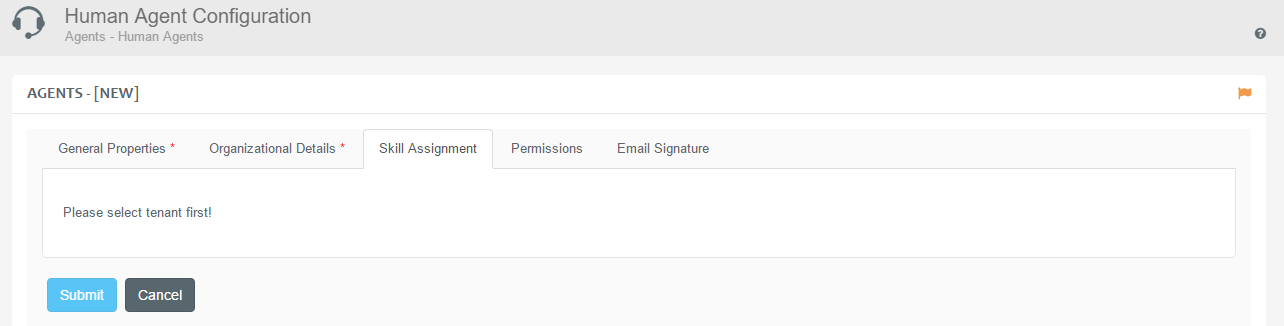
Skill Assignment
Specify the skill-set that is related to a particular agent by using the checkbox menu structure to determine whether the agent has the particular skill or not.
When assigning a skill to an agent, an associated skill level can also be specified using the drop-down list.
Select the tenant associated with the agent in order to choose from the related skills for assignment.

Skill Assignment Change
Skill Assignment Change
Supervisors have the ability to modify the skill-set of an agent anytime.
Skill activation is performed automatically in which case the agent would receive a message about him/her skill being updated and that a logon procedure is required to finish the activation.
However, it is also possible to modify and activate the skill-set change without having the agents logout and login from the agent application. This requires the following to be set on the agent's tenant level. You can read more about automatic skill activation at the Workflow Settings section.
Batch Update
After modifying the skill-set of an agent, run a Batch Update to execute the changes.
Agent Application Reference
Description about skill change from the agent's perspective: Skill Modification by Supervisor.
Agent Allocation Rules
When initiating a new outbound request or trying to distribute an inbound one, the system will route to the highest skilled agent unless the queue is set-up with “Prefer last agent” selected. This is configurable on a queue by queue basis. If ‘prefer last agent’ is selected then the system will check the history of the associated contact. If the given contact was already routed to an operator in the past, then the system can allocate the same operator for the request.
If the operator is not available or the contact was never routed to any operators previously, then the system tries to allocate an available operator having the highest level within the required skill. If multiple operators are available with the highest skill level, then the system allocates the longest idle one. If no operator having the required skill is available, then the request is placed into a waiting queue and waits for a suitable operator to be available.
Agents are loaded based on their skill sets and skill levels. Even the ones having the same skill set might be loaded quite differently. Those who have more skills or have higher skill levels might receive many more tasks. The difference in operators’ load might be quite significant, especially in blended environments where the system generates outbound requests in addition to routing inbound ones.
Notes and Restrictions on Skill Assignment
Use skill levels only in pure inbound environment
It is highly recommended to use skill levels only in pure inbound environments.
Use the same skill level for outbound and blended environments
For outbound and blended environments it is recommended to use the same skill level for each operator.
No guarantees that agents are evenly loaded
This mechanism has the following consequence: there is no guarantee that operators are evenly loaded!
Please note that it is advisable to use predictive dialing with only one skill assigned to the agents when working with a predictive campaign, so that the predictive algorithm is able to calculate call statistics correctly.
However, it is possible to assign more than one skill to the agents. Please be aware of the risks and consequences, such as overdialing in case of increased traffic on inbound skills.
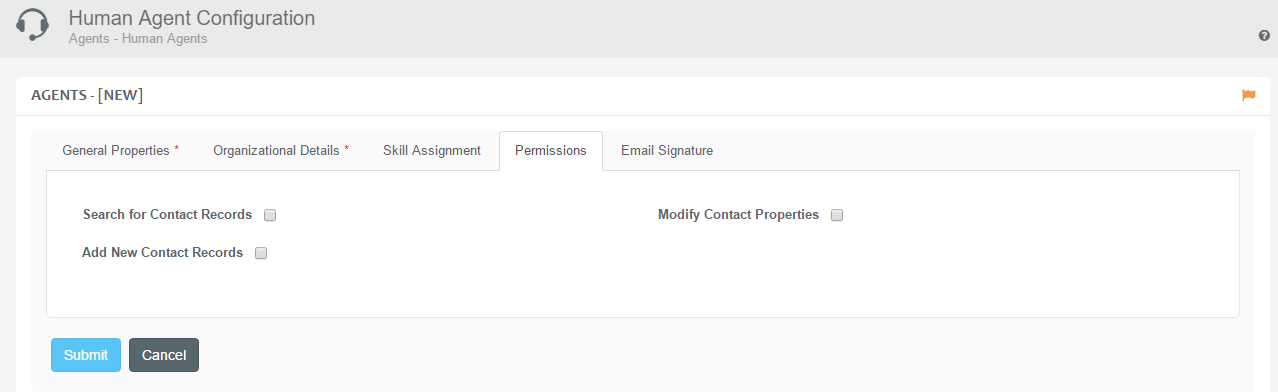
Permissions
Enable or keep disabled the following properties:
| Search for Contact Records | Browse contact database. This is relevant for the agent to be able to use the Address Book service from the agent application. |
| Modify Contact Properties | Modify properties of existing contacts. |
| Add New Contact Records | Append new contacts to the database. |
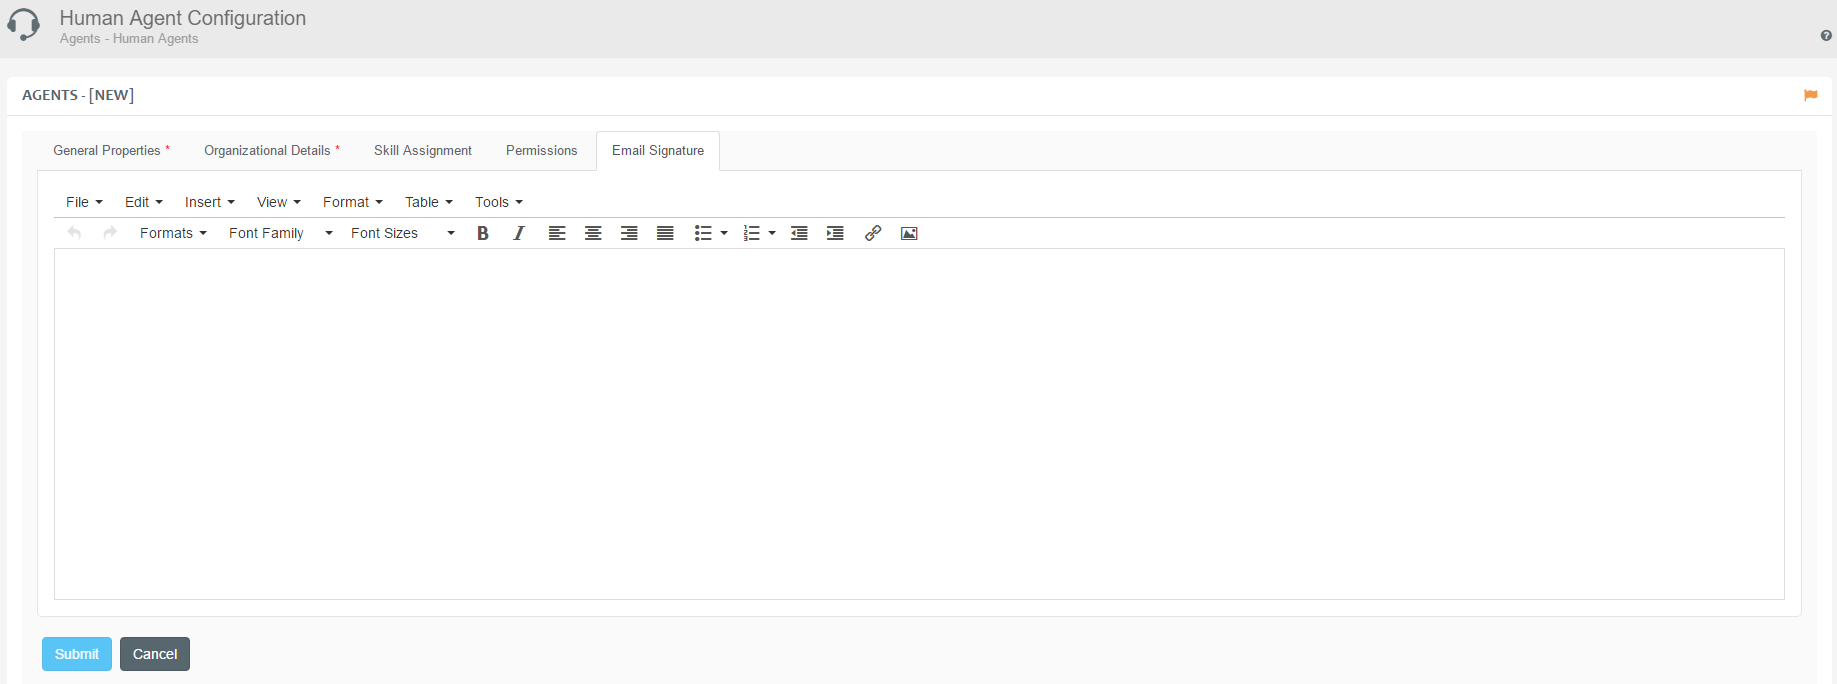
Email Signature
Set up e-mail template for the Agent which should include the signature, company logo, predefined welcome, etc.
Skill Management
Contact Expert system administrators can assign multiple agents to a skill.
The Skill Management option is only visible if there is at least one resource available in the particular tenant.
Skill Management
Navigate to Operations→ **Agents→Human *Agents→ More Actions →Skill Management*** in order to specify such skills.
Select a Skill and a Media type in the Select A Skill section at the upper portion of the form.
The Assigned list will show the name of the agents who already possess the selected values. Agents not assigned to the selected values will show up in the Not Assigned list.
Using Left-click, Control+Left click or Shift+Left click select one or multiple agents from the Not Assigned list.
Specify the proficiency Level the selected agents should gain on the designated skill.
Click the >> icon to perform the assignment. The selected agent names disappear from the Not Assigned list and show up in the Assigned list.
Removing skill association is performed the same way except you select agents from the Assigned list and use the << icon.
Clicking an agent name in either the Not Assigned or Assigned lists will display a short summary of the particular agent at the bottom section of the form.
Skill changes need explicit activation
Changes made are not activated immediately, the batch update process needs to be performed to notify all Contact Expert servers about the change.
Agents need to perform a log out - log in procedure for the skill assignment changes to take effect, unless the Enable automatically activating skill changes function is set to true. Read more about this function in the Workflow Settings#WorkflowSettings article.


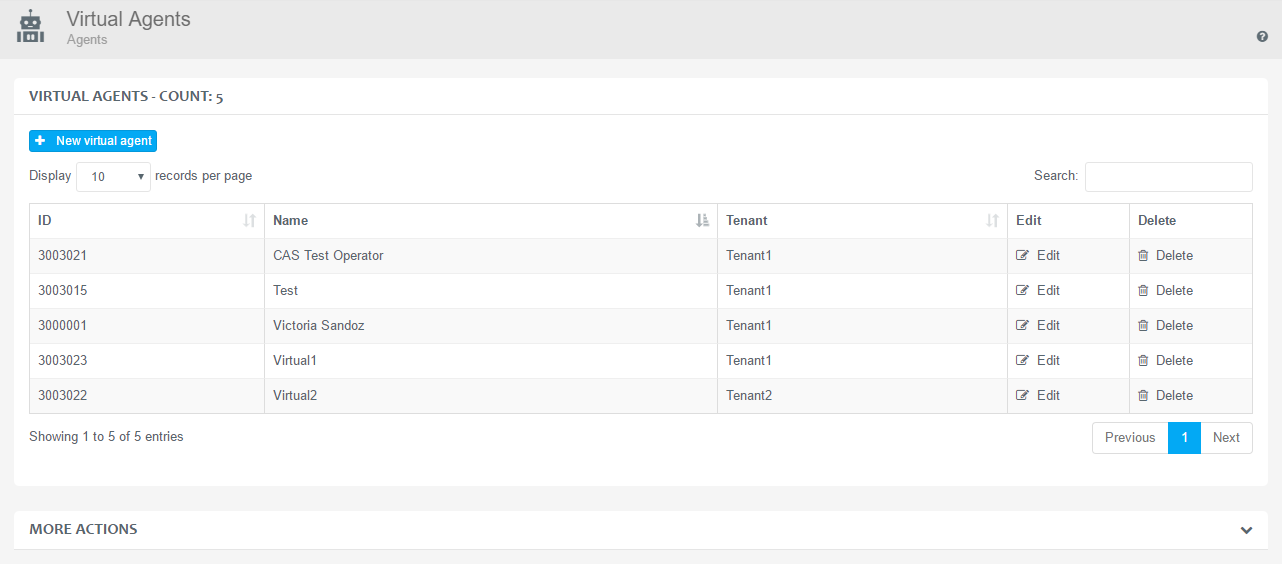
Virtual Agents
Virtual Agents can be used to handle outbound email media tasks via Skills. It is possible to configure the entries for virtual agents per tenant, so they will specifically belong to a particular unit within the organization.
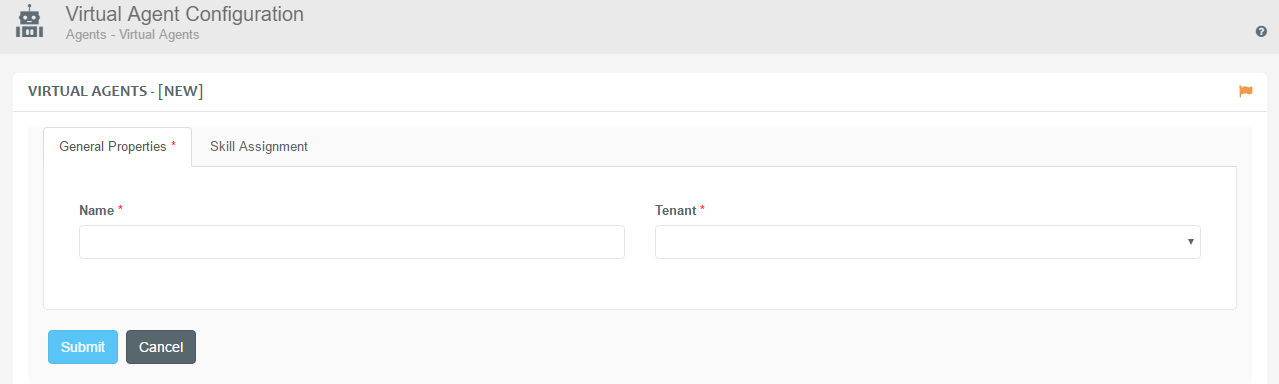
Creating a Virtual Agent
Navigate to Operations*→ **Agents→Virtual Agents* in order to manage the virtual agent entries. You can create a new virtual agent or edit or remove existing ones.
Use the +New virtual agent button to create a new virtual agent entry.
Specify a display name of the Virtual Agent.
Choose the associated Tenant.
Assign skills to it, bearing in mind the details described in the Skill Assignment chapter above.
Click the Submit button to save the modifications to the database.
Behaviour of Virtual Agents
When assigned an outbound task, Virtual Agents take the Message Template from the corresponding Campaign, fill out the template parameters from the Campaign's Contact Record fields, send the interaction via email and close the task.

IVR Channels
IVR channels are used to handle voice media automatically. It is possible to configure the entries for IVR channels per tenant, so they will specifically belong to a particular unit within the organization.
Creating an IVR Channel
- Navigate to *Operations*→ **Agents**→IVR Channels*.
* Use the +New channel button to specify IVR channels.
Specify the properties described below.
Click the Submit button to save the modifications to the database.

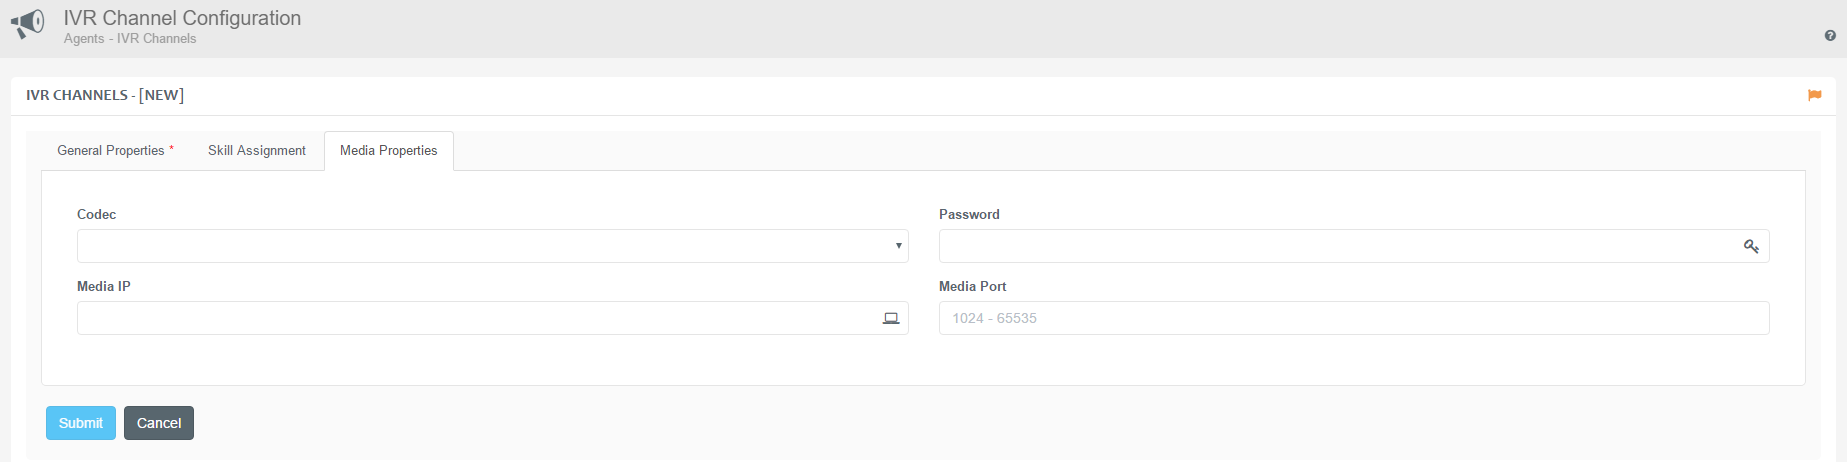
An IVR channel has the following properties:
| Tenant | Choose the tenant associated with the IVR channel. |
| Name | Specify unique display name. |
| Extension | Specify the user ID associated with the channel in the underlying unified communications platform. This should be set to the SIP URI of an IVR application endpoint plus the Channel ID (e.g. ivr@geomant.com;ce-chanid=1). |
| Gateway | Choose the associated voice gateway. |
| IVR | Choose the associated IVR. |
| Channel ID | Numeric channel ID. This should be unique for a given IVR instance and be the same as "ce-chanid" in the extension property. |
| Recording Rule | Channel specific recording rule. Leave it empty if no recording is required. |
| Skill Assignment | Assign the related skills to the IVR channel. |


Media Properties
| Codec | Specify the IP codec that is used to transmit media. This is irrelevant in case of SfB environment. |
| Password | Specify the password associated with the extension. This is irrelevant in case of SfB environment. Specify a dummy value. |
| Media IP | The IP address used to transmit media streams. This is irrelevant in case of SfB environment. |
| Media Port | Local transport port used to transmit media streams. This is irrelevant in case of SfB environment. |
Skills
Contact Expert uses skills based routing to route calls to the highest skilled agent. It is possible to configure the entries for skills per tenant, so they will specifically belong to a particular unit within the organization.
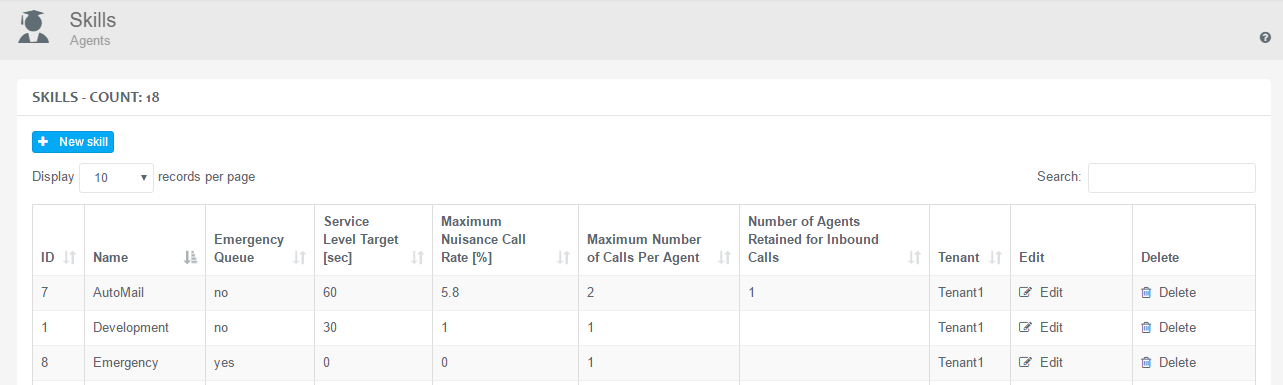
Creating a New Skill
Navigate to ****Operations*→ **Agents→ Skills*** in order to manage the skills to be assigned to agents. You can create a new skill or edit or remove existing ones.
Use the +New skill button to specify a new skill.
Specify the properties described below.
Click the Submit button to save the modifications to the database.
General Properties
A skill has the following general properties:
| Name | The display name of the skill. |
| Number of Agents Retained for Inbound Calls | Specifies the number of agents that are retained for inbound call handling when used with an outbound dialing strategy . The system decides which agents will be retained based on random measures – there is no option to name these persons.These agents will never receive outbound calls from campaigns having this skill assigned – the dialing mechanism simply removes this amount of agents during the outbound call process. |
| Service Level Target (sec) | Specify the Service Level value in seconds. The next interaction request is retrieved from the queue where the longest waiting time exceeds this target value the most. Read more about priorities in the following chapter: CE Priorities |
| Tenant | Specify the tenant associated with the skill. |
| Emergency Queue | If checked, Contact Expert will deliver work items from this queue to the agents as soon as possible. |
| ACD Policy | Choose which ACD policy should be directive in case of interaction routing for the skill. |

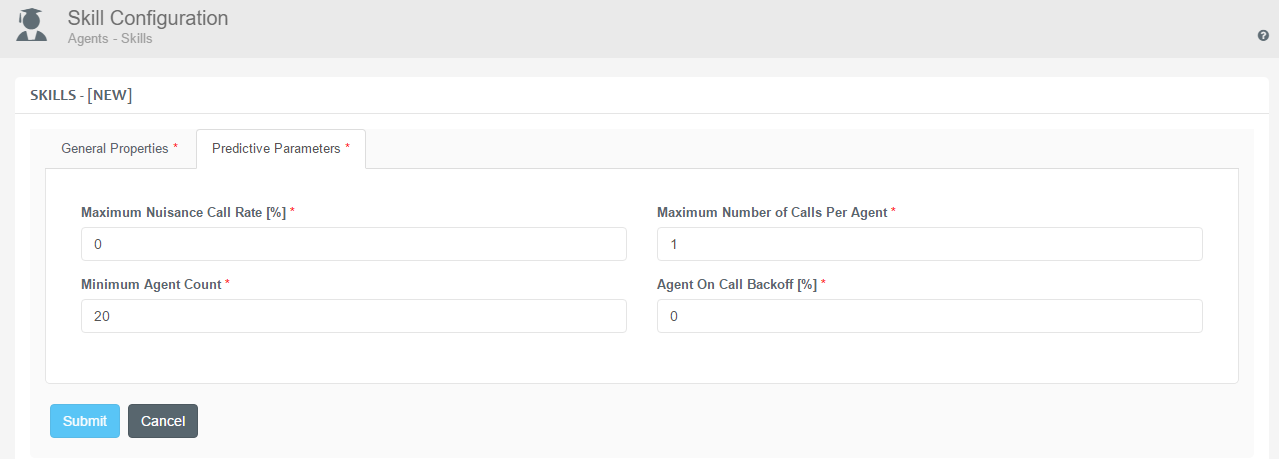
Predictive Parameters
Specify the Predictive Parameters:
| Maximum Nuisance Rate [%] | Specifies the maximum rate of outbound calls dropped/redirected due to no agent availability at the time the called party answered the call when used with a campaign set to predictive dialing strategy. If this value is reached, the system stays in predictive mode and starts the healing process. The Maximum Nuisance Rate is measured on a daily basis. Switching back to progressive mode occasionally will make sure this threshold is not violated for the day. |
| Maximum Number of Calls Per Agent | Specifies the maximum number of calls initiated per agent when used with a campaign set to predictive dialing strategy. |
| Minimum Agent Count | Specify the minimum number of agents required for the predictive dialing to start. When not satisfied, the system switches back to Progressive dialing mode automatically until this requirement is met. When not using Initial Statistics If this value is exceeded, the system stays in Predictive mode using a call pacing that ensures 0% nuisance rate. With Initial Statistics If this value is exceeded, the system stays in Predictive mode and switches back to using the Initial Statistics value. If you set a low number of agents, it can lead to insufficient functioning of the predictive algorithm and may cause unexpected effects on the statistical data. In general, the system needs at least 10-20 agents for stable operation. |
| Agent On Call Backoff [%] | Specify the percentage of calls to be initiated for agents already being occupied with interactions. |
For further details on the predictive parameters available on the Dialing Rules resources, check the Designing Queues & Campaigns article.
Emergency Queue
Emergency skills have their target service level properties set to 0 (zero) and this is not modifiable. So any campaign/queue associated as an emergency queue would always have the highest effective priority.
The Emergency skill feature is only available when the Priority Queues option is enabled.
Skills for Predictive Dialing Mode
Predictive dialing algorithm calculates historical call statistics and target rates for a given skill. When administering a new skill targeted to be assigned to a campaign with predictive dialing strategy, the following parameters must be set, otherwise the predictive algorithm will not start:
- Maximum Number of Calls Per Agent
- Maximum Nuisance Rate [%]
- Number of Agents Retained for Inbound Calls
These parameters affect the predictive dialing mechanism as explained in the following formula:
maximum # of predictive calls initiated = # of agents suitable for outbound predictive calls * maximum # of calls per agent + # of agents on call * maximum # of calls that can be initiated for agent on call - # of ongoing calls
As with any other skill, the ones that have the predictive parameters set can be assigned to multiple campaigns. However, skills tailored for predictive this way can only be assigned to these type of campaigns:
- Inbound Voice
- Outbound Progressive
- Outbound Preview
- Outbound Predictive
The predictive algorithm will not start unless the retainment mode is set to Fixed.
Notes and Limitations of the Predictive Dialing Strategy
The predictive algorithm works best if the agent who is part of the predictive campaign has only one skill - the one that is assigned to the predictive campaign. However, there is an option to reserve some agents in order to respond to inbound interactions in a timely manner even in a massively over-dialed campaign. The limitation of this blended configuration is that only a subset of agents working with outbound interactions can receive inbound tasks and they cannot have multiple skills assigned, only the one that is used for the outbound dialling in predictive mode.
The current calculation of the dialing is based on average task processing times of both inbound and outbound interactions of the specific skill.
Please note that it is highly recommended to use predictive dialing with only one skill assigned to the agents when working with a predictive campaign, so that the predictive algorithm is able to calculate call statistics correctly.
However, it is possible to assign more than one skill to the agents. Please be aware of the risks and consequences of this kind of use, such as overdialing in case of increased traffic on inbound skills.
**Overdialing can cause an increased number of nuisance calls. Contact
Expert does not switch back from predictive mode to progressive mode if
the predefined maximum nuisance rate is reached. If you use predictive
multi-skill mode, it is not guaranteed that you can control the nuisance
rate.
**
Contact priority handling in predictive dialing mode
Please note that CE utilizes a caching mechanism in predictive dialing mode. This means that the system stores the top 50 contacts that need to be called. It takes the next contact in priority order when processing the cache and dials it if it suits the prediction. If it is not, the contact will be sent back to the pool.
This can create scenarios where contacts in the cache will not be dialled according to their level of priority, because there is no available agent or the prediction does not allow dialling them.
Multi-skill for Predictive Dialing Mode
The same predictive dialing strategy without the restrictions of the classic predictive mode. The calculation has been altered, so that the predictive dialing strategy would work with multi-skill option, as well.
The new approach is extended so that every agent can be assigned to an outbound campaign - and this would be the preferred one - and can have multiple skills assigned to inbound campaigns. The predictive algorithm does not measure inbound traffic on these skills when calculating call statistics of an outbound campaign. Outbound dialing will initiate the proper number of calls as long as the traffic is relatively low on the affected inbound skills.
The following parameters are required for the Predictive dialing with multi-skill:
- Minimum Agent Count
- Agent On Call Backoff [%]
- Maximum Number of Calls Per Agent
- Maximum Nuisance Rate [%]
- Number of Agents Retained for Inbound Calls
The calculation is based on the average intensity of incoming calls and processing tasks in a campaign for all calls that are handled by agents in outbound campaign. These values are calculated from the average call inter-arrival time and average task processing time respectively. The server collects statistical information for all inbound calls handled by the agents in the specific skill.
Follow the steps below in order to enable multi-skill predictive dialing:
Setting Multi-skill mode for Predictive Dialing
Navigate to *****Operations→Workflows →Workflow Settings*.
**
Click Edit of the specific tenant.
Tick the Predictive Inbound Multiskill checkbox in order to enable the function.
Click Submit to save the changes.
Please note that it is highly recommended to use predictive dialing with only one skill assigned to the agents when working with a predictive campaign, so that the predictive algorithm is able to calculate call statistics correctly.
However, it is possible to assign more than one skill to the agents. Please be aware of the risks and consequences of this kind of use, such as overdialing in case of increased traffic on inbound skills.
**Overdialing can cause an increased number of nuisance calls. Contact
Expert does not switch back from predictive mode to progressive mode if
the predefined maximum nuisance rate is reached. If you use predictive
multi-skill mode, it is not guaranteed that you can control the nuisance
rate.
**

Work Codes
You can specify work codes for human operators to use for different agent states. The possibility is provided to create workcodes specifically for your tenant.
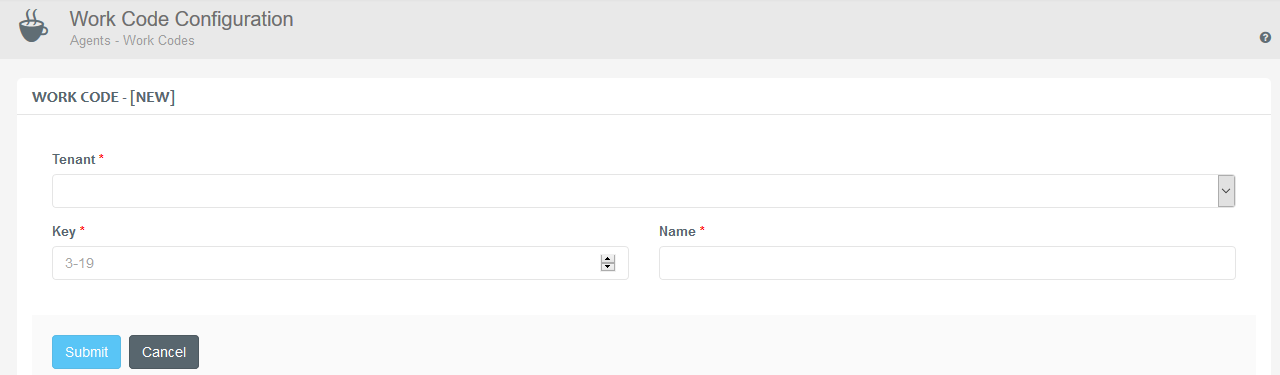
Creating a Work Code
Navigate to ***Operations*→Agents→Work Codes in order to specify the entries.You can create new entries or edit or remove existing ones.
Use the +New work code button to create a new work code entry.
Specify the properties described below.
Click the Submit button to save the modifications to the database.
Operators can select from the defined codes when going to AUX (CE-Break) state. Supervisors can generate reports in order to check which codes were used and how long by operators. A maximum of 20 codes can be defined, with the first 3 of them (AUX, ACW, LOOKUP) reserved for internal usage.

Specify the following properties:
| Tenant | Specify to which tenant the work code belongs. |
| Key | Specify a unique numerical value to identify the work code. |
| Name | Assign a unique display name to the work code. |
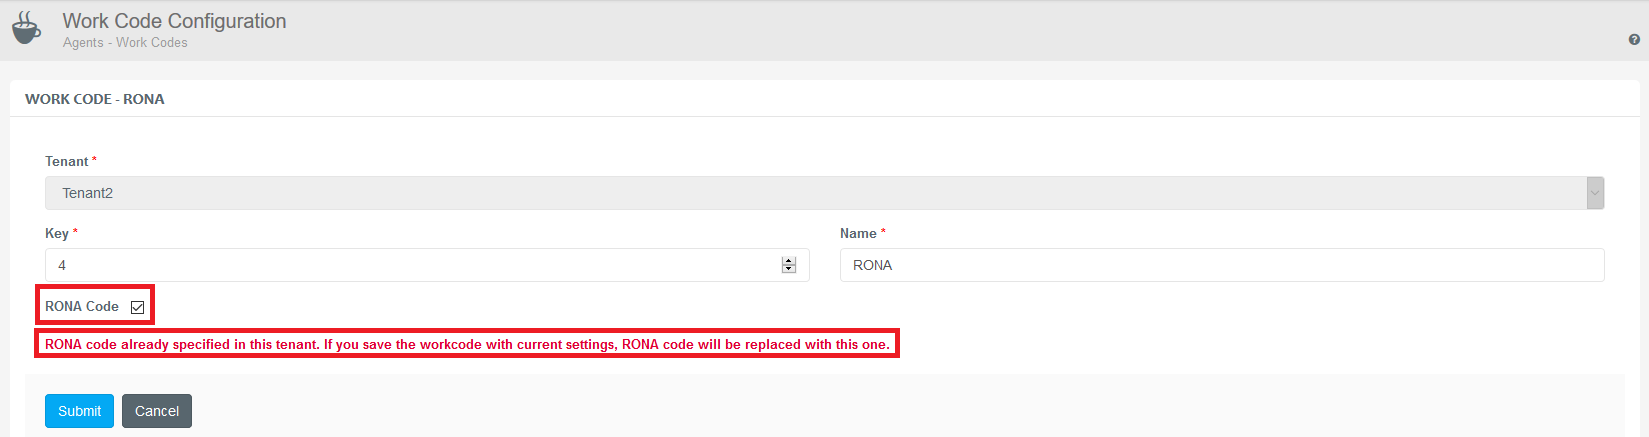
Redirect On No Answer - RONA Code
Administrators are allowed to designate one new or existing – custom, as in not built-in – Work Code to be associated to calls that "RONAd" at the agent. Such codes can not be manually selected by the agent. To designate a code to be used for RONA situations, follow these steps:
Either open an existing entry by clicking Edit in the list of resources, or click the +New work code button.
Enable the RONA Code checkbox.
This is an optional setting. When no RONA code is specified in a tenant, the system will still put the agent into Break, but will use the default code with a Key of 0 ("AUX") in such cases.
It is important that the value defined as the Agent alert timeout is smaller than the value set as the Call Forwarding option in the Skype for Business client application in order for the RONA code to work, otherwise the agent will not be placed to RONA break automatically. This way CE settings have priority over SfB settings, and the CE agent application can handle the released call and then switch the agent to RONA.
Visit the Routing Rules article to see how to set the Agent alert timeout value.
If the specific tenant already has a RONA code, a warning message appears stating the existing code would be replaced with the new one.
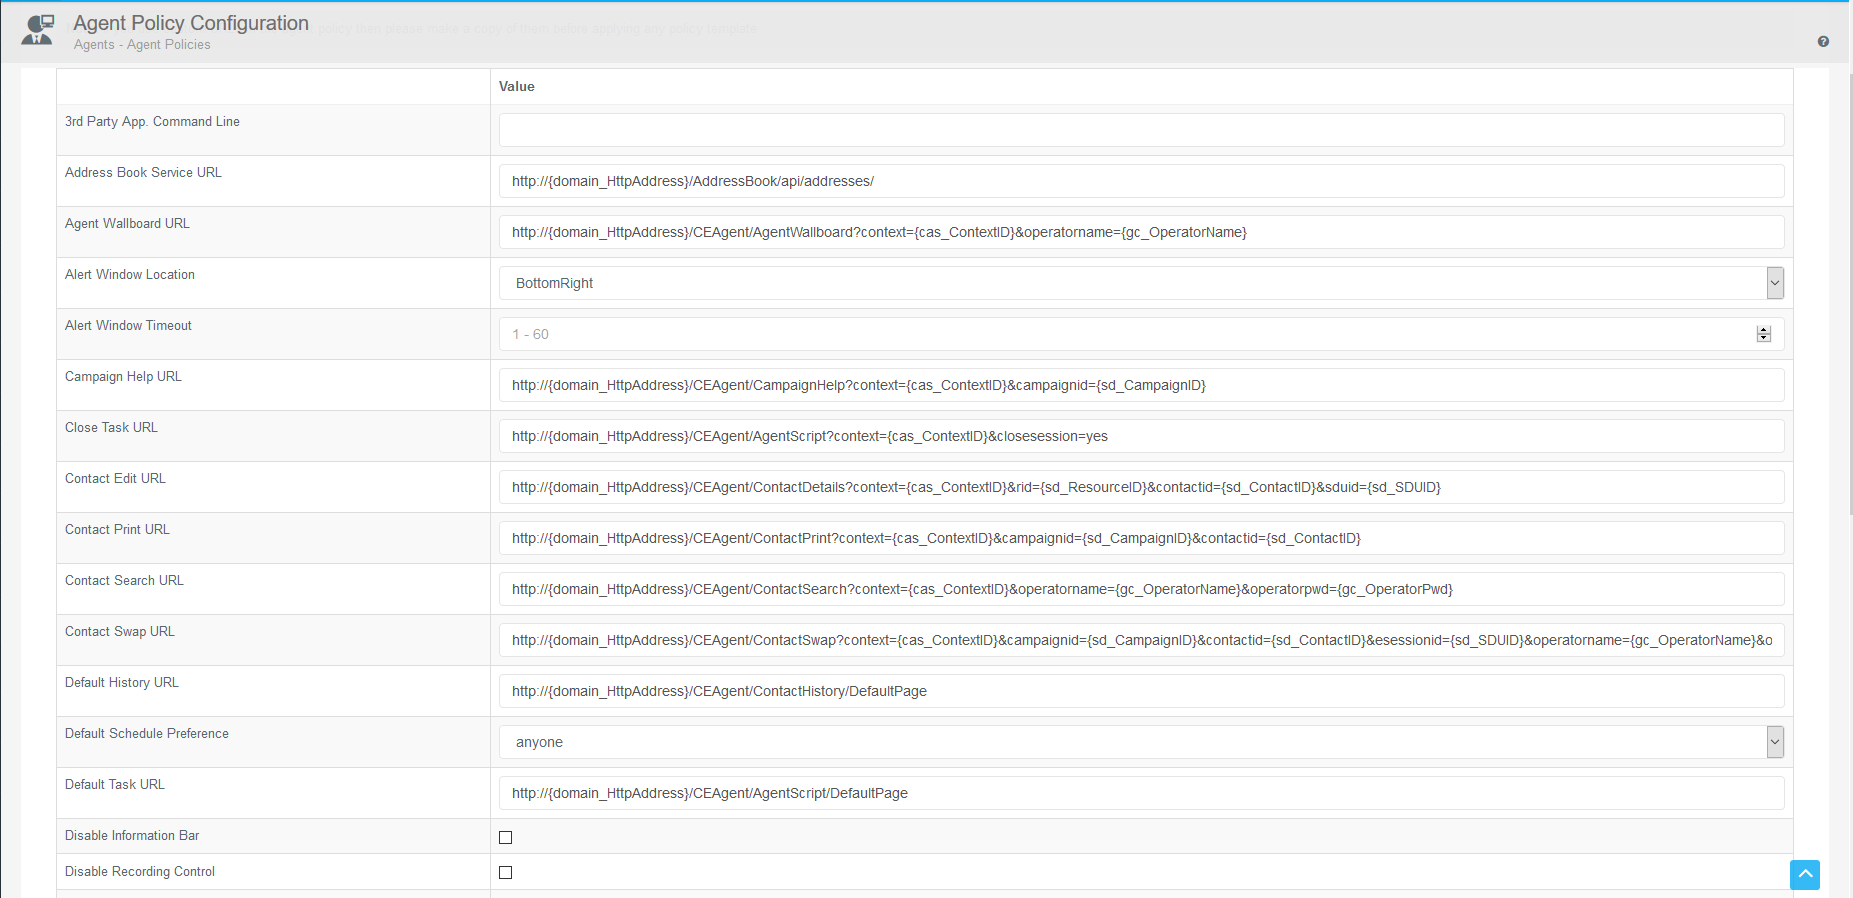
Agent Policies
Agent policies are a set of guidelines (parameters) that applies to the agent using the CE application. Such parameters are forcing the agent to select a business tag after completing a call or the URL of the campaign’s help page, for example.
Agent policies can be set and applied separately for different organizations (tenants).
Checking Agent Policies
Navigate to Operations→ Agents→Agent Policies.
Choose the tenant to be configured and click Edit.
Specify the parameters of the UC platform that affect all agents in the CE of a specific tenant.
Click the Submit button to save the modifications to the database.
The Address Books article describes the configuration steps of an address book entry.
Learn more about agent policies by navigating to the following link: Contact Expert Agent Policies)
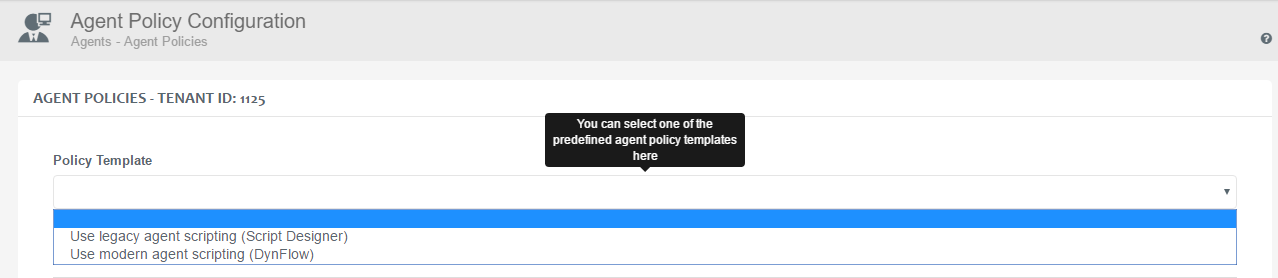
Agent Scripting
The updated agent side content pages are the only available option in CE. However, Contact Expert allows administrators to decide whether to retain using the legacy version of agent scripting. This can be set up using the policy templates provided by using the Edit button on a particular policy entry.
Please visit the Getting Started With Contact Expert Agent Client Application document articles for further details on the CE agent application details including the updated components since the previous release.
To enable the updated Agent content pages and Scripting select Use enhanced agent scripting from the Policy Template drop down list.
To use the legacy versions of the scripting method, choose Use legacy agent scripting(Script Designer) from the same list.
Agent Policy
Please visit the How to configure Contact Expert Agent Client Application) document article for more information on the values that can set from the Agent Policy.
Hunt Groups
Hunt groups or operator groups represent a set of operators or agents that are to be reported together. It is possible to configure the hunt groups per tenant, so it is specific to a particular unit within the organization.
Creating a Hunt Group
Navigate to ***Operations*→Agents→Hunt Groups to create and modify such groups. Operators and agents then can be assigned to these groups.
Use the +New hunt group button to specify such groups.
Specify the properties described below.
Click the Submit button to save the modifications to the database.
Please note that for the Microsoft Skype for Business edition of Contact Expert the Hunt Groups feature is merely a reporting feature. However, you do have to have at least one Hunt Group for the reporting to work properly even for SfB.

A hunt group has the following properties:
| Name | Assign a unique name to the new hunt group |
| Extension | Specify the user group used to sign in agents to. In case of SfB this value is irrelevant. |
| Tenant | Specify the tenant the hunt group belongs to. |
