Designing Queues & Campaigns
Contact Expert v6.1 for Skype for Business Server
Queues & Campaigns
In CE terminology the term ‘Campaign’ is used to describe all outbound interactions. The term 'Queue' is used to represent all inbound communication. In this version of the product both Queues and Campaigns are presented by the same resources under Queues & Campaigns menu.
Administrators can manage and maintain campaigns through the Contact Expert Portal.
Navigate to Operations →Workflows→Queues & Campaigns.
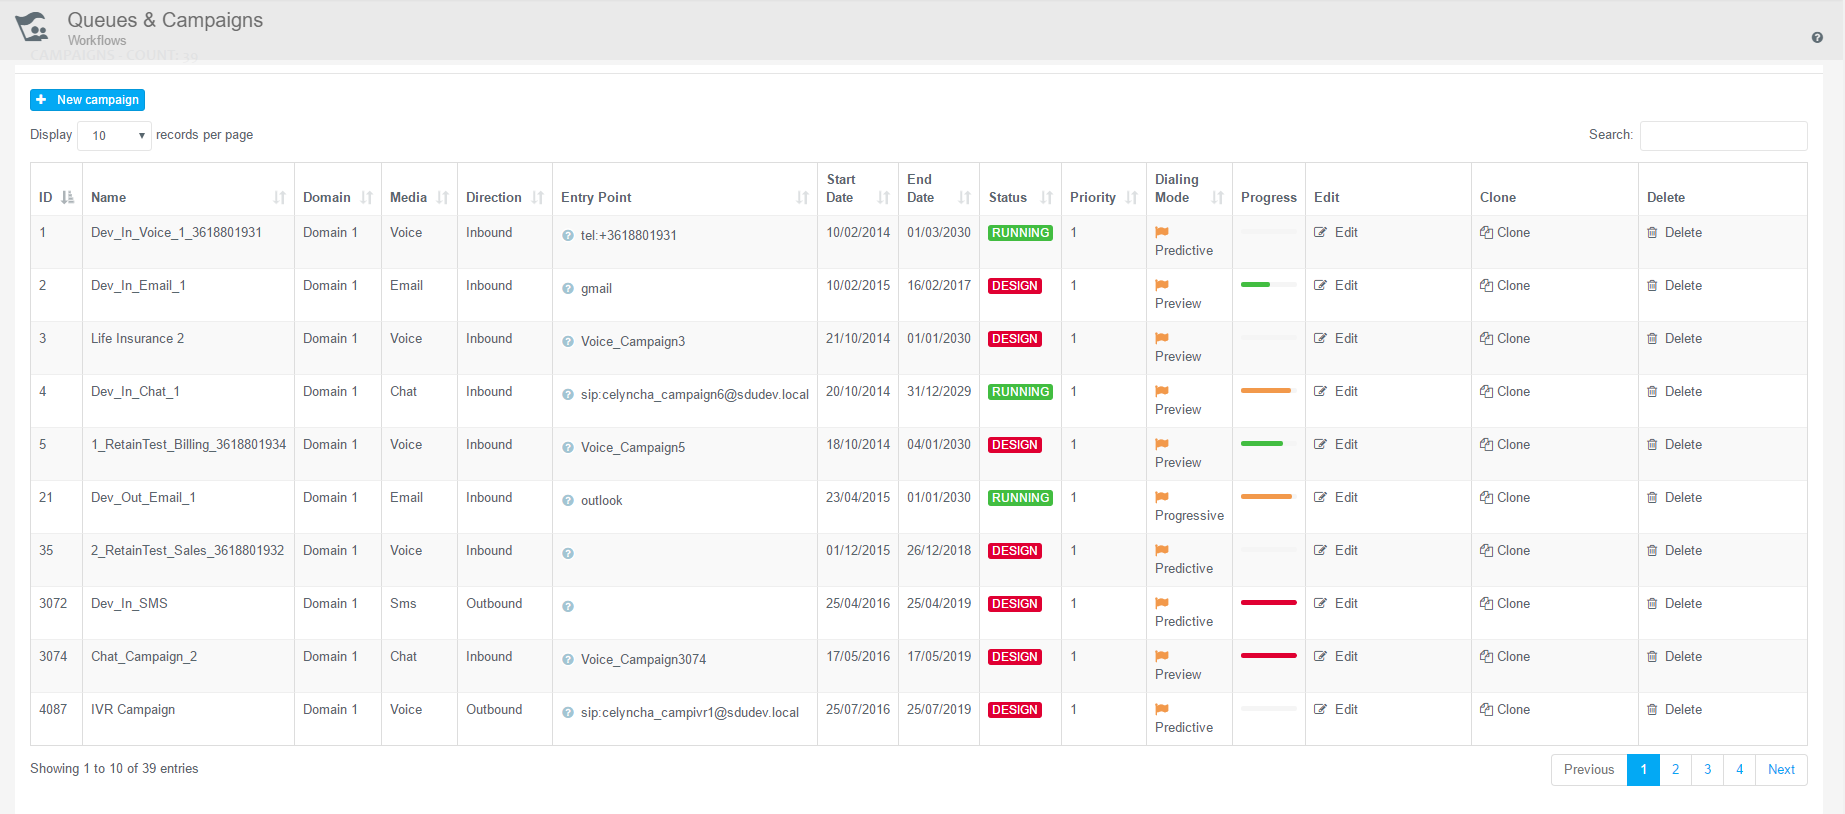
The *Entry Point *column contains an icon and the name of the campaign endpoint. In case you have Active Directory authentication enabled and successfully signed into the integrated Skype for Business client, this will show the current status of each endpoint. You can hover over the icon with the cursor to get the textual representation of the presence.
Entry point must be valid to retrieve campaign status
The Skype for Business presence can only be queried for valid campaign endpoints.
A campaign must be in running state in order to have a presence other than offline or unknown.
The following table indicates the meaning of each presence.
| Presence | Campaign Status |
|---|---|
| Available | The campaign is in running state and does not have any active tasks. |
| Busy | The campaign is in running state and has one or more active tasks. |
| Offline | The campaign is not in running state. |
| Unknown | Cannot retrieve the status. The campaign endpoint might be invalid. |
Voice and Chat media campaigns require valid Service Endpoints for
transmitting communication requests. Email campaigns need valid
Mailboxes.
Read the Service Endpoints article for more
information.
Campaign States
A campaign might have one of the following states:
| Running | Represents an active campaign. If the dial rule is also active, then the system allows inbound calls to the queues and agents, as well as initiates outbound communication requests from outbound campaigns. |
| Available | Indicates that the campaign is ready, but not active yet. Independently from the dial rule used for the campaign, no communication requests are permitted through this campaign. |
| Design | This state allows system administrators to modify contact and campaign properties. No communication requests are permitted through this campaign. |
| Importing | This state is set by the Contact Manager Service during contact list export/import processes. When the process is terminated the campaign state returns to the original state. |
| Terminated | This state indicates that the system automatically terminated the campaign, because one of the specified campaign termination criteria was satisfied. |
Use the Edit ** button in order to change the state of a campaign, select a new state, then click on *Submit.*
Creating a New Campaign
Tenant-level Administrators are able to create new campaigns and queues.
Creating a New Campaign
- Use the +New campaign button to specify a new campaign entry.
- Specify the properties described below.
- Click the Submit button to save the modifications to the database.
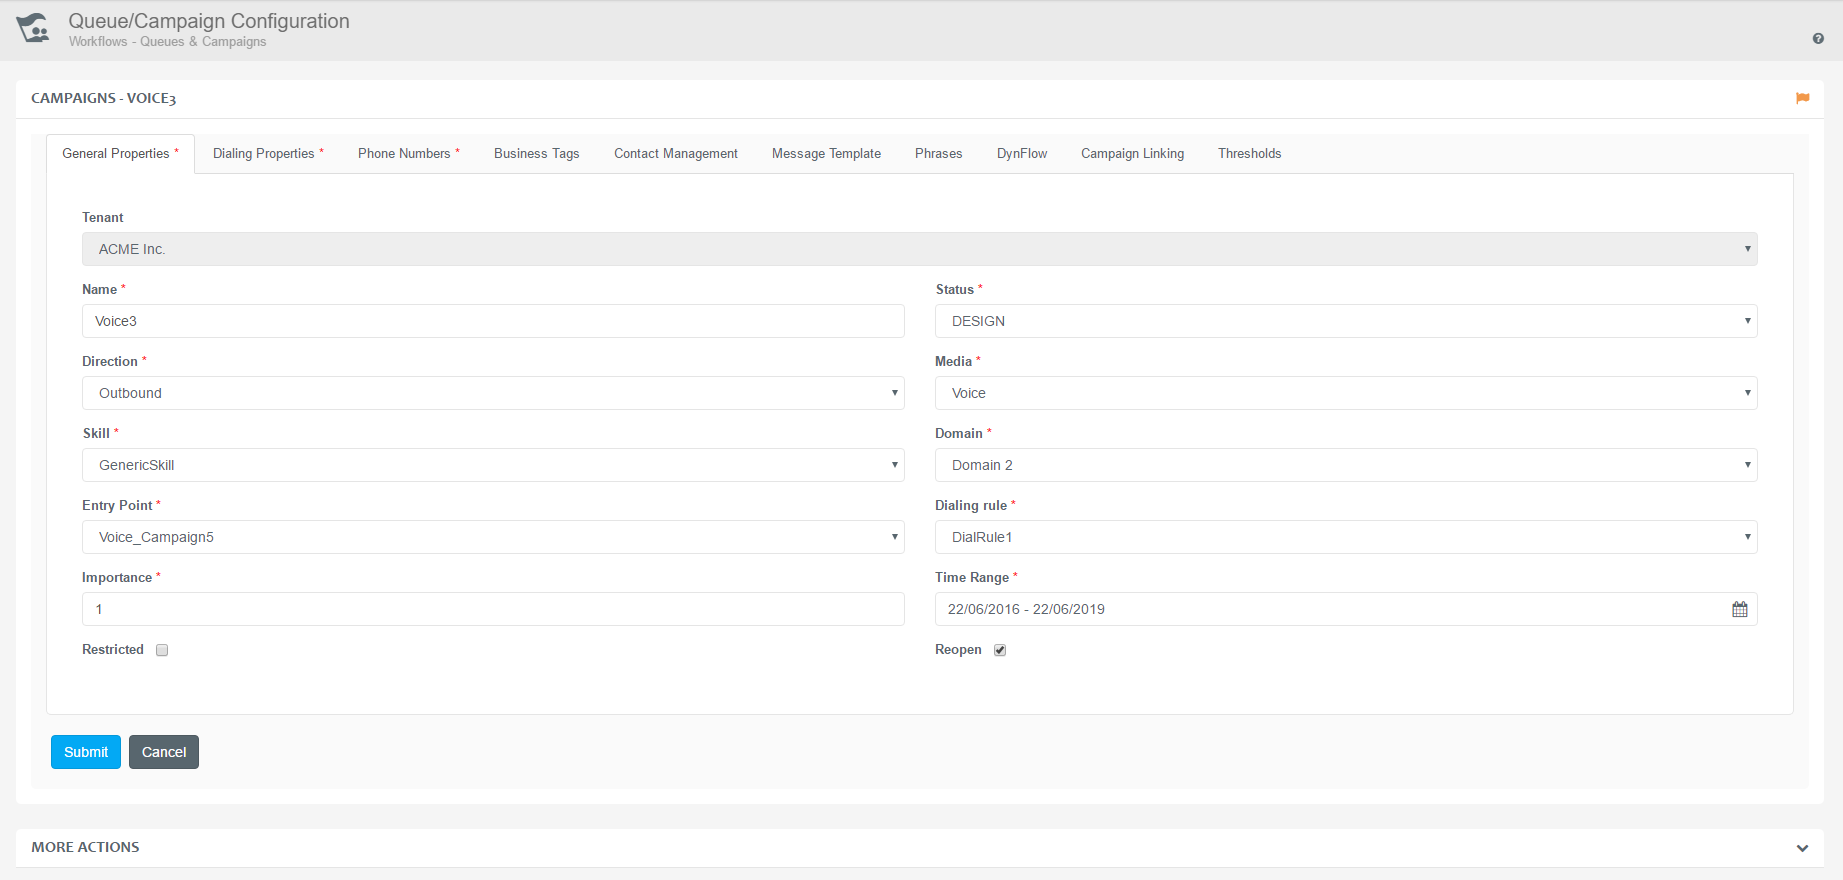
General Properties
Specify the following properties:
| Name | Assign a unique name to identify the campaign. |
| Status | Specifies the status of the campaign after creation. |
| Direction | Specify the direction of the interaction. It can be either Inbound or outbound. |
| Media | Specify the type of media to be used as the main channel of the campaign. It can be voice, email or chat. |
| Tenant | Specify the tenant associated with the campaign. |
| Skill | The skill defines which operators (agents) can work in the campaign. |
| Domain | Specify the domain associated with the campaign. |
| Entry Point | This property is used to initiate interactions from outbound campaigns and to match inbound interactions. It is a drop-down list including all the registered endpoints.
|
| Dialing rule | Select the campaign activity rule from the list of administered dial rules. |
| Importance | For outbound campaigns this determines the number of outbound calls initiated from the campaign. Increasing the importance of a given outbound campaign increases the number of outbound calls initiated. The value is only used for outbound campaigns. |
| Restricted | Reject callers who are not included in the contact list. The value is only used for inbound queues. |
| Time Range | The time range when the campaign is active. |
| Reopen | Limit the number of incoming calls to this campaign to one per customer. The value is not used for outbound campaigns. |
Entry Point list availability
Please note that the Entry Point menu will only list available choices if the Media, Tenant and Domain properties are defined first!
If the Media type is Voice or Chat, the Entry Point will list the domain related Service Endpoints registered.
If the Media type is Email, the Entry Point will list the domain related Mailboxes registered. Only one mailbox can be assigned to a campaign.
Read the Service Endpoints article for more information.
While the system allows to select No service as the Entry Point, please note that in this case the Status of the campaign cannot be set to *RUNNING* .
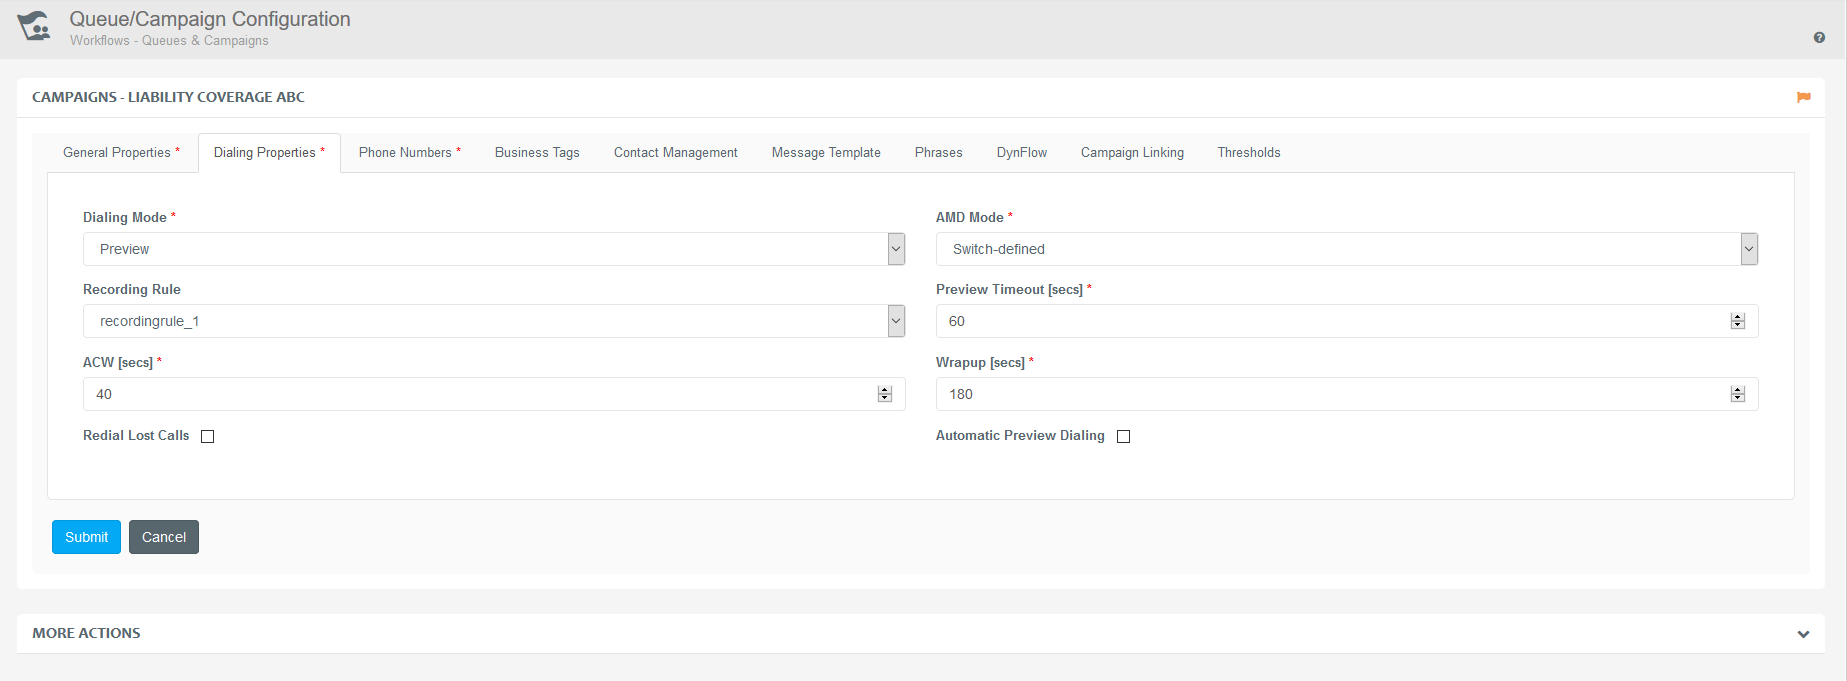
Dialing Properties
Specify the following properties:
| Dialing mode | Progressive: calls are automatically initiated and classified by the system in the background. Agents generally receive only those tasks which are associated to calls answered by a person. This saves the time otherwise would be spent by the agent waiting for a long ring or reaching an answering-machine. |
| AMD mode | It is possible to specify how to handle answering-machines detected by the telephony switch. This field can have one of the following 4 values:
|
| Recording Rule | Specifies which rule to apply for call recording purposes. |
| Preview Timeout | This field determines the timeout value (in seconds) for the Automatic preview dialing parameter. |
| ACW (secs) | After closing a task from the campaign, the agent is put into a timed after call work (ACW) state. No further tasks are delivered to the agent in this state. The maximum duration of this state can be specified here. The agent has the opportunity to interrupt this state and return to an active state. If agents do not activate themselves, then they will be taken into active state automatically by the system as soon as the timer expires. This value can not be less than 3 seconds! |
| Wrapup (secs) | Specifies the time-frame of the wrap-up timeout for a task. It enables the supervisor to offer different amount of administration time after an interaction is finished. |
| Automatic Preview Dialing | If the Dialing mode is set to Preview then this field specifies whether the system should dial contacts for preview tasks automatically after the timeout established in the Preview Timeout parameter. |
| Redial Lost Calls | If this option is checked, the system will automatically generate callback records for calls that are disconnected in the inbound queue. |
| Automatic Closure of Abandoned Calls | If this option is checked, the system will automatically close all calls that have been terminated by the customer during connecting to an agent. The task will not be presented to the agent in this case. It is important that the value defined as the Agent alert timeout is smaller than the value set as the Call Forwarding option in the Skype for Business client application, so that CE can handle the terminated call and then close the task. Visit the Routing Rules section to see how to set the Agent alert timeout. |
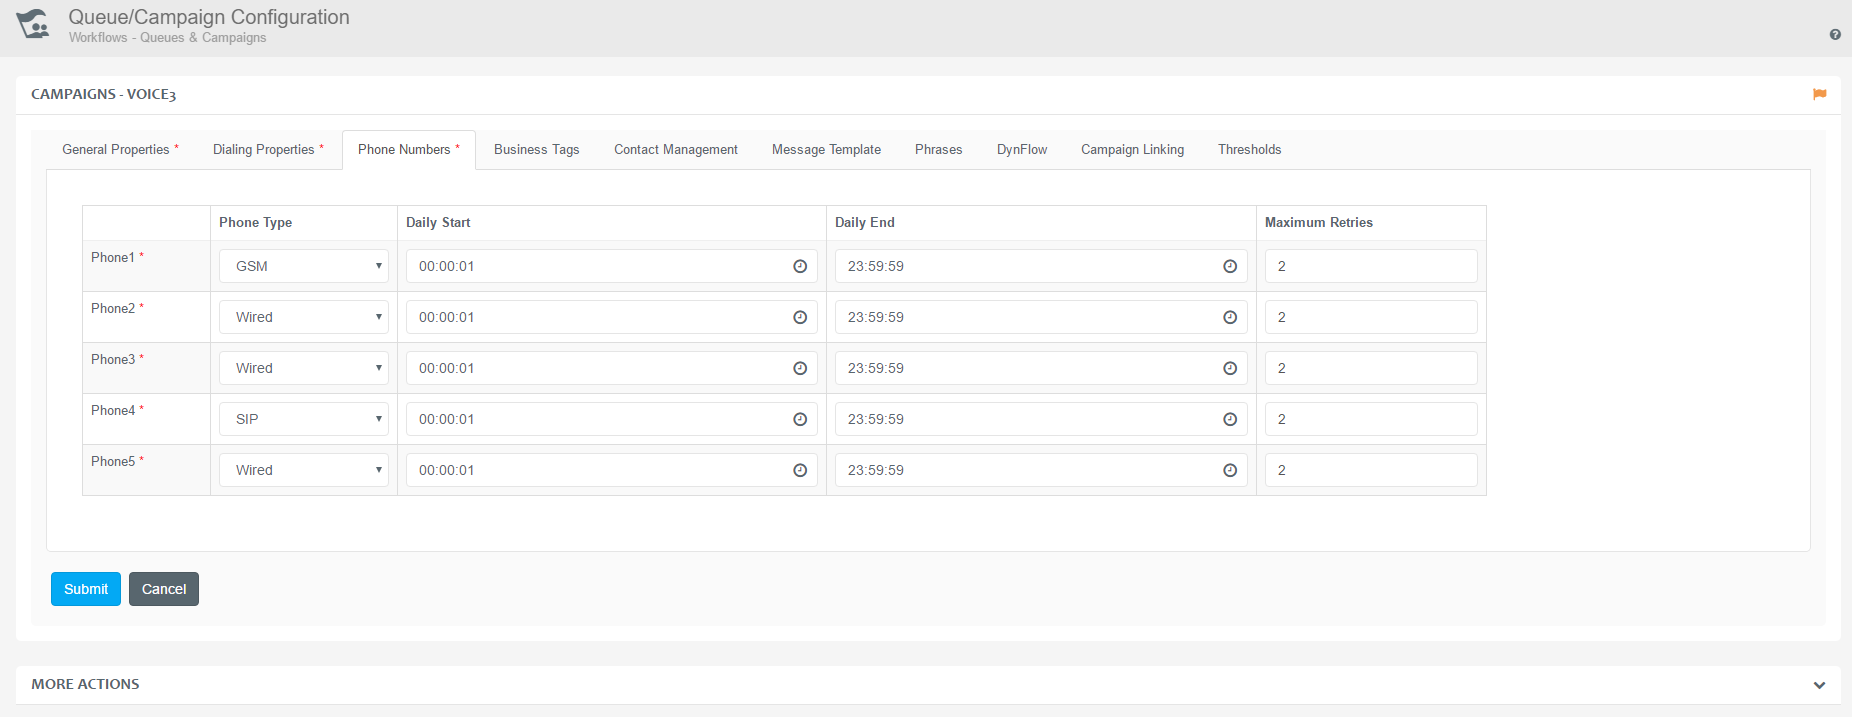
Phone Numbers
Multiple phone numbers can be assigned to each contact.
The properties of the available phone numbers can be specified as follows:
| Phone Type | Currently 3 types of phone numbers are defined: Wired, GSM or SIP. |
| Daily Start and Daily End | This daily time interval specifies when the given phone number is active. For example, a contact can be dialled using a mobile number in the morning, office number during the working hours and home number in the evening. |
| Maximum Retries | This parameter specifies the maximum number of call attempts for a given phone number. If the number of unsuccessful call attempts exceeds this threshold, the system automatically inactivates the given phone number and switches to one of the active ones. |
By default the system enables the assignment of 5 phone numbers to each contact. However, this system wide parameter can be changed.
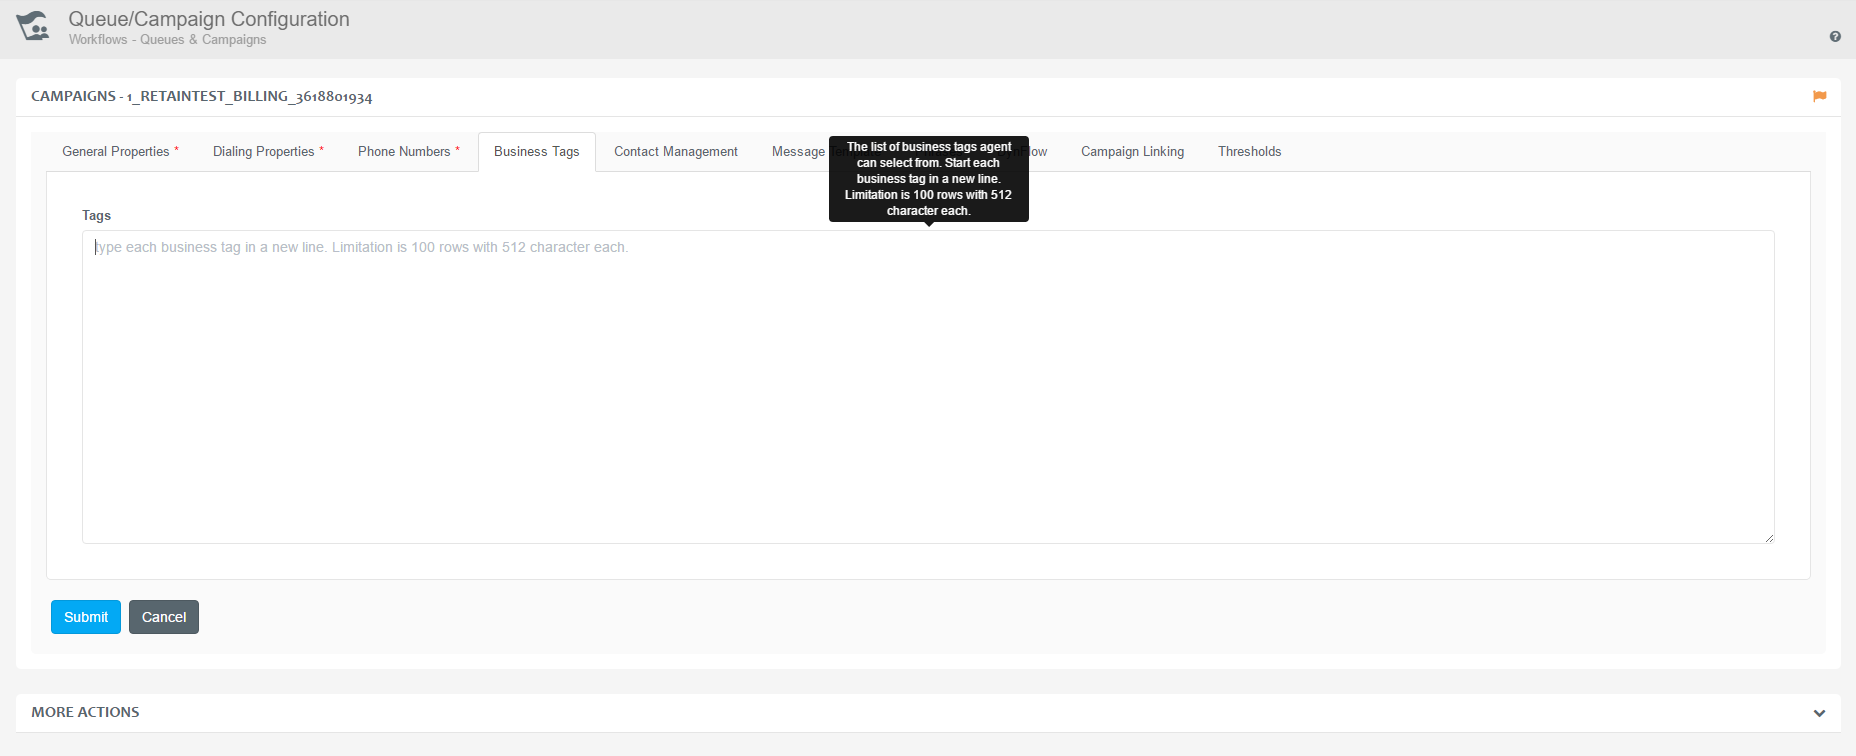
Business Tags
This tab allows you to associate a list of business specific tags (often known as ‘closure codes’ or ‘disposition codes’) to the campaign.
Business tags are presented in the Closure code dialog box. This dialog box comes up when the call is terminated and operators can select from the tags that are assigned to the specific campaign.
Values should be entered in new lines, separated by Enter.
Limitation is applied in the text field. The permissible limit is 100 rows of values, where 1 line of value can contain 512 characters including spaces and punctuation marks.
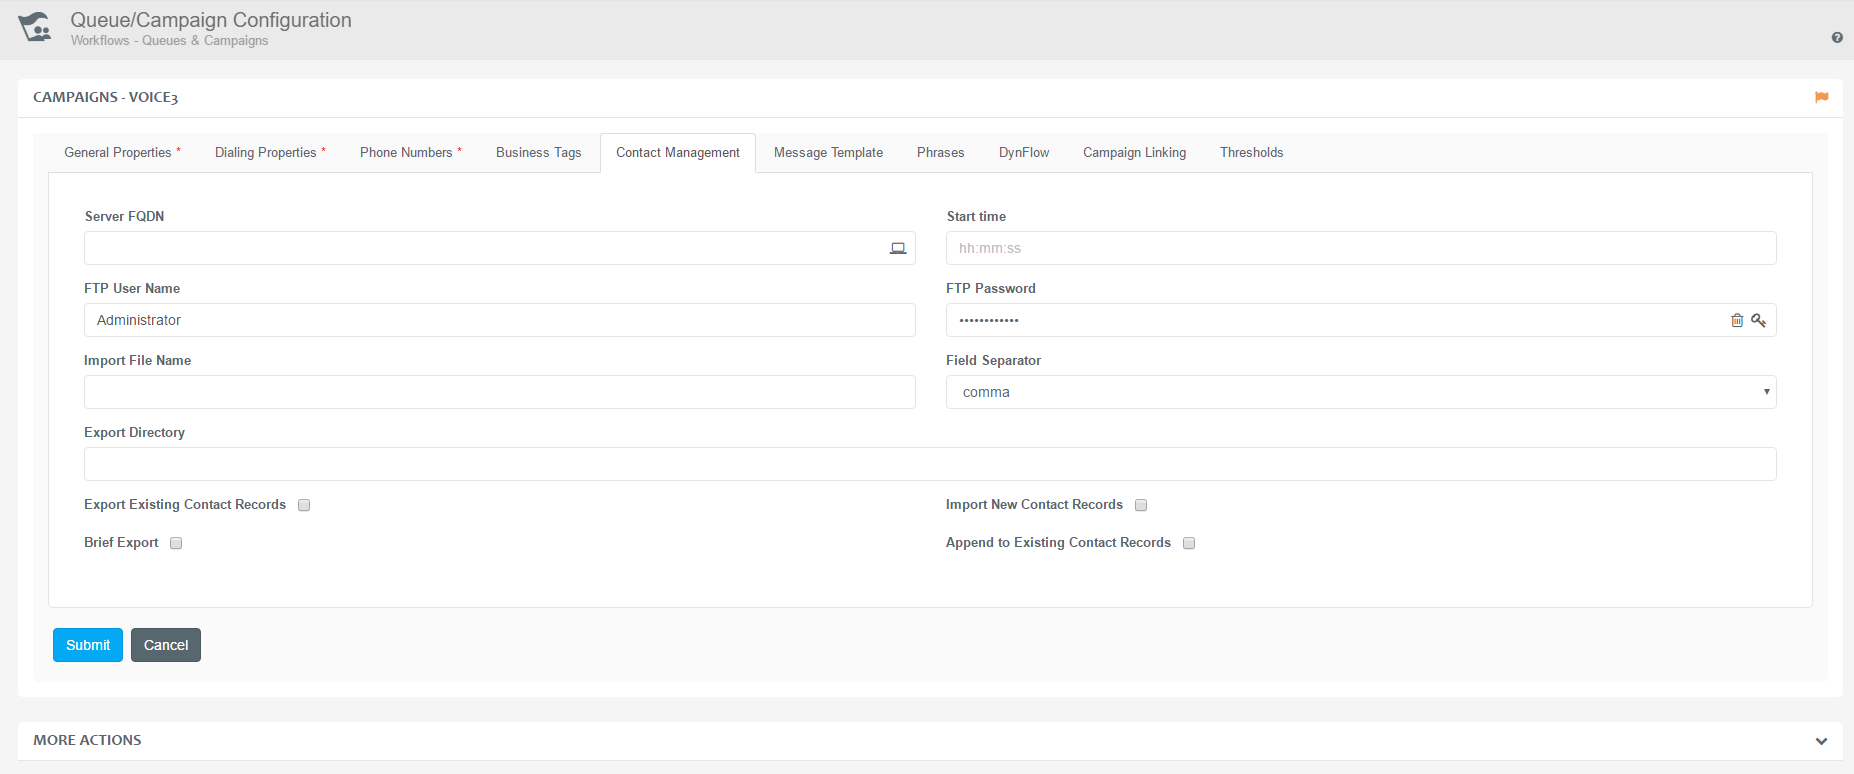
Contact Management
Specify the following properties of a contact management service:
| Server FQDN | Specify the host address of the FTP server where to import and/or export files. |
| Start time | Specify the time the import or export process should be started. |
| FTP User Name | Specify the account name to log in to the FTP server. |
| FTP Password | Specify the password for the FTP login. |
| Import File Name | Specify the relative path of the contact list file – containing new contact data – on the FTP server. |
| Field Separator | Specify the file format of the import/export file (the separator character can be comma, semicolon, colon, space and tabulator). |
| Export Directory | Specify the directory on the FTP server where the export files should be saved into. |
| Export Existing Contact Records | Specify whether existing contacts (and contact related data) should be exported from the database at the specified time or not. |
| Import New Contact Records | Specify whether new contacts should be imported to the database at the specified time or not. |
| Brief Export | Specify whether to export all data from contact records or only the ones specified in the config files. |
| Append To Existing Contact Records | Specify whether the new contacts should be appended to the existing ones or existing ones should be removed before appending new ones. |
Message Template
This tab allows you to create and edit outbound message templates.
Such templates can utilize any data item in the contact record as tags. Tags in templates are automatically populated with up-to-date data when tasks are delivered to agents.
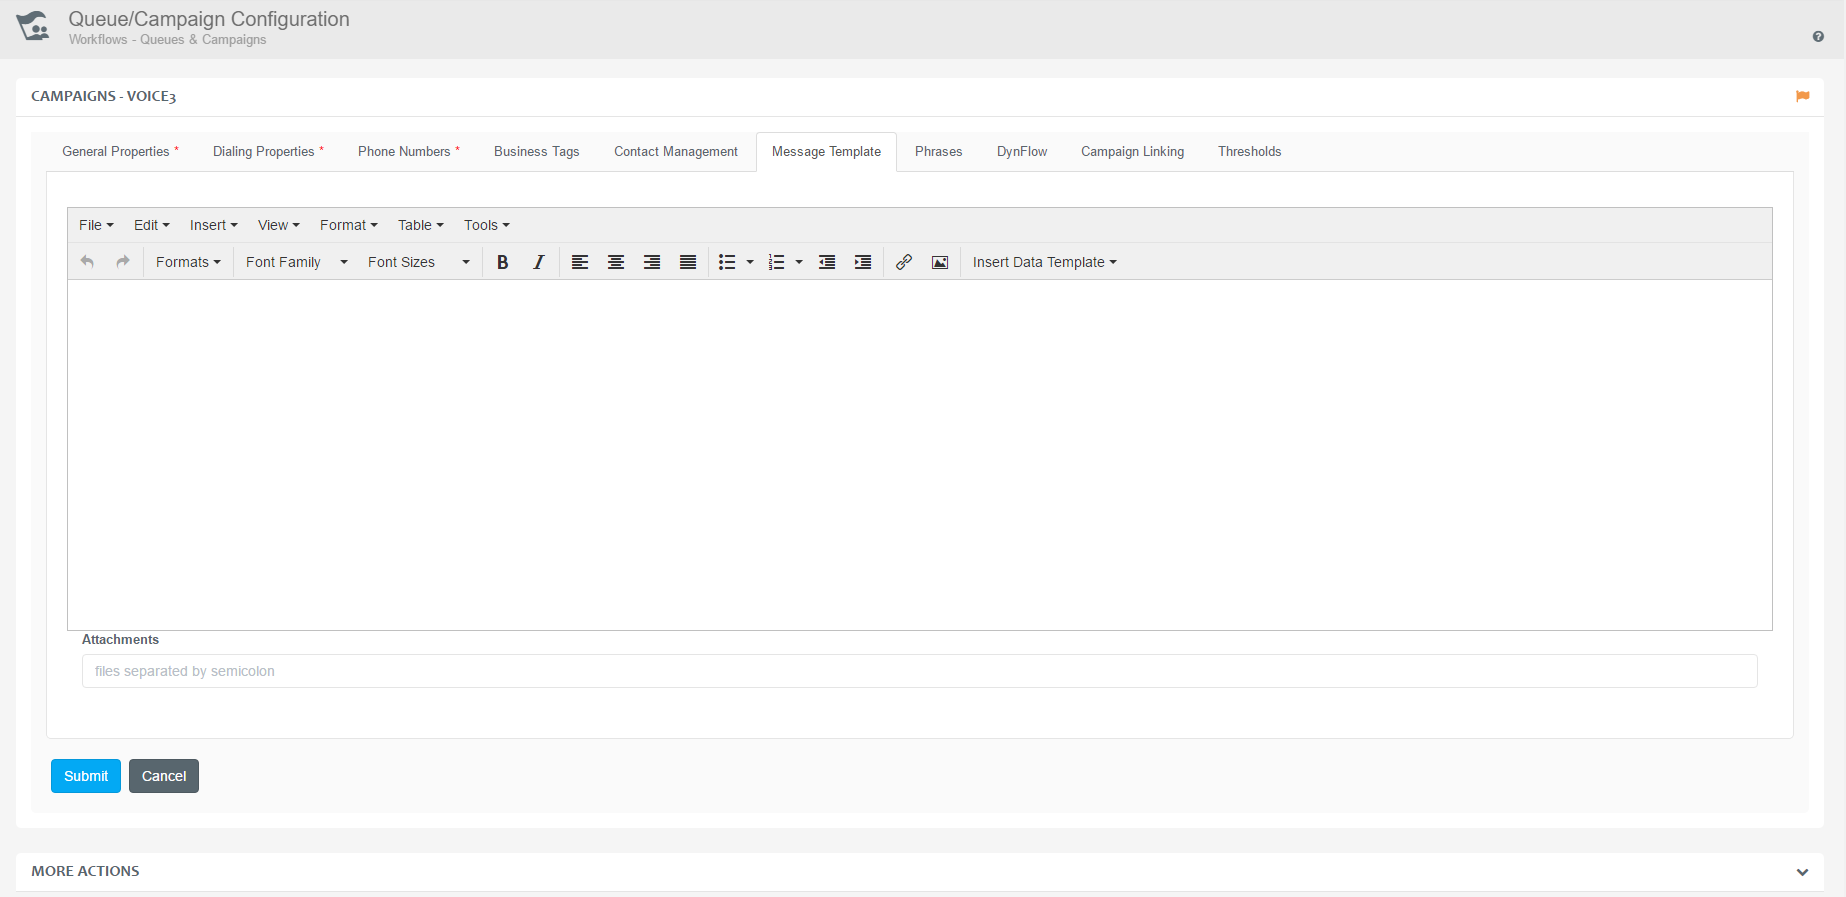
Inserting Data Template
Tags can be inserted to the message body by using the Insert Data Template function on the editor's toolbar. The following data tag can be inserted:
| Agent Name | The name of the agent who is working on the task. |
| Contact Related CRDS data | Insert CRDS data of the customer(s) who will receive the email. |
| Campaign Related CRDS data | Insert CRDS data of the specific campaign. |
Contact related CRDS data can be set via the Operations→Customers→Contact Master Data Fields .
Campaign specific CRDS data can be set via Operations→Workflows→Queues & Campaigns→Edit→MORE ACTIONS→Edit Contact Record Structure .

Adding Attachments to Message Templates
Contact Expert Portal offers the possibility to attach files to Message Templates, which will be sent out with the email in case agents decide to use the template in their email communication.
- Place the attachment files onto a network share.
- Share the network location so that the computer account of the CE Core Host can read files from it.
- Navigate to Operations→Workflows→Queues & Campaigns .
- Click Edit of a preferred campaign entry.
- Go to the Message Template tab.
- Insert the file names separated by semicolons.
Please note that configuring network shares for Message Template attachments in a multi-tenant environment does not provide proper security separation between tenants!

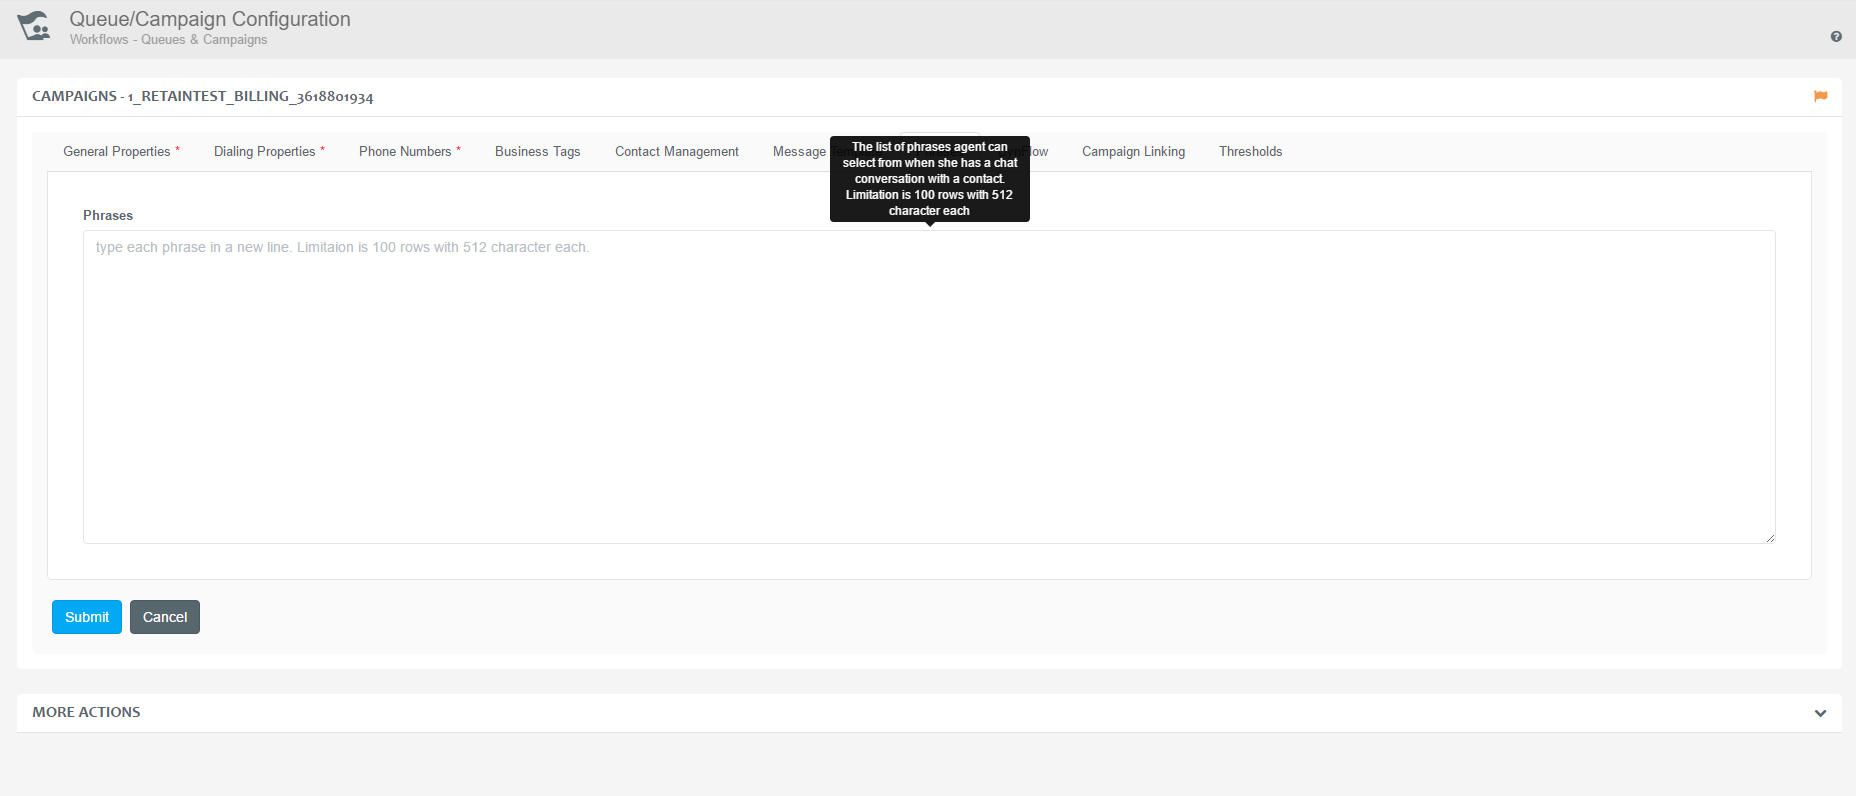
Phrases
If the campaign’s media type is chat, then an extra feature can be used. Campaign specific phrases can be entered here which can be inserted by operators into chat conversation windows.
You can refer to SfB contact card data using formatted 'tags' – phrases between dollar signs, e.g. $Company$, $Department$, $DisplayName$, $PrimaryEmailAddress$, $FirstName$, $LastName$, $LocationName$, $Office$, $Title$, etc.
Values should be entered in new lines, separated by Enter.
Limitation is applied in the text field. The permissible limit is 100 rows of values, where 1 line of value can contain 512 characters including spaces and punctuation marks.
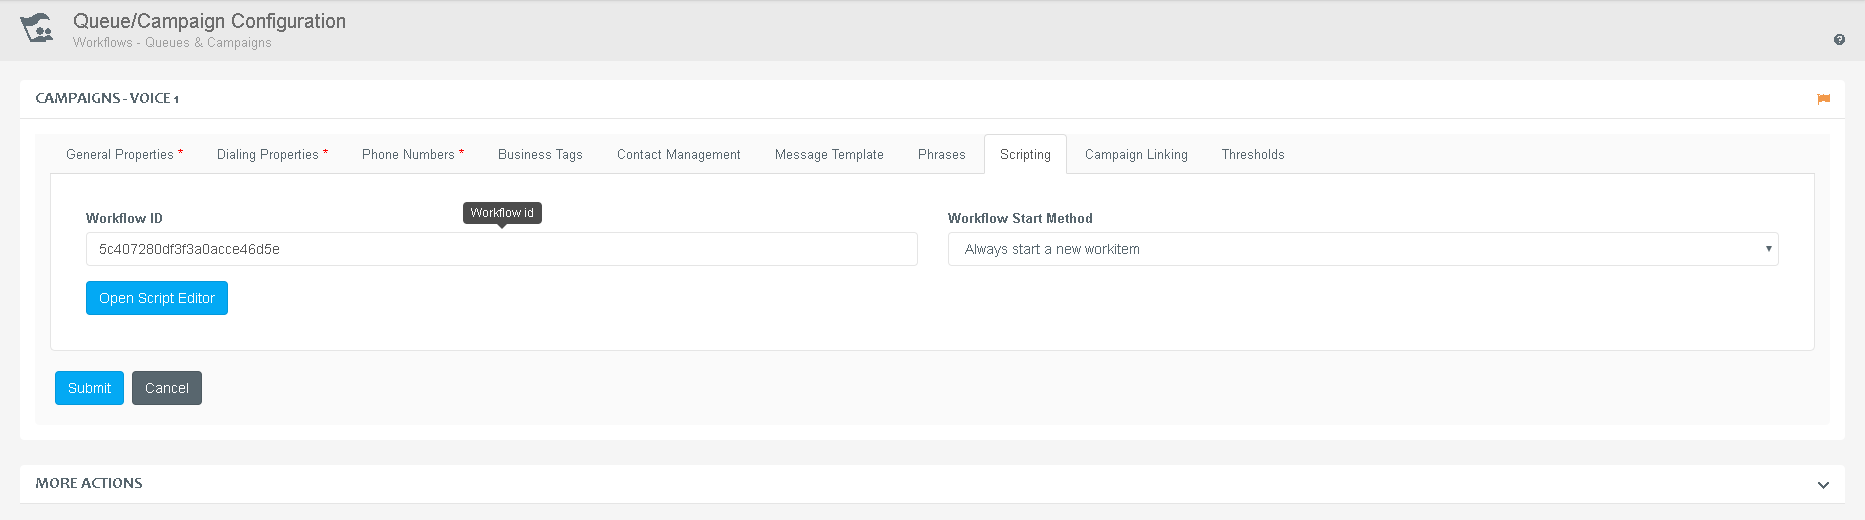
Scripting
This tab provides scripting workflow settings. This tab is enabled with the Use enhanced agent scripting agent policy in the CE domain with which the relevant campaign (queue) is associated. To associate an existing script flow to the queue or campaign:
Specify the ID of the workflow.
Choose one of the following methods:
- Always start a new work item.
- Continue existing work item if possible.
- Agent decides whether to continue or start a new work item.
Click Submit.
To modify an existing script, or create a new one:
- Click Open Script Editor.
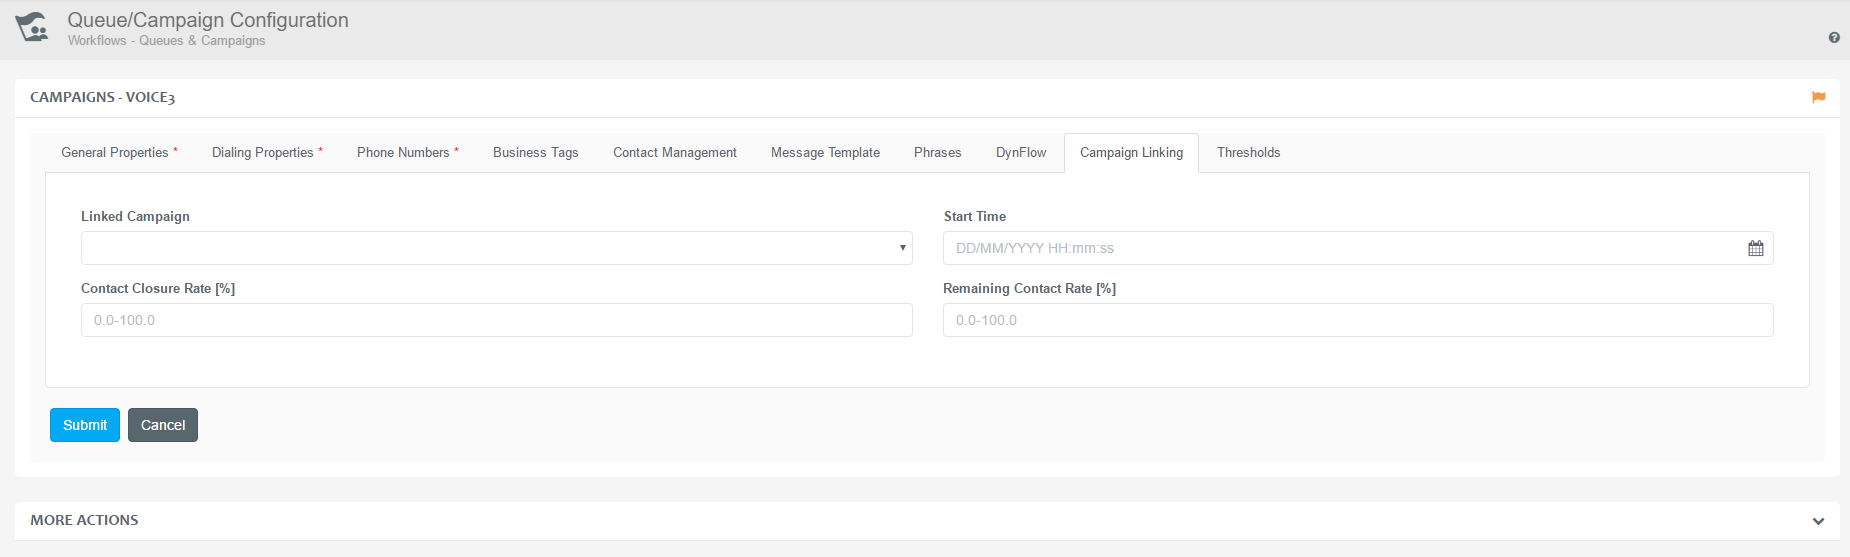
Campaign Linking
Campaign linking gives permission to the current campaign to start another campaign when specific conditions are met. The following properties must be provided to allow this feature:
| Linked Campaign | Specify which of the existing campaigns to start when the conditions are met. |
| Start Time | Specify the exact time that indicates when to start the particular campaign. |
| Contact Closure Rate | Specify a limit in percentage that indicates when to start the linked campaign. The ratio adds up of the closed contacts and the active contacts. |
| Remaining Contact Rate | Specify a limit in percentage that indicates when to start the linked campaign. The ratio adds up of the remaining contacts and the active contacts. |
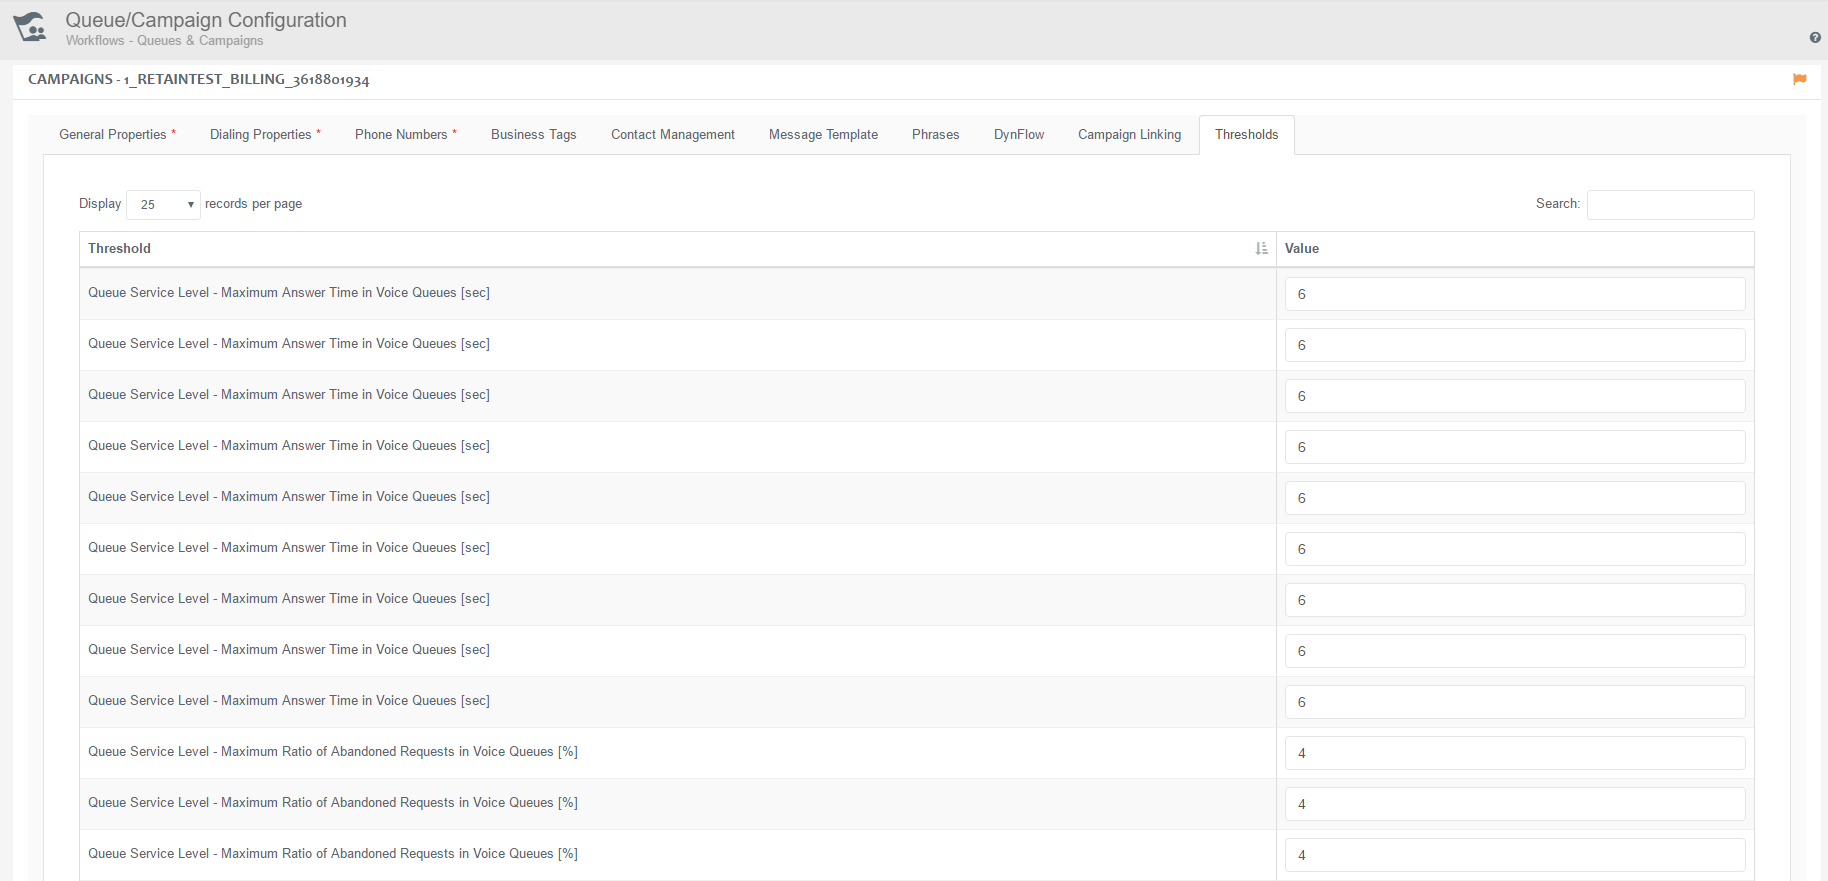
Campaign Specific Report Thresholds
This tab provides the ability to modify the threshold settings of a specific campaign.
Follow the below steps in order to enter the Queue/Campaign Configuration window and alter the value settings.
- Navigate to ***Operations →Workflows→Queues & Campaigns.
*** Click Edit on a preferred campaign.
Go to the Thresholds tab.
The available thresholds for modification are all related to the Queue Service Level of the concerned campaign.
These thresholds are media specific, so if the media of a campaign is modified, the thresholds will be applied to that specific, newly added media. For example, if you change a chat campaign to a voice campaign, the threshold values will be related to the voice media. However, if these changes are reverted, the previous threshold settings will be applied.
| Maximum Answer Time [sec] | It is a data type threshold, which specifies the time period within the requests should be handled. Provide this value in seconds. |
| Maximum Ratio of Abandoned Requests [%] | It is a visual threshold, which specifies a high number of abandoned requests. Provide the percentage which abandoned interactions should be kept under. |
| Minimum Abandoned Request Time [sec] | It is a data type threshold, which specifies the minimum period of a request to be spent in queue before considering as abandoned. Provide this value in seconds. |
| Minimum Service Level [%] | It is a visual threshold, which specifies a critically low service level. Provide the percentage of interactions to be answered within the target answer time. |
This option is only available for voice and chat campaigns.
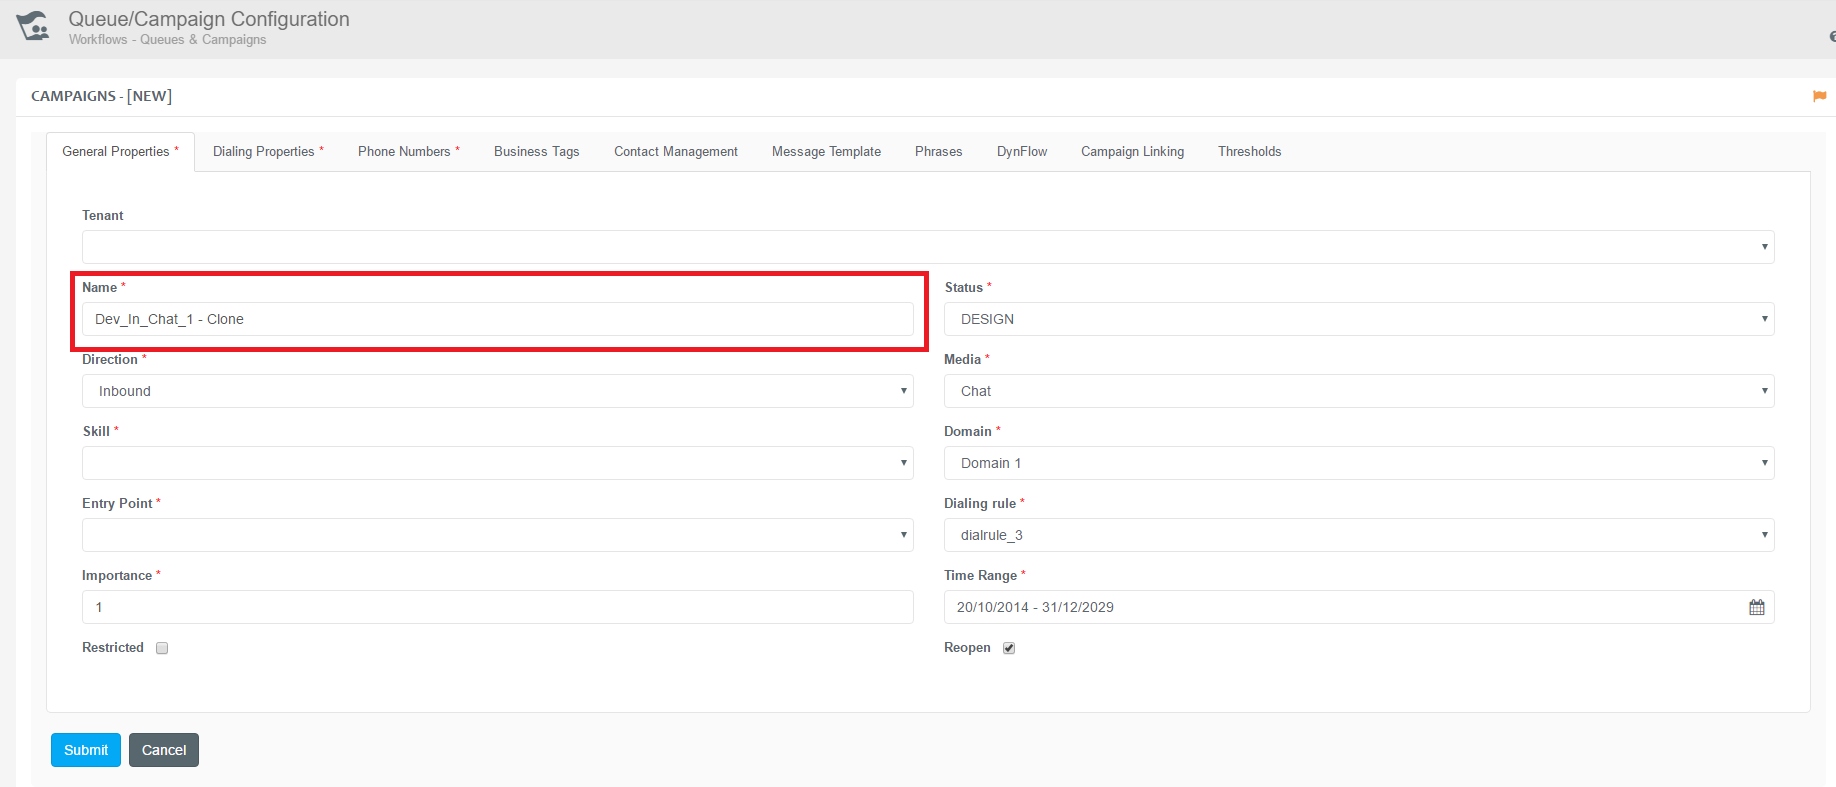
Campaign Cloning
Contact Expert Portal allows cloning of existing campaigns.
Use the +Clone button on the Campaign page to specify the campaign to clone.
The new campaign creation form will be presented populated with the properties retrieved from the chosen campaign, instead of a blank form.
Click the Submit button to save the modifications to the database.
After cloning a campaign please review the current settings and modify them according to you needs.
Default name for cloned campaigns
Note that these campaigns inherit the name of the cloned campaign appended with the " - Clone" text. This should be changed to a more meaningful name.
Mandatory change when cloning
The Entry Point on the General Properties tab must be changed for the cloned campaign.

Contact Record Structure
Contact Expert campaigns can be personalized for a better engagement with customers. Campaign managers, usually an administrator or supervisor can use CE Portal to personalize campaigns by extending existing campaign contact record structure with custom data fields.
Each campaign has its own Contact Related Data Sheet table in the system database. Each row in the CRDS table represents a contact record, new fields can be added/removed.
Follow the below steps in order to manage the CRDS fields.
- Navigate to ***Operations →Workflows→Queues & Campaigns.
*** Click on Edit of the appropriate campaign and click MORE ACTIONS to manage the CRDS rows.
Click on Edit Contact Record Structure .
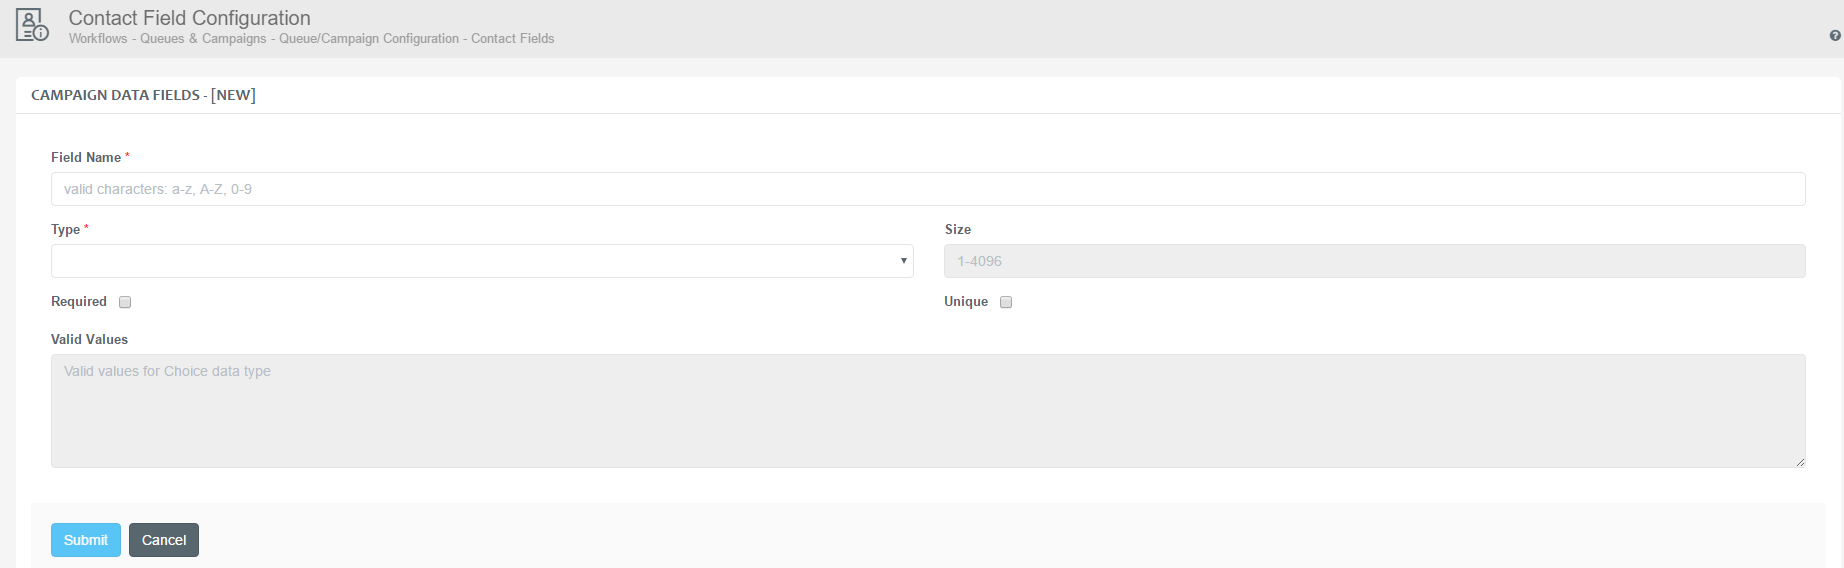
Use the +New data field button to specify new campaign data fields.
- Specify the properties described below.
- Click the Submit button to save the modifications to the database.

Specify the following properties:
| Field Name | Assign a unique name for the Data Field. |
| Size | Specify the size of the data field. |
| Required | It indicates whether the agent has to select a value or not. |
| Unique | It indicates if the data column includes a unique value. |
| Valid Values | Specify valid values for the Choice data type. |
The following types can be defined for a CRDS field:
| Choice | Set of values that is presented to the agent during the call, valid values need to be specified. |
| Integer | Integer value, can be a unique identifier (enable "Unique" property for the field) |
| Date | Data field representing a date |
| Time | Data field representing time |
| String | Free text field, please maximum allowed characters in the Size property |
| Boolean | Logical value, that represent a yes or no (true/false) answer |
Removing fields
Administered CRDS data fields can be removed from the Contact Record Structure list view. Please note that removing a CRDS data field cannot be reverted and all data contained in the given field will be lost.
Master Data
Please note that each campaign CRDS data table is extended with custom fields defined via Operations →Customers →Contact Master Data* Field*** as specified by the Master Data section.
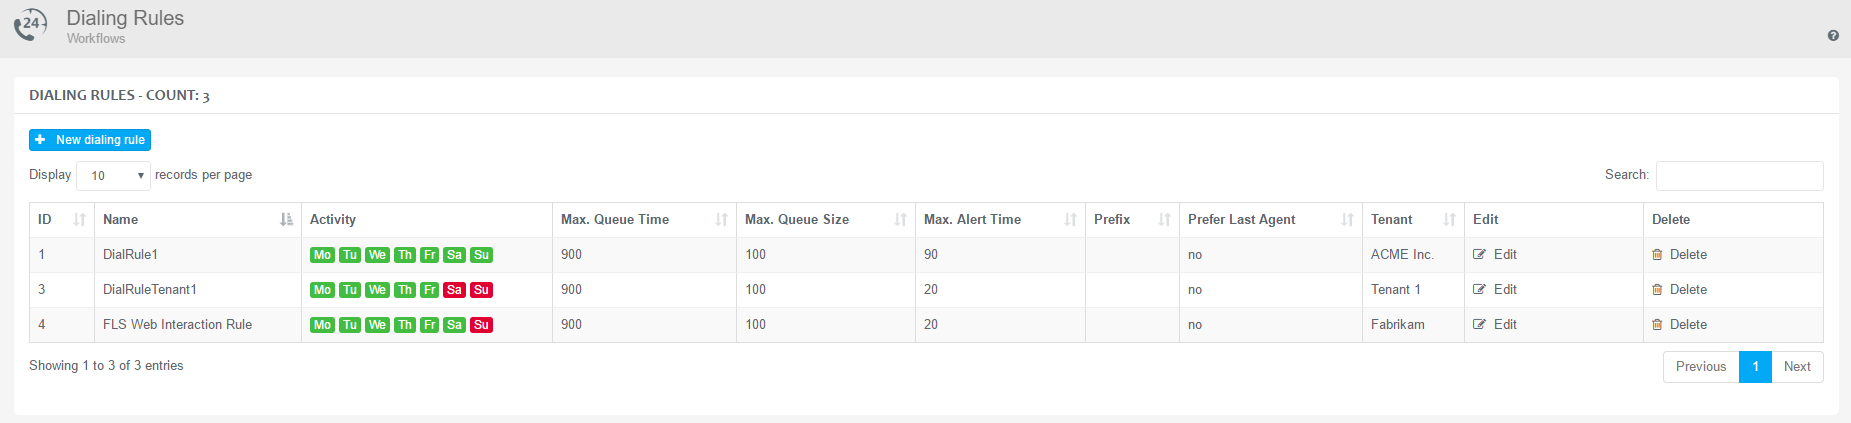
Dialing Rules
Among many of its features, Dialing Rules control queue and campaign availability related events like active periods. For example, you can set a campaign to be active from Monday to Wednesday between 8 am and 8 pm and from Thursday to Friday between 9 am and 5 pm. The active days are shown in green in the following figure, while inactive ones are shown in red.
Follow the below steps in order to manage the dialing rules in your environment. You can configure the dialing rules specifically for your tenant.
- Navigate to **Operations→Workflows →**Dialing Rules.
**** Use the +New dialing rule button to create a new dial rule.
Specify the properties described below.
Click the Submit button to save the modifications to the database.
Only unassigned rules can be removed
Please note that you can only remove rules that are not assigned to campaigns.
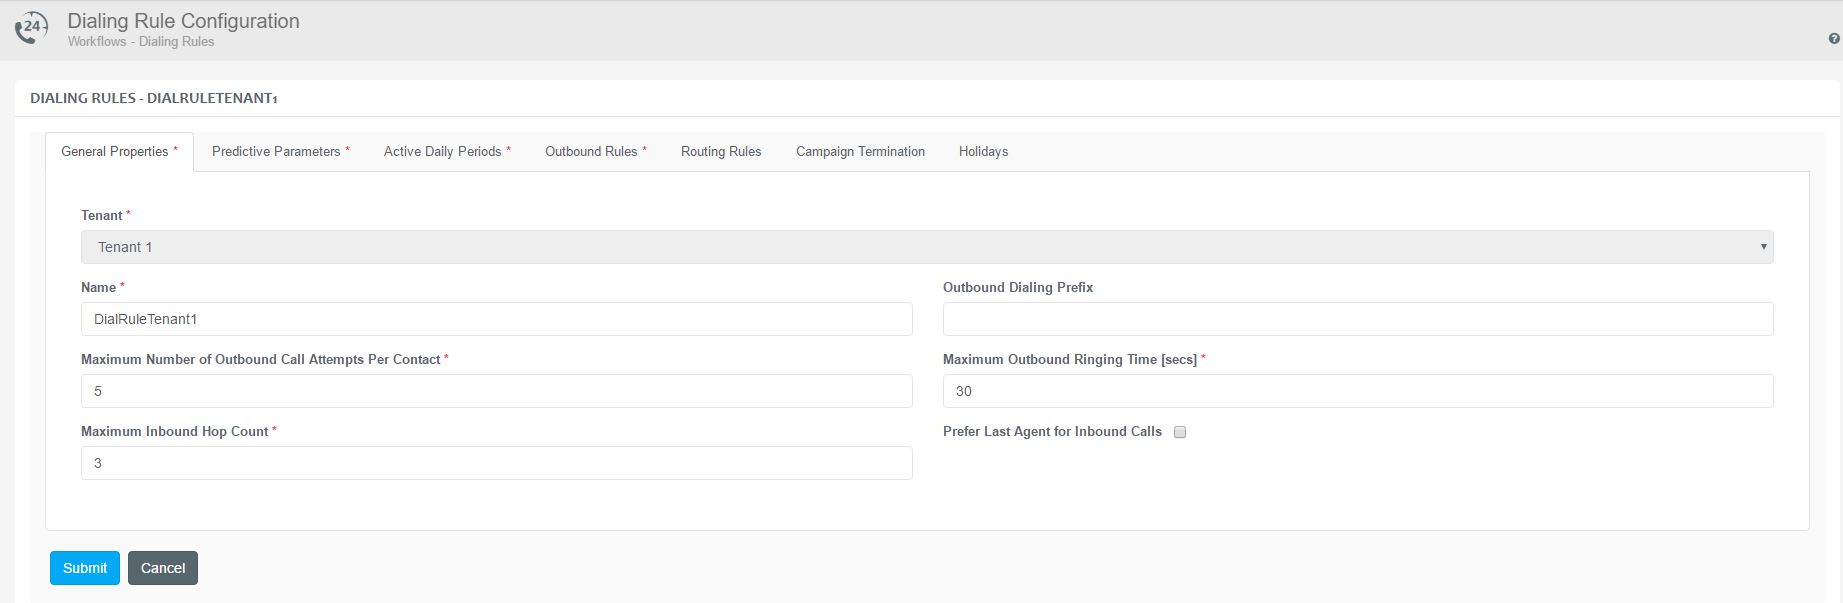
General Properties
Specify the following general settings:
| Tenant | Specify the tenant to be associated with the dial rule. |
| Name | Assign a unique name to the dial rule. |
| Prefer Last Agent for Inbound Calls | If checked, the call will be routed to the Agent who handled the specific contact the last time - this can happen if the Agent is available. |
| Maximum Number of Outbound Call Attempts Per Contact | Specify the maximum number of attempts to reach a contact. |
| Maximum Outbound Ringing Time | Specify the maximum number of seconds to alert the contact. |
| Outbound Dialing Prefix | Prefix to append to the PSTN number before dialing. |
| Maximum Inbound Hop Count | Specify the maximum number of times the request can be redirected. |
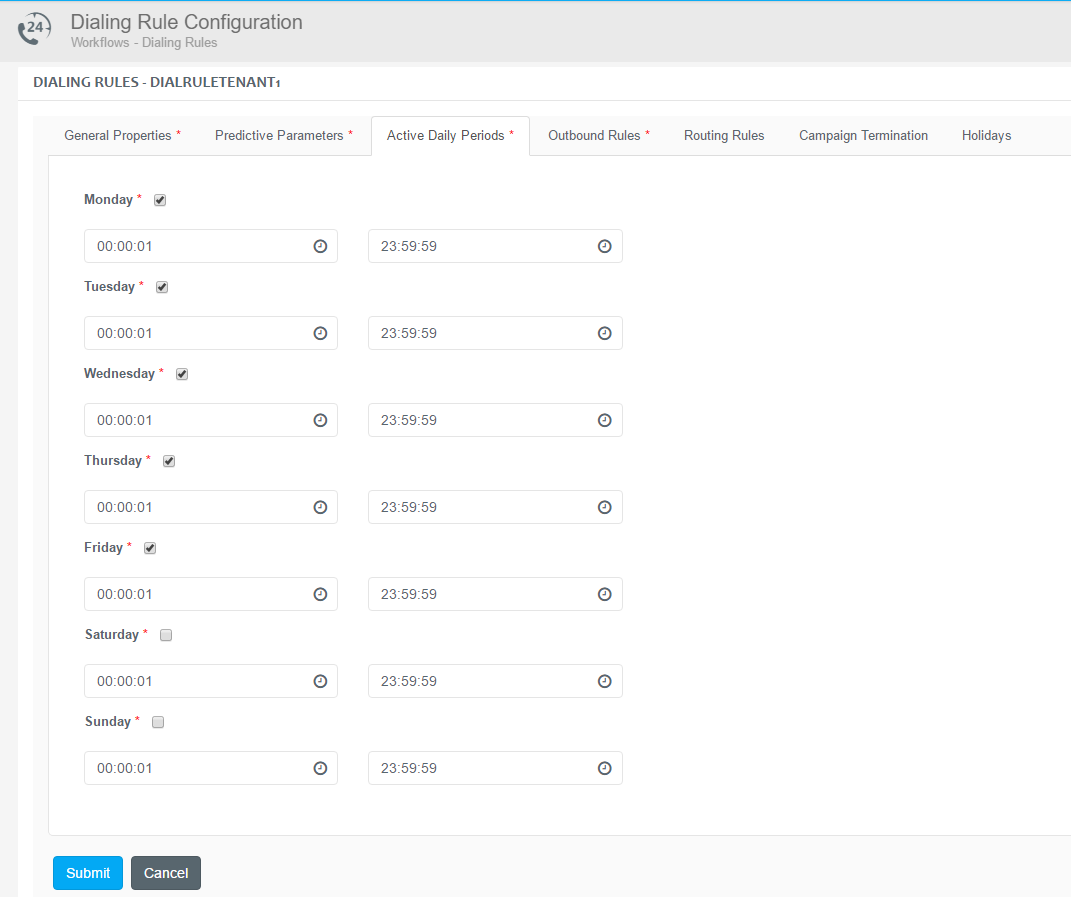
Active Daily Periods
Activate or deactivate days, specify daily start and end times. The availability is set to every day from 00:00:01 to 23:59:59 by default.
Predictive Parameters
The predictive dialing method collects statistical information from the campaign operation on a periodic basis to measure if and when is it safe to switch to Predictive mode. It is using the information provided on this tab as well as the Predictive Parameters tab of the Skills resources for that.
For further details on the predictive parameters available on the Skills resources, check the Management of Agent Related Parameters article.
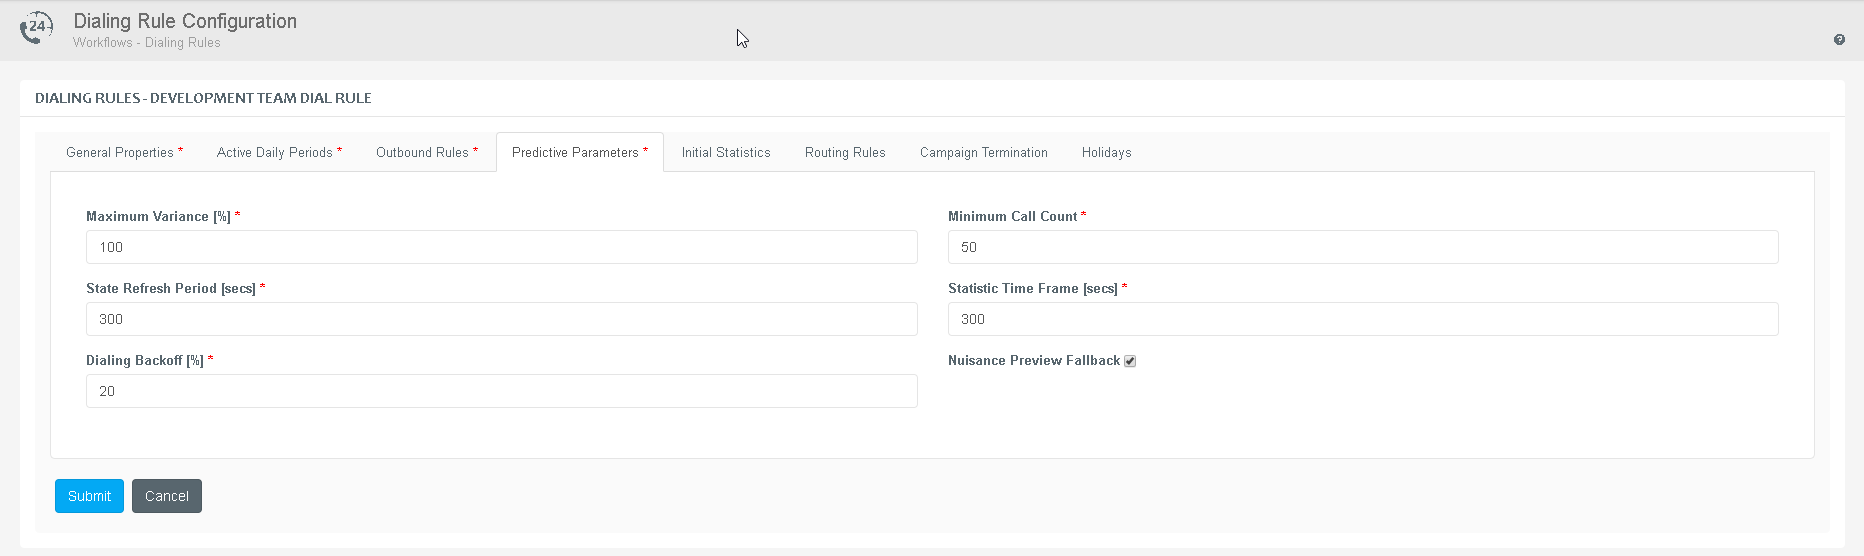
Warmup and Healing
The system constantly calculates the optimal dialing rate to keep the Contact Centre efficiency at peak level. When certain types of diversions happen from one statistical time frame to the next – e.g. the nuisance call rate is violated, the telephony endpoint connection is severed temporarily, etc. – the system goes into a "healing" mode, gradually slowing the dialing rate until the diversion disappears. When the system finds that the statistical values are once again stabilized, it starts a "warmup" process to gradually speed up the dialing rate until it reaches the optimal level for the campaign.
| Maximum Variance [%] | Specify the maximum value of call statistics change allowed by the system to function in predictive dialing mode. When not using Initial Statistics If this value is exceeded, the system stays in Predictive mode using a call pacing that ensures 0% nuisance rate. With Initial Statistics If this value is exceeded, the system stays in Predictive mode and switches back to using the Initial Statistics value. |
| Minimum Call Count | Specify the minimum number of calls that is necessary in order to accurately measure the statistical parameters of calls and to determine variance in the statistical time frames. When not using Initial Statistics If this value is exceeded, the system stays in Predictive mode using a call pacing that ensures 0% nuisance rate. With Initial Statistics If this value is exceeded, the system stays in Predictive mode and switches back to using the Initial Statistics value. |
| State Refresh Period [secs] | Specify the time frame that indicates when to recalculate statistical sample. Data is evaluated after every interval. The time frame should be set in a way to allow the system to handle the minimum number of calls for the defined set of agents. |
| Statistic Time Frame [secs] | Specify the duration of intervals that indicates when to generate the statistical sample. |
| Dialing Backoff [%] | Specify the value that indicates how the system should control the number of calls initiated. These calls have been estimated based on the statistical sample. |
| Nuisance Preview Fallback | The parameter defines how the system should handle nuisance calls - calls that reached the called party but have been terminated due to no agent availability. If checked, the system will place such contacts to Preview mode and presents the task to a reserved agent prior to dialing. Otherwise, the contact remains in predictive mode and the system initiates the callback accordingly. |
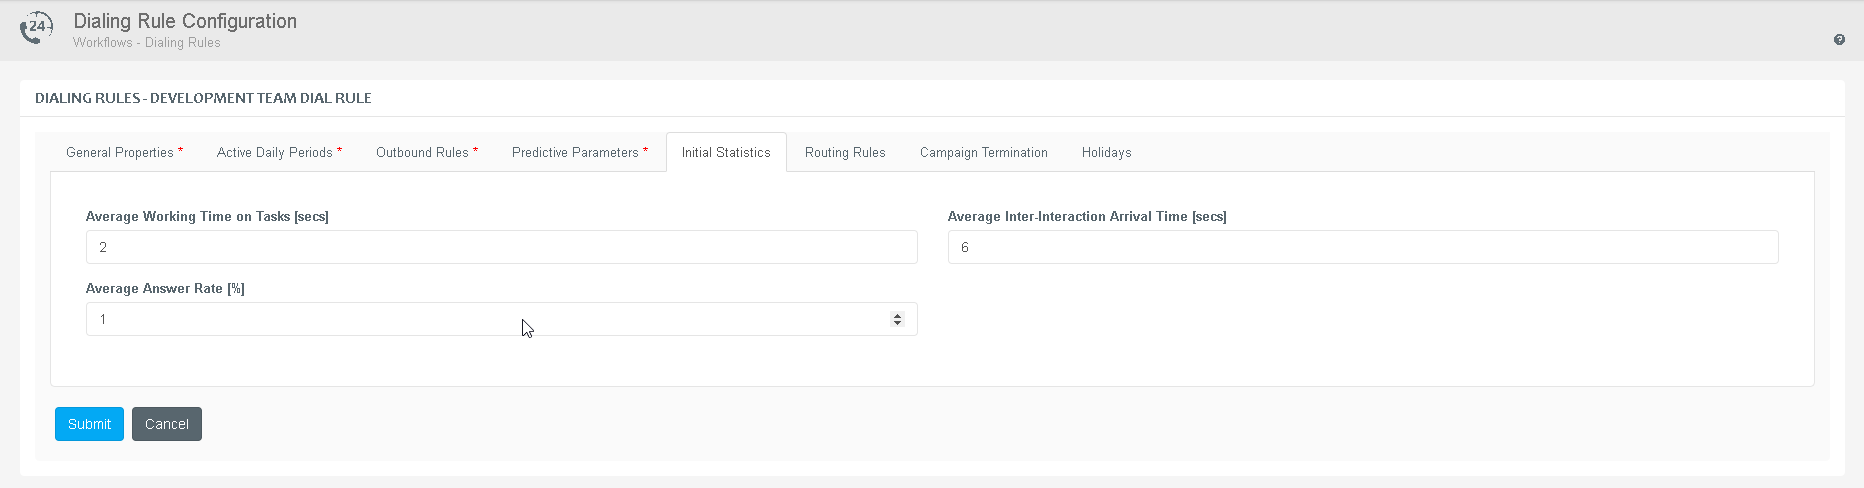
Initial Statistics
For customers having in depth knowledge of their contact list – in other words, they know how many of those contacts will actually pick up, how long the average talk time is going to be, etc. – and wishing to avoid the initial warm-up period needed for the system to learn this by itself, the Initial Statistics tab provides the means to set these values. The system will use these to start the campaign in Predictive mode right away.
| Average Working Time on Tasks [secs] | The average time the agents spend working on tasks (including, but not limited to actually talking to customers over the phone). |
| Average Inter-Interaction Arrival Time [secs] | The average time between two consecutive inbound interactions – outbound calls picked up by the called party and being handed off to an available agent. |
| Average Answer Rate [%] | The percentage of outbound calls initiated by the system actually picked up by the called party. |
If one of these fields are filled, the CE portal requires all the rest to be filled properly as well. The fields are either all empty or all of them properly set.
When the Initial Statistics values are set, the system switches back to using these values in some diversion situations without dropping out of the predictive mode. This provides an overall better efficiency as long as the Initial Statistics values are correct.
If the Initial Statistics values are not correct, the overall system efficiency could drop significantly which can result in either agents getting underutilized sitting in Available state without receiving calls, or the maximum nuisance rate getting frequently violated. In such cases Supervisors are advised to either fine tune the Initial Statistics values or delete these altogether and let the system learn how to maintain the predictive mode on itself.
Outbound Rules
This parameter section enables the definition of a number of actions the system performs automatically upon various outbound call outcomes.
The available actions are:
| Use the current number | The phone number used in the current outbound call will be re-used in the next interaction. |
| Inactivate phone number | Inactivates the phone number used in the current outbound call. Would the contact qualify for further outbound call attempts then the next interaction will be attempted on another phone number registered for this contact. If all of the phone numbers were inactivated (or if there is no other phone number assigned to the contact) then there will be no further outbound calls attempted for this contact regardless of whether the Maximum number of retries was exhausted yet. |
Currently the system handles the following outbound call outcomes:
| Outcome | Built in | Gateway detected | SfB/Lync platform | Avaya and other platforms |
|---|---|---|---|---|
| Answering machine is detected | ||||
| Busy tone is detected | ||||
| Fax tone is detected | ||||
| Modem tone is detected | ||||
| No answer from contact | ||||
| SIT no circuit, network conjection | ||||
| SIT unspecified: re-ordered; intercept; vacant code | ||||
| Invalid destination | ||||
| Agent signed out meanwhile | ||||
| Abandoned in queue | ||||
| Undesired party | ||||
| Nuisance call |
Legend
![]() Enabled
Enabled
![]() Skype for Business / Lync Mediation server can filter
out custom SIP header messages
Skype for Business / Lync Mediation server can filter
out custom SIP header messages
![]() Not tested on the platform
Not tested on the platform
![]() Not implemented
Not implemented
The next interaction attempt can be scheduled by specifying the Schedule property. The scheduled time should be given as a relative time; e.g. "00:00:05:00" schedules the next attempt in 5 minutes.
Contact Expert will attempt to call the phone number in this outbound call again if :
- the Maximum Number of Outbound Call Attempts Per Contact is greater than 1, and
- the number of outbound call attempts is lower than Maximum Number of Outbound Call Attempts Per Contact, and optionally
- for preview campaigns: the agent selected a failure outcome or reason code type in the call closure dialog.
This means that if – for preview outbound call strategies – the agent selected a non-failure type of code, the system will not attempt to call this phone number again even if the Maximum number of retries was not exhausted yet.
Contact Expert considers the Outbound attempts and Maximum number of retries settings for predictive, progressive and preview outbound strategies.
Automated outbound call attempts versus callback calls in preview campaigns
In case the agent closes an unsuccessful outbound call with a callback request scheduled, then the system registers a callback attempt at the scheduled time.
Closing an unsuccessful outbound call with a callback request will immediately terminate the dial rule logic on the contact. Instead, the callback schedule will dictate when the next call attempt will be made.
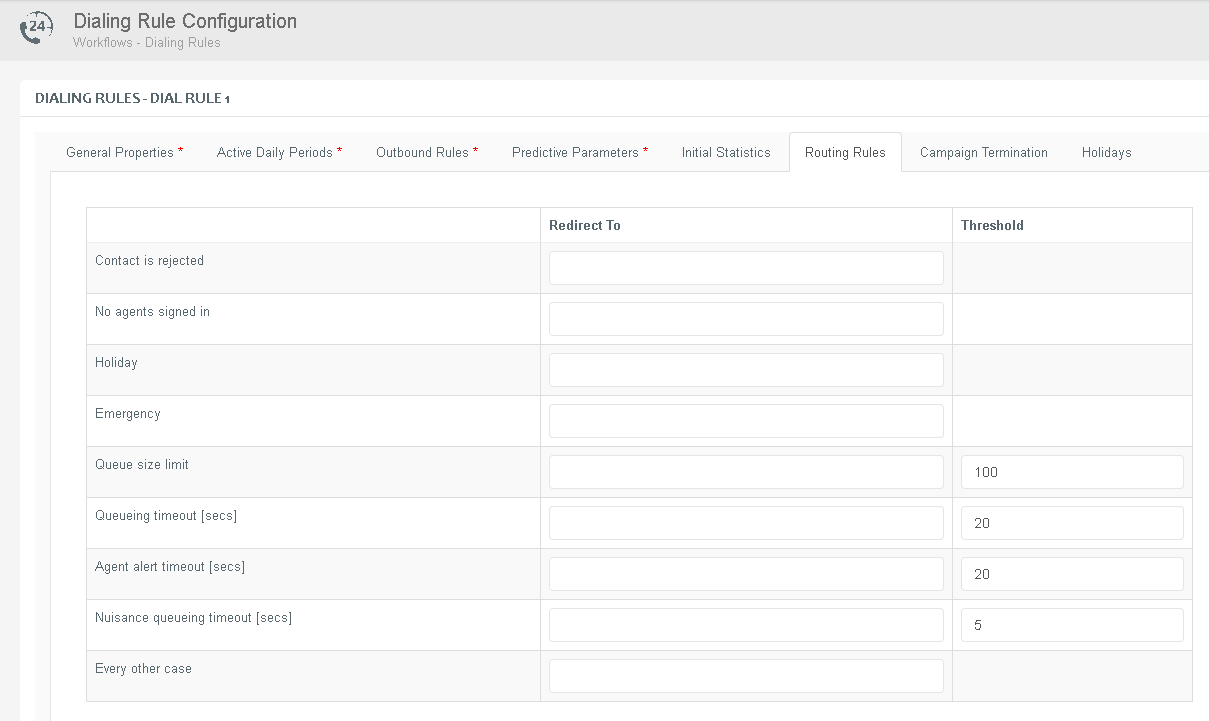
Routing Rules
The Routing Rules parameter section can be used to specify what to do with inbound requests if no suitable operator is available or the allocated one does not pick up the call in a given time. In these cases, communication requests can be redirected to different destinations.
The following properties are available for redirection purposes:
| Contact is Rejected | Specified callers are not allowed to access the campaign and are routed to this particular URI. |
| No Agents Signed In | Calls are routed to this URI when no suitable operator is available (i.e. no properly skilled agents logged in to CE). |
| Holiday | All incoming calls are routed to this URI when a holiday is in effect. This rule is applied for both Public Holidays and Dialing Rule Holidays. |
| Emergency | All incoming calls are routed to this URI when the emergency status is activated. |
| Queue Size Limit | Calls are routed to this URI when the number of callers waiting in queue exceeds the queue size limit. The maximum queue size (number of calls in queue) can be specified in the Threshold column. |
| Queuing Timeout | Calls are routed to this URI when the maximum queuing time is exceeded. The maximum queuing time (in seconds) can be specified in the Threshold column. |
| Agent Alert Timeout | Calls are routed to this URI when the allocated operator does not pick up the call within the specified amount of time. This maximum waiting time (in seconds) can be specified in the Threshold column. In the SfB edition of Contact expert it is possible to enter a Threshold value but keep the Redirect To field empty. In this case the calls will be redirected to the same queue. |
| Nuisance Queuing Timeout | Calls are routed to this URI when the customer is ready to be routed to an operator but none of them are available. The maximum time (in seconds) can be specified in the Threshold column. |
| Every other case | This rule is applied to calls that suffer inbound routing failure for reasons none of the other rules cover. Prominent cases for this are when the call arrives outside of the Active Daily Period, or when the Queue/Campaign is not in the Running state, and others. This rule does not act as a 'fallback' option for when other rules are not set! These rules gets activated in their specific inbound routing failure scenario, there is no rule to catch them all. |
| Redirect to | Specify the phone number or SIP address of the destination to route the calls to in any of the above described cases. If no entry is defined in this field, the call will be routed back to the originating campaign or queue. |
| Threshold | Specify the duration of the events described above in seconds to define after how long a call should be redirected to the specified destination in any of the cases mentioned above. |
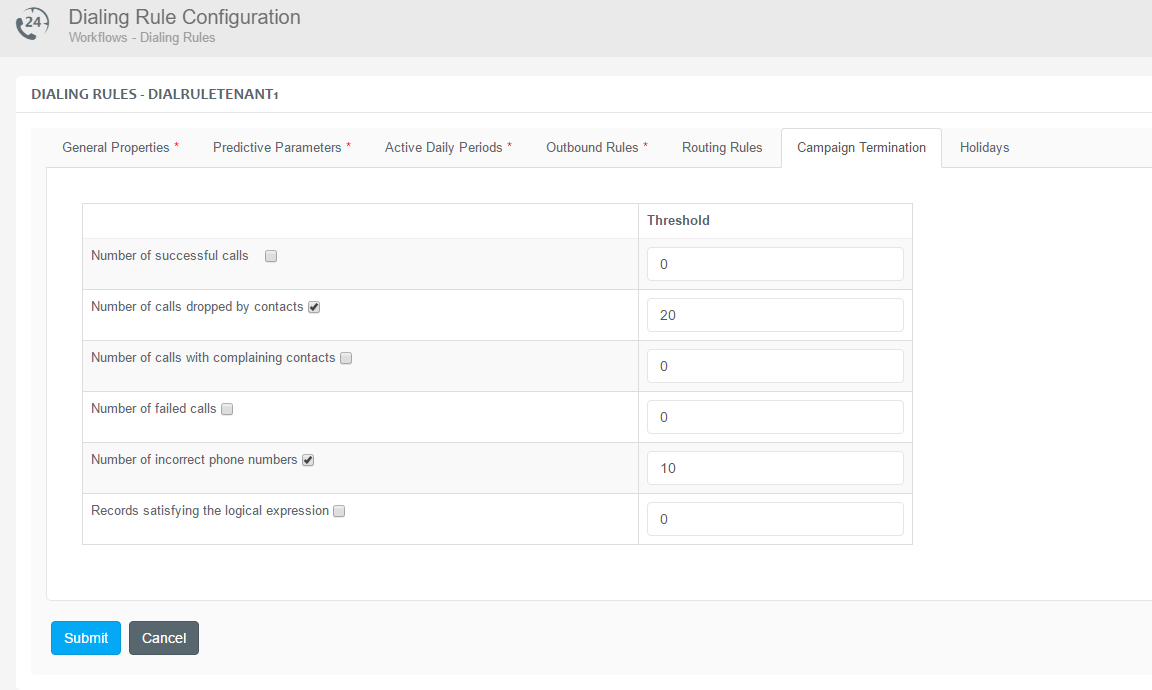
Campaign Termination
This tab – applicable for outbound campaigns – can be used to specify automatic campaign termination criteria. The termination criteria means that after one of the predefined criteria is met, the campaign should be terminated automatically. Such a criteria can be that the number of failed calls in the campaign exceeds a predefined threshold. The currently available criteria types can be seen on the right.
The first 5 are related to call outcomes while the last one is related to the collected data. So the last criteria means evaluating a logical expression over each contact record and if the number of contact records satisfying the expression exceeds a given threshold, then the campaign is automatically terminated.
Holidays
The Holidays section can be used to add new or remove existing holidays. These settings are applicable only for the current dial rule, not globally.
