Ad-hoc Outbound Activities
Contact Expert v6.1 for Skype for Business Server
The Lookup Mode
Even in an inbound contact centre there will be times when agents need to initiate outbound calls to customers, for example if the contact centre allows customers to register callback requests whilst waiting in the queue.
Callback requests registered in the system previously are automatically offered to qualified agents at around the designated deadline, and it can be configured to be dialled bz the agents manually, or by the system in an automated fashion.
Such outbound activities are regularly termed as being 'ad-hoc' as opposed to outbound work performed while working with an outbound dialling campaign.
There is a special workcode that allows the agents to perform ad-hoc outbound activities like picking callback requests or launching one-time outbound calls, etc. even if the agent is working with inbound interactions otherwise. Agents who intend to work on such ad-hoc outbound activities need to select the Lookup workcode before going on break.
Lookup Activities
Agents can use the lookup mode to achieve the followings:
- Search for and get details about customers in the contact database by numerous criteria (e.g. contact details, campaign, interaction date and time, closure code etc.).
- Search for Skype for Business contacts using an embedded Skype for Business lookup control.
- Search for previously handled tasks in their task history.
- Search for pending rescheduled tasks (e.g. registered callback requests) assigned to them.
- Update the details of an existing contact record.
- Create new contact records.
- Initiate the handling of any rescheduled task either registered by the customers in a self-service manner while waited in any of the queues or registered by agents while interacting with the customers.
- Initiate an ad-hoc outbound call from any queue that can manage outbound calls in the direction of any customer, Skype for Business contact or external phone number.
- Get an agent-initiated outbound task associated with any customer in voice and email media.
Please note that administrators or supervisors can determine whether you have permission to use the The Lookup Screen screen or not. If this permission is not granted, you cannot access the features available on the Lookup screen – which induces all lookup activities listed above - despite you are able to put yourself into a Lookup state.
Going on Lookup Break
You can access the Lookup page if you are in Active state (you have no task at the moment). There are two options to place yourself into lookup state, which technically is a break: selecting the Lookup workcode (auxiliary code) and then going on break, or using the Quick Dial/Quick Email feature.
See sections Quick Dial and Quick Email on this page to learn more about these features.
Selecting the Lookup Workcode
Depending on the Popup Workcode Window agent policy set by your supervisor or administrator, you might need to select Lookup as the default workcode on the Workcodes tab first if the workcode selection window is suppressed. In this case, please ensure that the workcode shown in the title of the tab is Lookup. If not, click the Workcodes tab, then select the Lookup code, then follow the steps below. For more information on this setting, please contact your supervisor or administrator.
- Press the Break button on any media tab.
- Optional: In case the workcode selection window appears (see the related information above), select Lookup from the drop down list, then click the green check-mark.

The Lookup Screen
The Lookup screen – displayed when you are in lookup mode – can be separated into the following regions:
- Navigation menu: The Lookup page contains a navigation menu at the top left area. Clicking each menu item will expand the corresponding section on the page and the page will be scrolled to the open section automatically.
Please note that the Agent Client Application has been modified in parallel to the conversion of Microsoft Lync to Microsoft Skype for Business. Contact Expert v5.6.2 and all versions after this maintenance release include Skype for Business references.
Lookup page sections: These sections provide tools and information in different ways reflecting the various aspects of the ad-hoc outbound activities. Some sections contain a table with rows of data together with search filters and sorting. Each row can be double-clicked to pop the contents into a Contact Details page for viewing or modification.
You can have multiple sections open at the same time. The icons of the section headers are clickable: to toggle a section between collapsed and expanded state, click the icon of its header.
- Contact Search: In this section, you can search a specific customer in the contact database using a range of filters to find and review customer interactions. You can even get a task to proactively continue or complete the customer interaction.
- Email Search: This section allows the agent to look for specific emails in certain queues and campaigns. You can search emails for users, groups and lists.
- Quick Dial: Quick dial allows you to rapidly initiate an outbound call if you already know the phone number or if you wish to retrieve contact details from Skype for Business in order to call a Skype for Business user, Response Group or Contact Expert campaign endpoint.
- Quick Email: Quick email allows you to easily create outbound emails if you know the email address you wish to compose and send the email. You can send emails to users, groups and lists.
- Task History: This region will show your most recent tasks. You can even drill down to reveal contact details and get a task to proactively continue or complete the customer interaction.
- Rescheduled Tasks: This is the section where you can view all the rescheduled tasks assigned to you (e.g. callback requests registered in the system and waiting for calling back). You can even initiate the interaction proactively any time before the specified schedule date and time.
The following chapters describe the usage of the mentioned four page sections in details.
Skype for Business lookup control: An embedded SfB search control can be found at the top right area of the screen. This control helps you to search for any SfB contact and get any of the addresses from the contact card (find the details below).
You can hide or show the panel any time by clicking the Hide Skype for Business or Show Skype for Business button placed at the top right corner.

Contact Search
In this page section, you can retrieve contact records by using a wide range of filters. It contains the following basic filter fields:
- Campaign/Queue: The name of the queue or campaign.
- Agent: The name of the agent who interacted with the customer last time.
- Session State: The status of the customer interaction (e.g. Remaining, Closed, Callback etc.).
- Major Code: The session's major technical closure code.
- Minor Code: The session's minor technical closure code.
- Start Time: Returns contacts that are in remaining or postponed state and need to be dialed out before the specified date -interactions on the given date are not included.
- Contact Name: The name of the customer.
- Phone Number: The phone number of the customer.
- Email Address: The email address of the customer.
You can also use campaign specific contact related data (CRDS) fields. Check the Show More Fields checkbox to show these additional filter fields (if available).
Since these extra filter fields are campaign specific, you also need to select a campaign or queue to make them visible. However, it is possible that no CRDS field exists for the selected campaign, so no additional field will appear.
Several filters are drop-down lists where you can select a value from a predefined list, others are text-field boxes where you can type any free text. All these fields are case-insensitive. This means, for example, if you enter john smith, all records containing John Smith, john smith, JOHN SMITH etc. will be retrieved.

Searching for Contacts
Click the Search button to perform a search.
The contact records satisfying the search criteria will appear in a table under the search form. The results can be sorted and filtered per column. Also, you can use the general search field to filter the results across all columns. You can navigate between the table pages, as well as you can set the number of entries to be shown per page.
If you double-click any row in the table, a Contact Details screen will be popped up containing all details related to the selected contact record.
Please read Managing Contacts article to learn more about the Contact Details screen.
Clearing the Search Form
Click the Clear button to delete every search criteria. Then all filter fields will be reset.
Creating New Contacts
If you have not found the customer you were looking for, you can create a new contact record by clicking the New Contactbutton.
Please visit Managing Contacts page to learn how to add new contacts to Contact Expert.
Email Search
The Lookup page includes an email search function. Agents can easily find emails by specifying various filtering criteria.
Navigate to the Email tab.
Use the Quick Email button to open the Lookup page.
Click on the Email Search button.
Specify the preferred search filters.
Click on Search to perform the lookup.

Search Filters
The Email Search function offers a range of filtering options which are the following:
| Campaign/Queue | Choose the campaign or queue where the lookup should be performed. |
| Start Time | If the information is available, enter the start time of the email task to narrow down the search results. |
| Email Address | Specify the email address of the specific task. |
| End Time | If the information is available, enter the end time of the email task to narrow down the search results. |
| Subject | Enter the subject of the email. |

The search results will display several pieces of information in the form of a list.
| Date | The date and time when the email task has been sent. |
| Email Address | The email address of the contact. |
| Contact Name | The full name of the contact. |
| Subject | The topic of the case. |
| Campaign/Queue | The queue used to send or receive email. |
| Agent | The name of the agent handling the email task. |
| Direction | Whether the email task is inbound or outbound. |
Viewing Emails
You have the option to view an email from the list of search results without opening an email task for it. The email can be viewed by clicking on it from the list of search results.
Email Extract
The first 150 characters of the email body is displayed when viewing them in the search list.
In case CE is upgraded from a version before 5.10, and there are existing emails in the system, a cache needs to be built manually of these email extracts using the Set-CEEmailExtract CE powershell cmdlet. This needs to be performed a single time only as all new emails will automatically use the cache. This email content cache was introduced to significantly speed up Email Search operations.
For further details on the cmdlet please read the PowerShell Commands Commands article.
How to view an Email
Navigate to the Email tab and click on the Quick Email button.
The Lookup form will appear.
Use the Email Search button to initiate an inquiry.
Enter the preferred search criteria and hit Search.
Select an email item from the list of search results and single click on it.
The email body will be displayed in an expanded mode within the same page. The email is displayed in either plain text or HTML text.
Responding to Emails
You have the option to respond to an email from Lookup mode after getting the list of search results. There are 3 possibilities to choose from: Reply, Reply All and Forward. You will be directed to a new task in each case, and the task will be associated with the Campaign and Contact details automatically.
How to respond to an Email
Navigate to the Email tab and click on the Quick Email button.
The Lookup form will appear.
Use the Email Search button to initiate an inquiry.
Enter the preferred search criteria and hit Search.
Select an email item from the list of search results and single click on it.
The 3 options to action on an email will appear under the subject line of the email item.
| Reply | The original email body will be inserted into the email editor as a quoted section. Only the sender's email address will be added as the recipient. |
| Reply All | The original email body will be inserted into the email editor as a quoted section. All recipients of the original email (including the sender's and all the addresses in CC) will be added as the recipients. |
| Forward | The original email body will be inserted into the email editor as a quoted section with no predefined recipient. |
Action buttons are visible and accessible for emails if the campaign is running and available. If the Campaign is closed, not running or deleted, these actions will not be feasible.
If the Contact does not exist in the database, a new contact entry will be created.
Quick Dial
Use this section to dial any Contact Expert contact, Skype for Business
user, campaign endpoint, response group or external PSTN number in
an ad-hoc manner. The Quick Dial section contains the following input
fields:
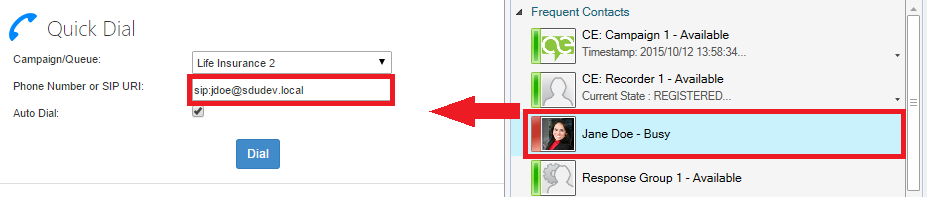
Campaign/Queue: The name of the Contact Expert queue or campaign managing the outbound call which will be initiated.
Phone Number or SIP URI: The phone number or Skype for Business address which will be the destination of the initiated call.
Auto Dial: Check if you want to start the dialing automatically when clicking the Dial button or allow the agent to dial the contact manually.
In auto dial mode, the ad-hoc call will be similar to a progressive outbound task while the manual dialling mode is similar to a preview outbound task.
The default value is determined by the selected campaign. The auto dial preference is specified for each campaign and queue through the Contact Expert Administration interface by your administrator or supervisor. The checkbox will be checked or unchecked by default according to this setting. However, you can overwrite the default behavior if desired as the state of this checkbox can be changed freely.
This option is available only if you are signed in to voice media.
The same Lookup screen will be loaded as if using the Break button to go on the lookup break. The only difference is that you will jump automatically to the Quick Dial section (see below) directly on the loaded screen.
To initiate the call:
Press the Quick Dial button on the Voice media tab.
Select a campaign from the drop down list.
Enter the phone number or SIP URI to be dialled.
You can either type it via your keyboard or using the on-screen popup dial pad.
Moreover, you can insert the address of any Skype for Business contact into this field using the Skype for Business search control (for further information, please read the next chapter).
Optional: If you would like to change the predefined auto dial preference, check or uncheck the checkbox accordingly.
Click the Dial button.


Using the Skype for Business Lookup Control
The SfB lookup control helps you to find a SfB contact and get any contact address for the Quick Dial feature. If the panel is hidden, click the Show Skype for Business button first.
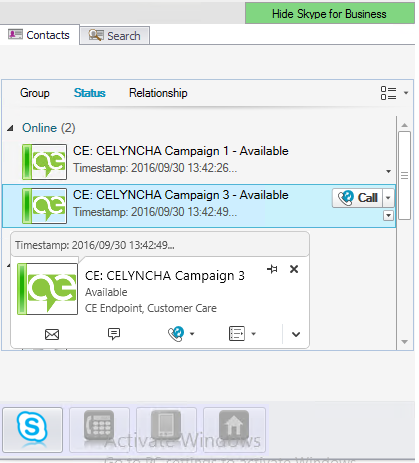
Browsing Skype for Business Contacts
The Skype for Business lookup panel's 'Contacts' tab enables you to browse your Skype for Business contacts within the agent client application. Basically, this is your Skype for Business contact list embedded in the agent client application. The interface is similar to your Skype for Business client, so you can use the embedded control in the same way.
The contacts can be viewed by group, status and relationship – as in your Skype for Business client at the desktop. If you found the contact you have searched for, click on the name then select the desired destination in the bottom bar. You can choose one from the Skype for Business, work, mobile and home address if available.
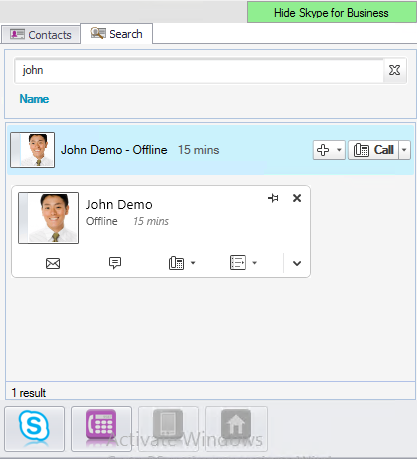
Searching for Contacts in the Global Contact List
On the Search tab you can perform a global search for a contact. Type the name of any kind of contact (Skype for Business user, Skype for Business Response Group or Contact Expert queue/campaign endpoint), then select the desired contact from the result list and select a destination number in the bottom bar.
Inserting the Skype for Business Contact's Address
The Phone number or SIP URI input field will be filled with the selected address automatically.
If no destination has been selected manually, the Skype for Business address is going to be inserted by default (this is the first option in the bottom bar).
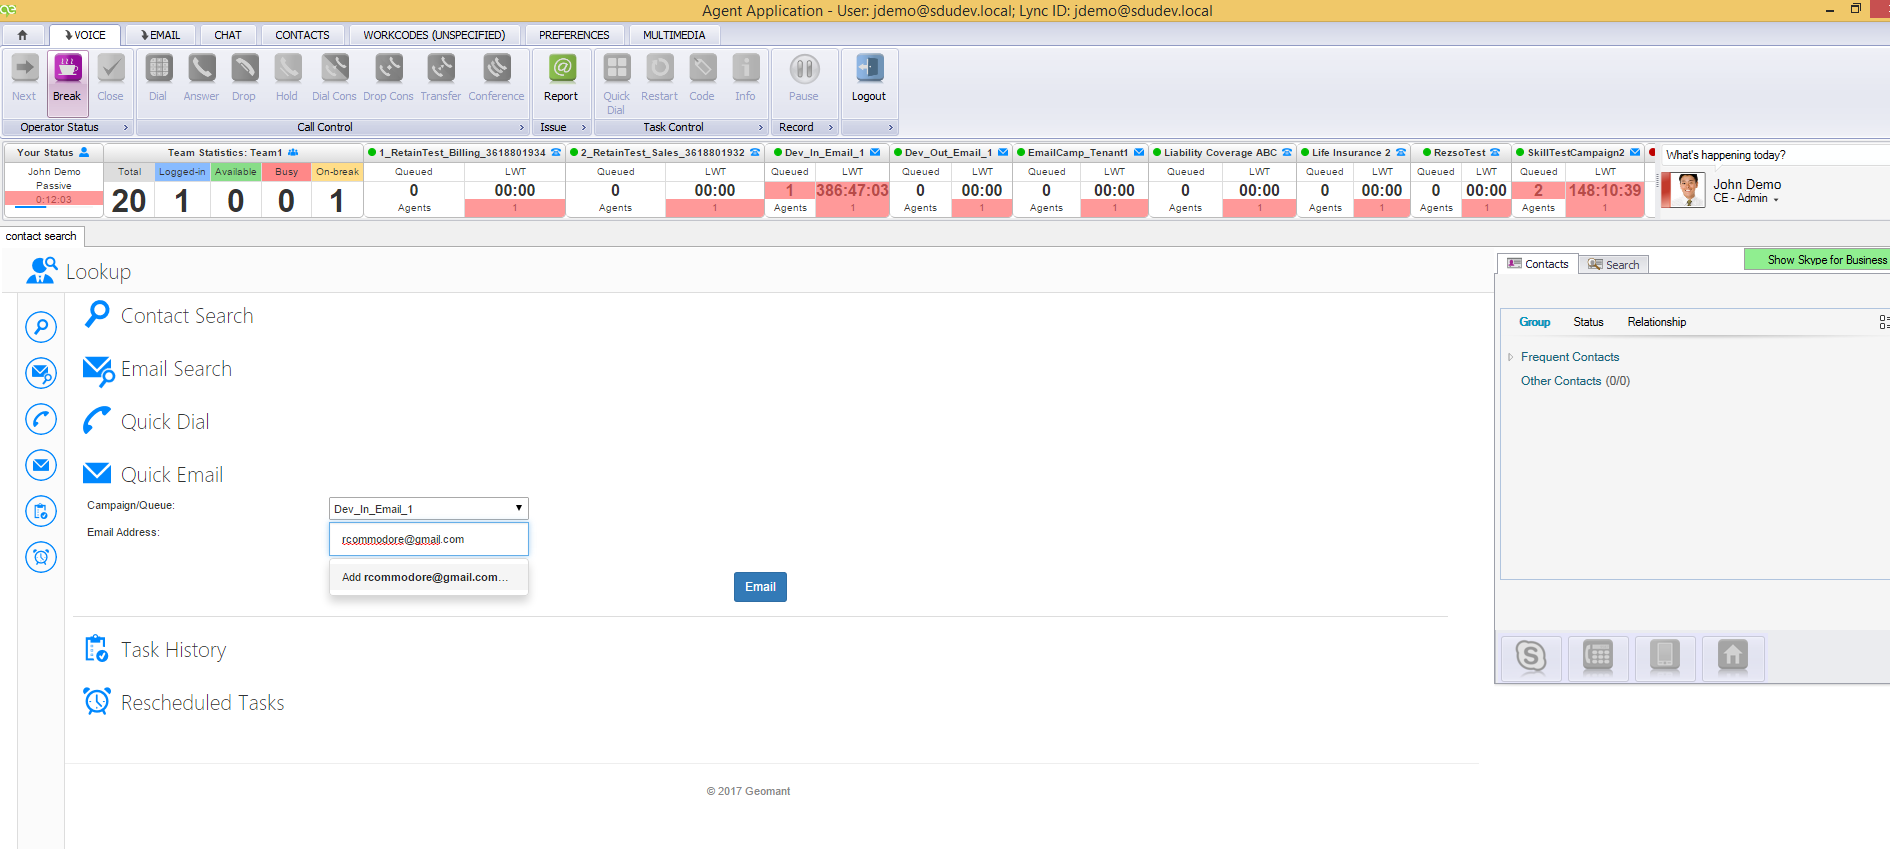
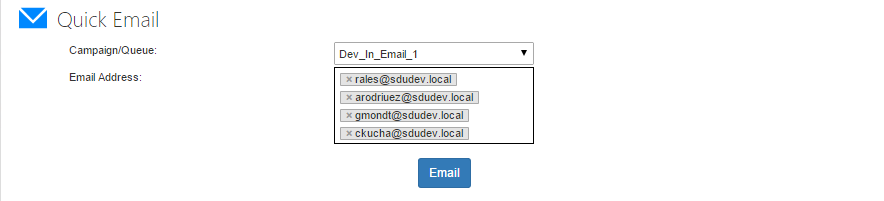
Quick Email
Agents can initiate an outbound email task from the Email tab.
Navigate to the Email tab.
Use the Quick Email button to create a new email task.
The Lookup page will appear.
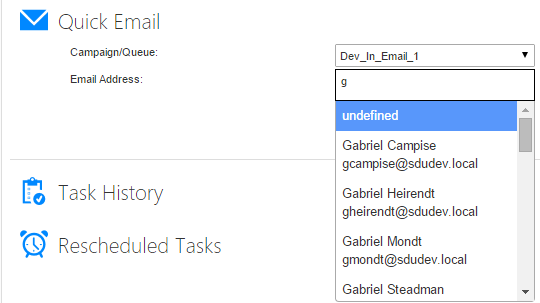
Choose the campaign in question and start entering the contact's email address. You can enter more than one address, the contacts will be listed in rows.
One second of delay is needed for the application to load the
contacts.
Maximum 10 visible rows are displayed, the rest can be viewed by
scrolling.

Use *Enter* in order to add an email address to the list, and
*Backspace* to remove it.
Click on Email to open the mail editor form.
Compose the mail and finish the task following the basic process of task handling.

The contact search uses the Address Book service that enables corporate directory service integration. The agents can lookup email address and name from the following objects:
- Users
- Groups
- Distribution Lists
These results are displayed in the form of a list while entering the details in the To, Cc, Bcc input fields. The application queries all results based on the input.
Filtering is case insensitive and performs a 'begins with' search in both names and email address.
The Address Book service presents email address details only from the associated tenant of the agent.
Task History
In this section you can review the contact records associated with your most recent tasks.
The task history is shown as a table and the results can be sorted and filtered per column. You can also use the general search field to filter the results across all columns. You can navigate between the table pages, as well as you can set the number of entries to be shown per page.
If you double click any row in the table, a Contact Details screen will be popped up containing all details related to the selected contact record.
Please read Managing Contacts article to learn more about the Contact Details screen.

Rescheduled Tasks
Use this section to review your scheduled outbound tasks.
The list of the pending callbacks and other scheduled tasks is displayed in a table. The table contains the most important details about the last interaction (date and time, agent, business tag etc.) and the next interaction (e.g. schedule time and preferred agent to deliver the task to).
The results can be sorted and filtered per column. You can also use the general search field to filter the results across all columns. You can navigate between the table pages, as well as you can set the number of entries to be shown per page.
If you double click any row in the table, a Contact Details screen will be popped up containing all details related to the selected contact record.
Please read Managing Contacts article to learn more about the Contact Details screen.
Items will only appear in Rescheduled Tasks list if their distribution type is either Only me or Prefer me and the target agent is the current agent. In other words, rescheduled tasks filed with the Anyone distribution type do NOT show up for any agents except for the one who last handled it. This will keep the list unclutterred by only presenting items that are directly dedicated to the target agents.
The list displays the rescheduled tasks with different background colors, which demonstrate the different statuses of the tasks.
| Red | Red background indicates the rescheduled task is expired. |
| Yellow | Yellow background indicates the rescheduled task is delayed. |
| Green | Green background indicates the rescheduled task is due. |
| Neutral | No background color indicates the rescheduled task is scheduled. |
The colors are only indicators of importance.
Getting the Outbound Task
You may see the term 'get task' while performing ad-hoc outbound activities. Whenever you initiate an outbound activity or get served a callback request automatically, Contact Expert will pass a task to you.
Read this chapter for further details on tasks.
You can set Contact Expert to deliver a task to you from the Contact Details page.
Please read Managing Contacts article to learn more about the Contact Details screen.
You can open Contact Details from the Lookup page by double clicking a table row of a contact record either in the Contact Search, Task History and Rescheduled Tasks list. The Contact Details page will be popped up in a modal window containing all contact related data like name, email, phone numbers and other campaign specific data.
Another option to get a task is to press the Dial button in the Quick Dial section on the Lookup page.
You have different possibilities regarding getting the task depending on the media type of the queue or campaign the contact belongs to:
- Voice: You are enabled to call the customer.
- Email: You have the ability to write an email to the customer.
- Chat: You are not able to initiate an outbound chat session.
Initiating an Outbound Call
There are two options to get an outbound voice task:
To use the Quick Dial method:
Navigate to the Quick Dial section.
Select a voice campaign from the drop-down list.
Specify the phone number to be dialled.
Click the Dial button.
The voice task will be passed to you.
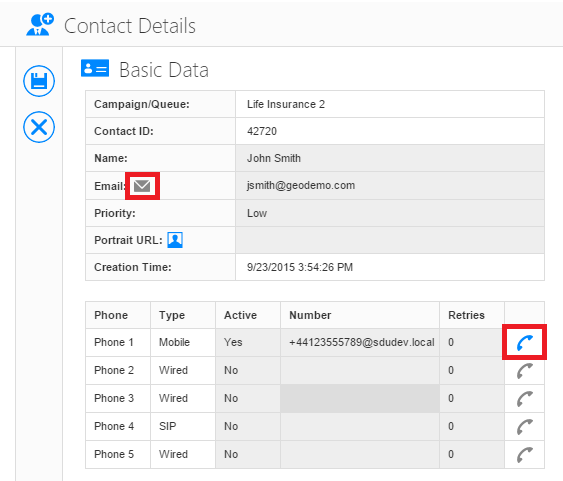
To use the Contact Details method:
Open the Contact Details page of the desired contact as described Getting the Outbound Task.
Click the blue phone icon next to the phone number to be dialled.
It may happen that all icons are grey. This means the feature is disabled for some reason (e.g. the media type of the campaign is not voice, no phone number is specified or you are not logged in to the skill assigned to the campaign).
The voice task will be passed to you.
Initiating an Outbound Email Task
To use the Contact Details method:
Open the Contact Details page of the desired contact as described Getting the Outbound Task.
Click the blue envelope icon next to the email address of the contact.
It may happen that the email icon is grey. This means the feature is not available for some reason (e.g. the media type of the campaign is not email, no email address is specified or you are not logged in to the skill assigned to the campaign).
The email task will be passed to you.
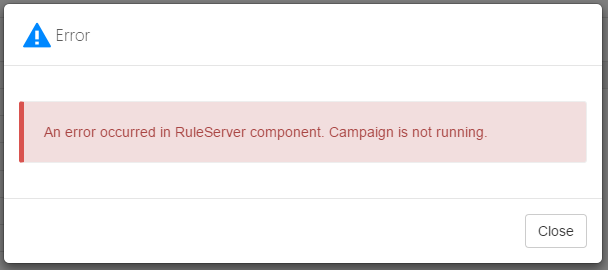
Understanding the Get Task Errors
If the task cannot be passed to you, a modal error message will be displayed. The message informs you about why the operation was unsuccessful. Some of the possible reasons are:
- The campaign does not exist.
- The campaign is not running.
- The campaign is closed (out of business hours or business days).
- The campaign is not started yet or has already been ended.
- You do not have the sufficient skill for the campaign.
To close the modal window, click the Close button.
If passing the task fails at the first time, it is recommended to retry to get the task after a few seconds or minutes. Sometimes there is no specific failure reason and the next try might be successful.
Outbound Agent Scripting
Such as in inbound case, it is possible to create scripts for the agents and collect structured data from the customers. Scripting assists the effectiveness of the outbound work flow by guiding the agents through the customer interaction to ensure all business objectives pertaining to the interaction are met.
Whether working on an outbound campaign or performing ad-hoc outbound calls on behalf of an inbound queue, Contact Expert automatically provides you with the campaign script or data form (if optioned in your contact centre) associated with the customer interaction.
In preview mode, you can review all the customer related information before initiating the conversation. In case your contact centre works with the progressive outbound dialling strategy, then the outbound conversation will be started automatically at the moment you receive the customer related information. The outbound dialling strategy is configured by your supervisor or administrator.