Managing Contacts
Contact Expert v6.1 for Skype for Business Server
Contact Management Screens
The following table lists the web screens that can be used for administering customers and retrieving customer interaction details, and how the screens can be accessed:
| Screen | Embedded(1) | Popup Window(2) |
|---|---|---|
| Contact History | ||
| Contact Details | ||
| Searching and Managing Contacts | ||
| Replacing the Contact | ||
| Printing Contact Data | ||
| Agent Scripts |
- (1) The screen is loaded into an embedded frame in the Web Content or the Script area of the main window automatically. These areas are visible if the Agent Client Application is used in full screen mode.
- (2) The screen can be displayed in a popup window by clicking the Toolbar button manually. These windows can be shown either in full screen mode and toolbar mode.
For further information on the main window layout and display modes, please visit Contact Expert Agent Client Application at a Glance page.
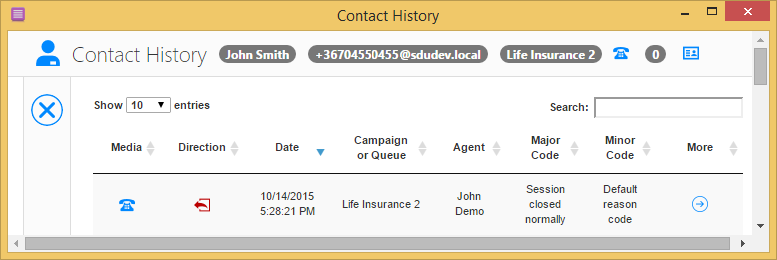
Contact History
Contact History is one of the most important screens in Contact Expert Agent Client Application. In full screen mode, it is automatically loaded into the middle area of the main window each time you get a new task.
Customer Information Bar
The top section of the Contact History screen shows the most essential customer and campaign related details from left to right:
- The name of the customer (if no name has been specified, INBOUND_CONTACT or OUTBOUND_CONTACT is shown)
- The phone number (in case of voice campaign) or email address (in case of email or chat campaign) of the customer
- The name of the queue or campaign
- The media type of the queue or campaign
- The number of unsuccessful outbound calls (how many times the customer could not be reached so far)
- View and edit contact details button (clicking this button loads the Contact Details screen)
If you are not sure what kind of information is displayed in a badge, hold your mouse pointer over the badge and a tooltip will appear to help you.
You can copy any data (e.g. phone number) to the clipboard by selecting the text in the badge and pressing Ctrl + C.

Quick Contact Details
The first badge showing the name of the customer is clickable. To get more details about the customer, click the badge. Additional contact data (e.g. email address, landline or cell phone number, SIP URI, etc.) will be displayed in a modal dialog. To close the dialog, click the Close button or click out of the dialog.

Email Editor
The Email editor allows the agent to contact the customer via email right from the contact history page. This is a convenient way of getting in touch with the customer, since every relevant information is available regarding the specific task - in a single click.
Click on the Email button to open the embedded email editor and compose the text.
This function is only available if it is enabled on the Preferences tab within the Agent Client Application. Email Preferences in the Agent Client Application

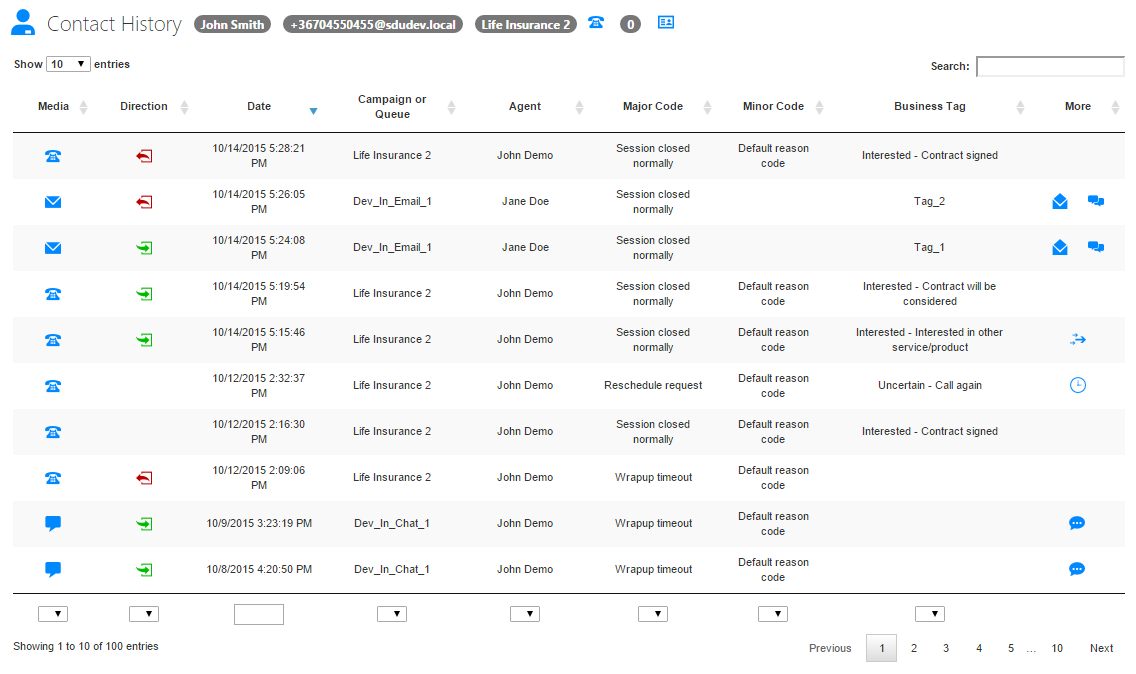
Customer Interaction History
Below the information bar you can find the table containing the historical records.
The records can be sorted and filtered per column by using the criteria fields at the bottom of the columns or change the ordering of the rows by clicking the headers. You can also use the general search field to filter the results across all columns. You can navigate between the table pages, as well as you can set the number of entries to be shown per page.
The table has the below columns:
- Media: The media type of the customer interaction. It can be voice, email or chat.
- Direction: The direction of the customer interaction. It can be inbound, outbound or unspecified (empty).
- Date: The date and time of the customer interaction.
- Campaign/Queue: The name of the inbound queue or outbound campaign which managed the customer interaction.
- Agent: The name of the agent who handled the Contact Expert task associated with the customer. It can be empty if no agent was involved e.g. the customer dropped the line while waiting in the queue.
- Major Code: The major technical closure code (reason code) of the interaction set by Contact Expert automatically or by the agent manually.
- Minor Code: The minor technical closure code (detailed reason code) of the interaction set by Contact Expert automatically or by the agent manually.
- Business Tag: The result of the customer interaction from the business's perspective. It can be empty if no business tag was specified by the agent.
- More: It is a special column containing icons indicating extra information. Clicking them brings up the Record Details modal dialog.
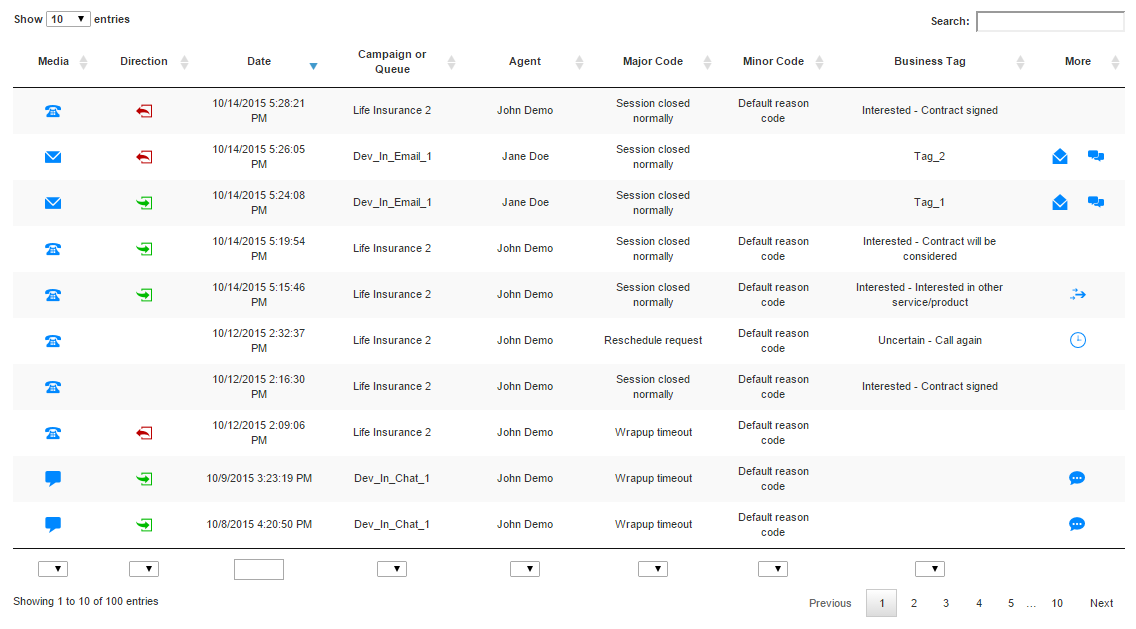
The Media, Direction, Date and More columns are always displayed, the others (Campaign/Queue, Agent, Major Code, Minor Code and Business Tag) are automatically hidden or shown depending on the width of the window or screen.
The meaning of the icons shown on the Contact History page are explained in the following table:
Icon
Description
Media Types
- Voice
 {.image-center}
The interaction was a voice call.
 {.image-center}
The interaction was an email.
- Chat
 {.image-center}
The interaction was a webchat session.
- Comments

Free-text comments belong to the interaction.
Directions
- Inbound
 {.image-center}
The customer initiated the interaction.
- Outbound
 {.image-center}
The agent initiated the interaction.
Record Details
- Callback Info
 {.image-center}
The task has been rescheduled e.g. a callback has been registered. Click the icon to show the details.
- Follow-up Info
 {.image-center}
The customer was transferred to another agent or queue. Click the icon to show the details.
- Message Info
 {.image-center}
In case of email record, there is additional information about the sender and the recipient. Click the icon to show the details.
- Hidden Table Columns
 {.image-center}
There are table columns that are not displayed on the screen, but contain additional information about the interaction such as callback, follow-up or message details. Click the icon to show the details.
- Email Details
 {.image-center}
In case of email record, you can view the email received from the customer or sent by the agent who replied to the customer by clicking the icon.
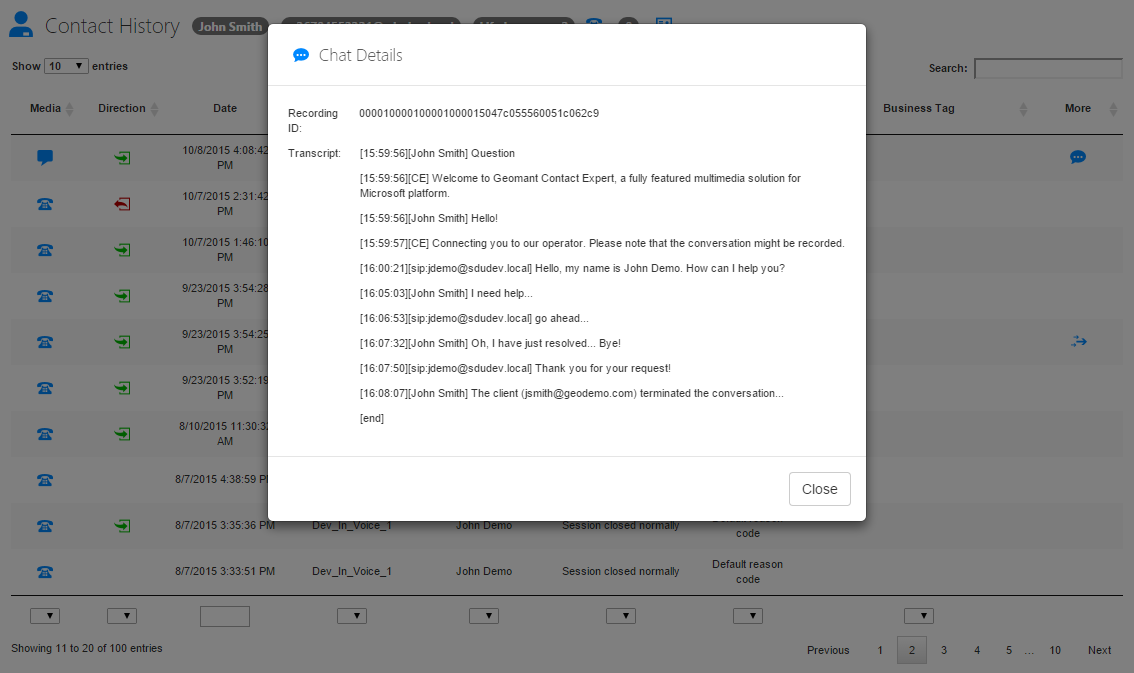
- Chat Details
 {.image-center}
In case of chat record, you can view the transcript and the recording ID of the conversation by clicking the icon.
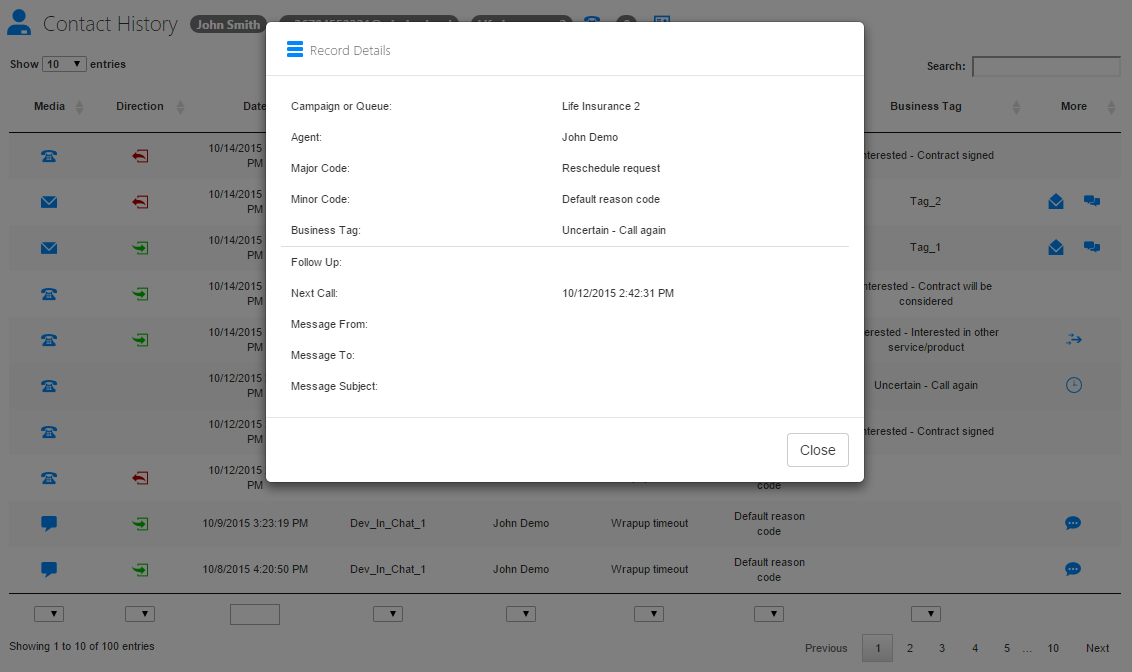
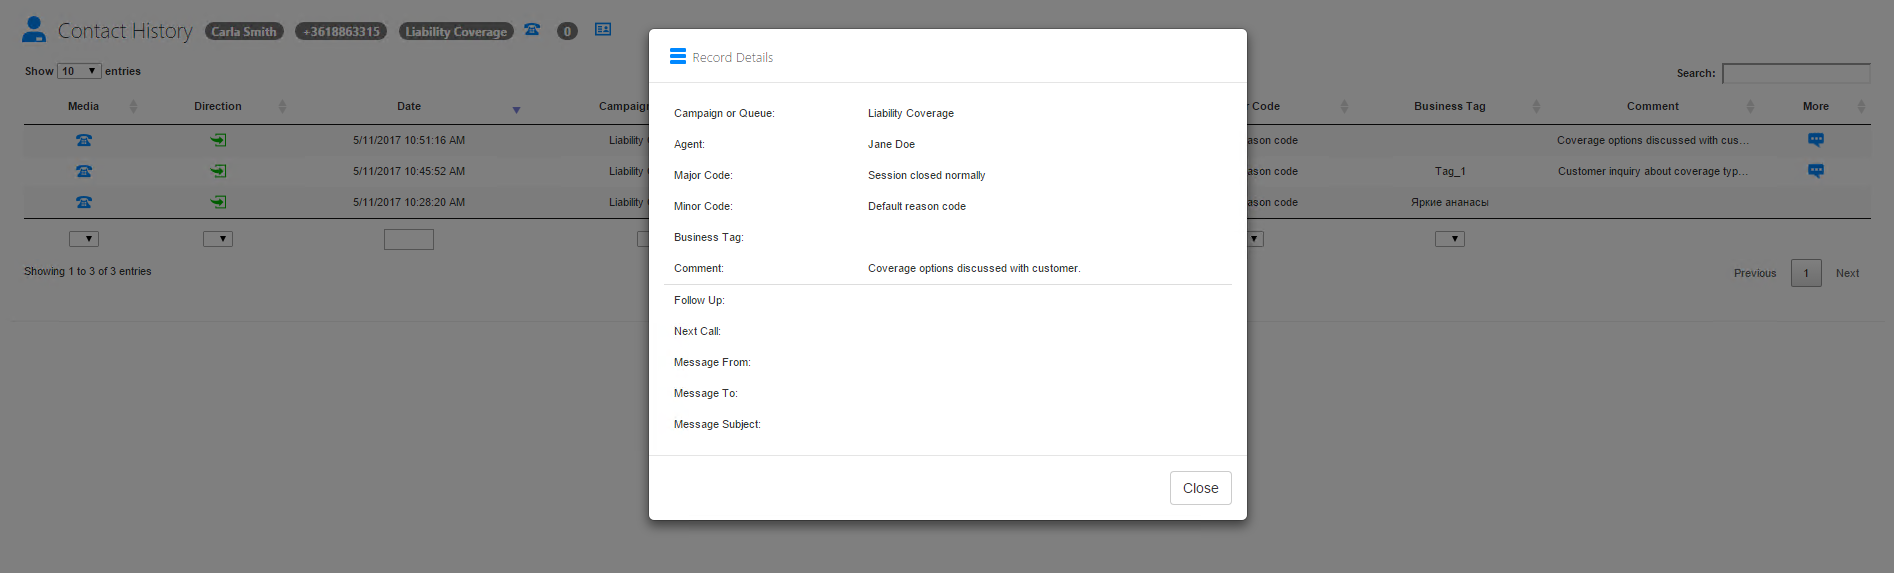
History Record Details
All icons in the More column are clickable. To get more details about a
specific customer interaction, click one of the following icons:
.
Additional history record data (e.g. information about call transfer,
rescheduling, email sender, recipient and subject, etc.) will be
displayed in a modal dialog. To close the dialog, click
the Close button or click out of the dialog.
The following extra fields are shown in the Record Details dialog:
- Follow Up: It contains transfer details in a given format:
[destination];r=[reason];o=[outcome].
- Destination: The phone number or SIP URI of the transfer destination (e.g. Contact Expert queue, another agent or consultant).
- Reason: Why the customer was transferred (it can be overflow if the queue size limit has been reached and Contact Expert initiates the transfer automatically or consult in case of manual transfer initiated by an agent).
- Outcome: Whether the transfer was successful (OK) or not (failed).
- Next Call: The scheduled time of the interaction has been rescheduled (e.g. a callback has been registered by the customer or an agent).
- Message From: The email address of the sender in case of email records.
- Message To: The email address of the recipient in case of email records.
- Message Subject: The subject of the email in case of email records.
The dialog also shows the content of the Campaign/Queue, Agent, Major Code, Minor Codeand Business Tag columns from the table as these columns might be hidden.
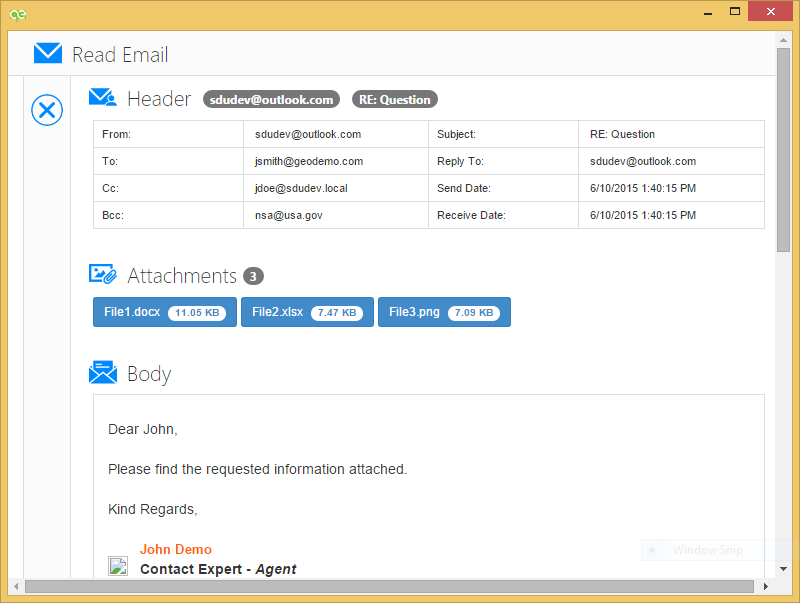
Viewing the Email Interaction History
Any previous emails exchanged with the customer (either received from or
sent to) can be reviewed in the customer interaction history section.
These are available for review on-demand, so if you need to open and
read any previous email, simply click the
icon to open it.
The email will be displayed in a popup window titled Read Email.
Please review the Viewing Received Emails section of the Working with Emails article to learn more about the Read Email screen.
Viewing the Chat Interaction History
The chat sessions can be reviewed in a similar way. The transcript of the instant messages is saved for every chat session, so it can be reviewed as well as the emails. Click the icon to view a transcript. A modal dialog containing the recording ID of the conversation and the transcript will appear. Click the Close button or click out of the dialog to close it.
Viewing the Comment History
All comments related to the contact entry can be reviewed. Click the
icon to view the
comments within the Contact Details section.
You can add new comments to the contact during task handling.

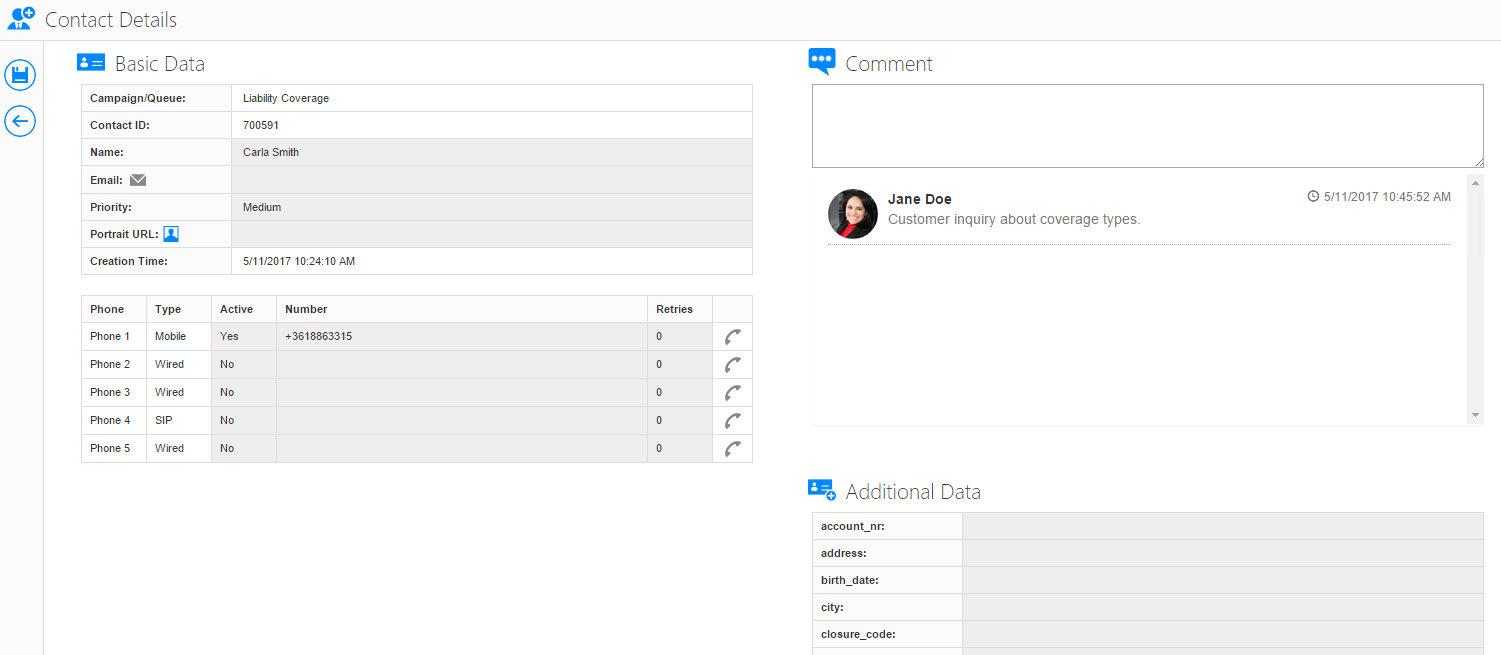
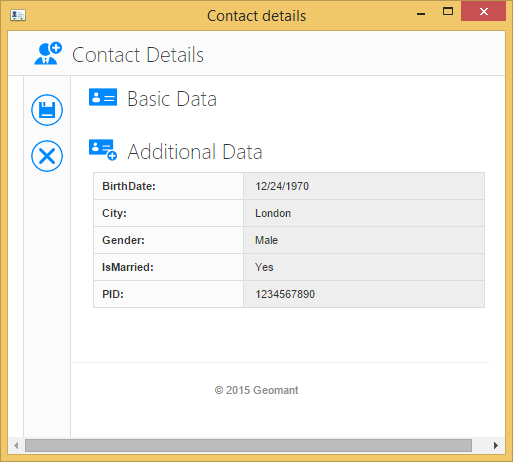
Contact Details
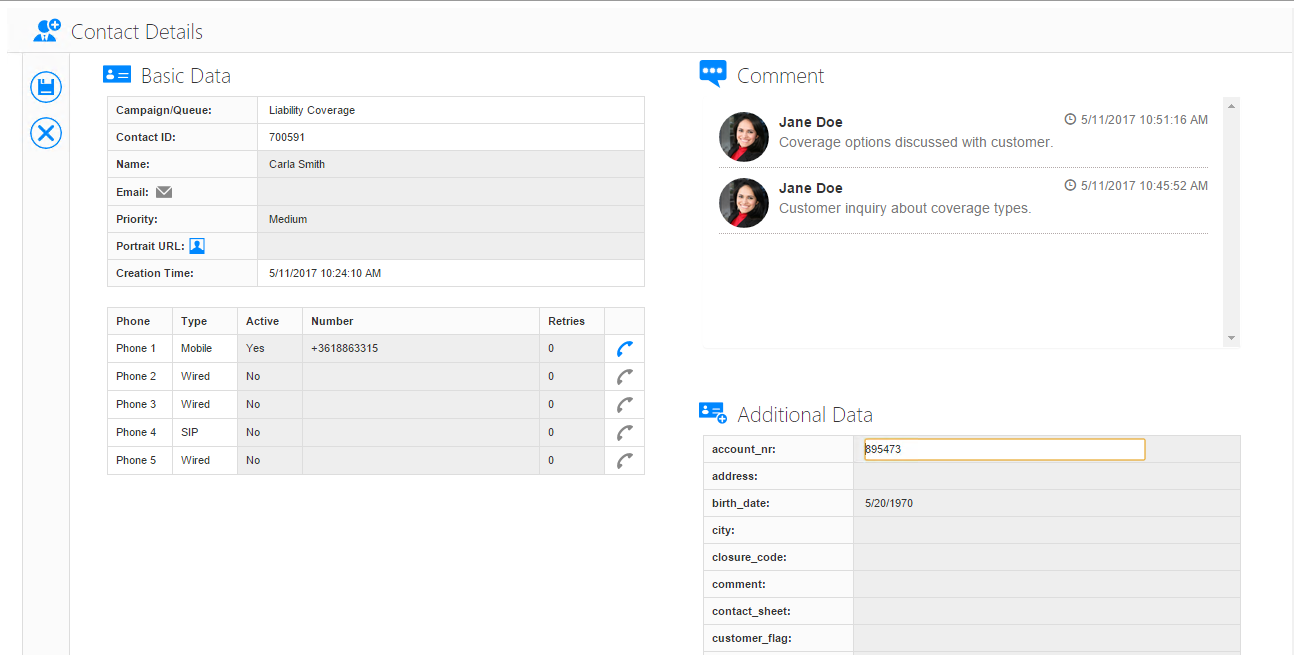
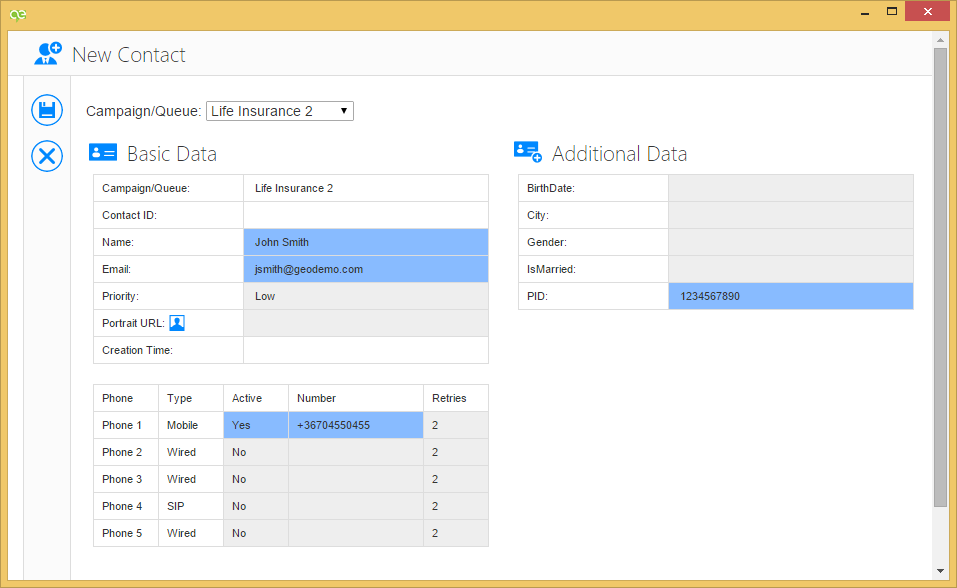
The Contact Details page showing all customer related data is parted into two sections: Basic Data and Additional Data. Both sections can be expanded or collapsed by clicking the icon in the header. Depending on the screen or window width, the sections are arranged vertically or horizontally.
Basic Data shows the following contact details:
Campaign/Queue: The name of the inbound queue or outbound campaign which manages the interactions with the customer.
Contact ID: A unique identifier which identifies the customer in Contact Expert.
Name: The name of the customer (if no name has been specified, INBOUND_CONTACT or OUTBOUND_CONTACT is shown).
Email: The email address of the customer.
Please read the Getting the Outbound Task section of the Ad-hoc Outbound Activities article to learn more about the functionality of the
 icon next to the email
address.
icon next to the email
address.Priority: The priority of the customer (low, medium, high or top).
Portrait URL: The URL of the customer's profile picture. You can view the picture by holding the mouse pointer over the
 icon
iconCreation Time: The date and time when the contact record was created.
Phone Numbers: It lists the individual phone addresses (numbers or SIP URIs) added to the contact record.
- Type: The type of the number (wired, mobile or SIP).
- State: A phone number can either be Active, Inactive or Excluded.
- Number: The customer's phone number or SIP URI.
- Retries: The maximum number of retried call attempts. If the number of unsuccessful call attempts exceeds this threshold, the system automatically inactivates the given phone number and switches to one of the active ones.
Please read the Getting the Outbound Task section of the Ad-hoc Outbound Activities article to learn more about the functionality of the
 icon next to the phone
address.
icon next to the phone
address.
The Additional Data section contains all campaign specific contact data.
Contact related data set (CRDS) is specified by your supervisor or administrator for each campaign separately, therefore the structure of the data set can be different. It is also possible that no CRDS field is added to the campaign; the Additional Data section is empty in this case.
The value of a CRDS field can be a number, string (text), boolean (true or false), date, time or selection.
The Comments section contains all related comments assigned to the specific contact.
Viewing Contact Data
The Contact Data screen is available from many other pages (e.g. Contact History, Lookup, etc.) or from the toolbar, as well.
Even if you are not able to edit (see below), you can still view the contact details.
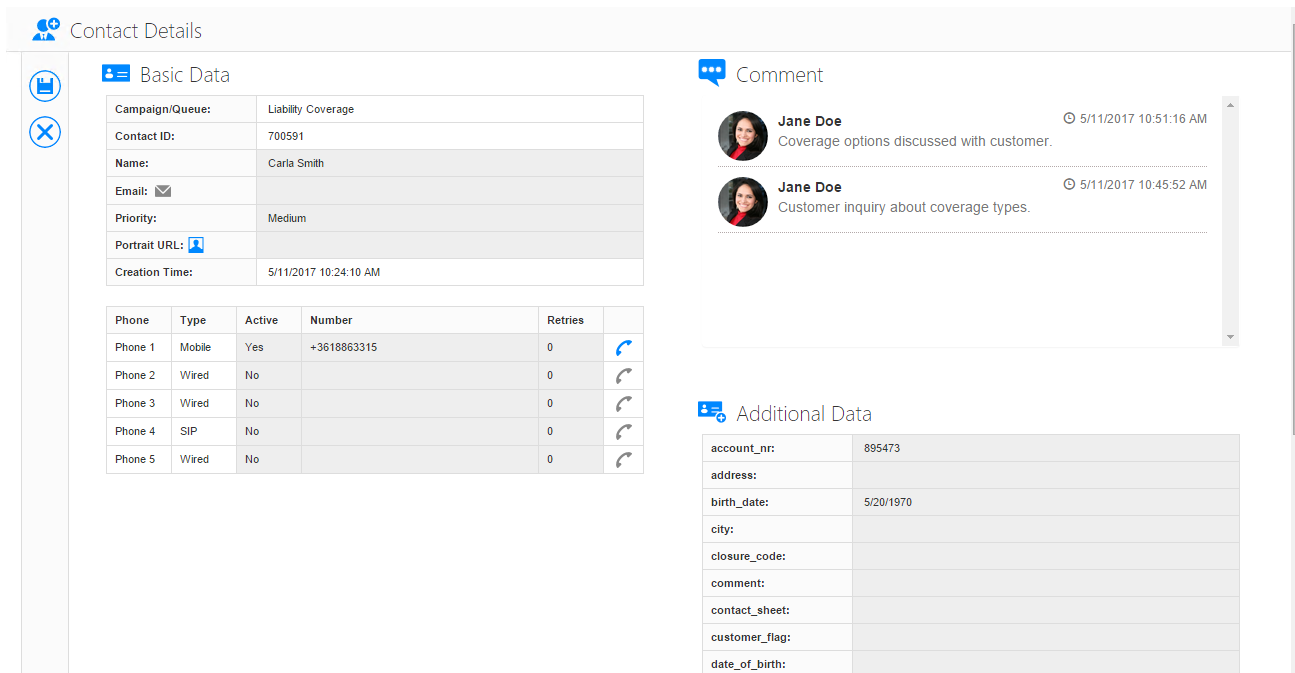
Editing Contact Data
Administrators or supervisors can determine whether you have permission to modify the contact data or not.
If you have the permission, you can edit all the fields allowed to be modified by agents. The editable fields have a light GREY background.
To modify a contact data, double click the light grey area. The field will switch to an editor mode where you can specify the new value. Click out from the editor area to return to the view mode.
You can also use keyboard shortcuts to speed up the operations. In editor mode, press Enter or Esc to get back to the view mode. If you press Enter, the new value is retained in the field. If you hit Esc, the original value will be restored.
Note that the background of the modified data is GREY by default, but if you have entered an incorrect value, the background turns to RED.
Modified data will not be saved automatically, you need to click
the  icon to save all
changes.
icon to save all
changes.
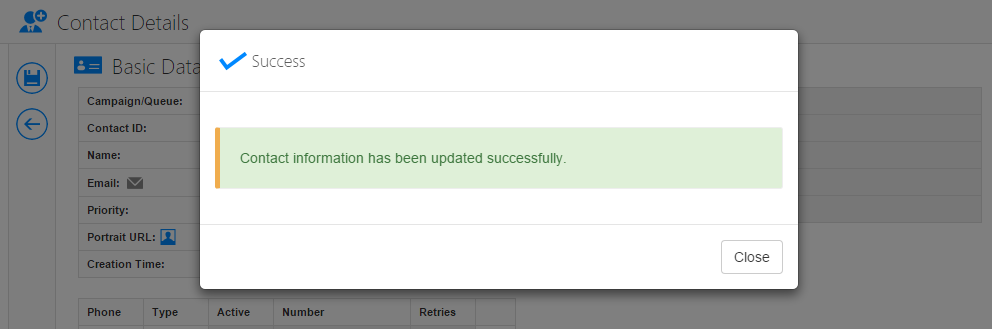
If all changes made were acceptable and the operation was successful, a success confirmation message will appear. Click the Close button to hide the message.
If any given value was incorrect or any value could not be saved, an error message will be shown referring to the deficiencies (e.g. a required field is empty or a date has an incorrect format). Click the Close button to hide the message, modify the wrong data then try to save the changes again.

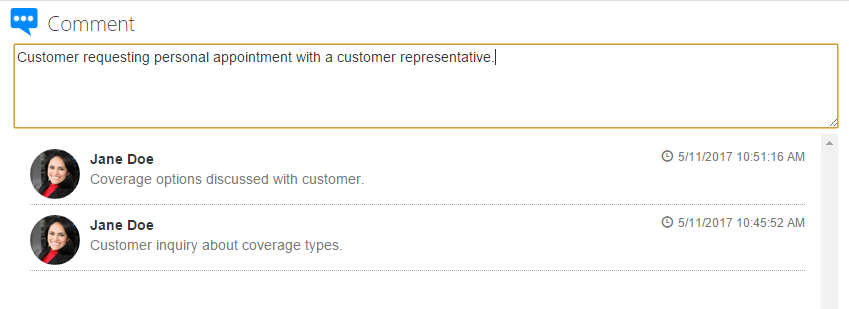
Adding Comments to Contact Data
It is possible to add new comments to an existing contact data during task handling.
Use the View/Edit Contact Details button to open the Contact Details form.
Enter your statement in the Comments section and save the entry.
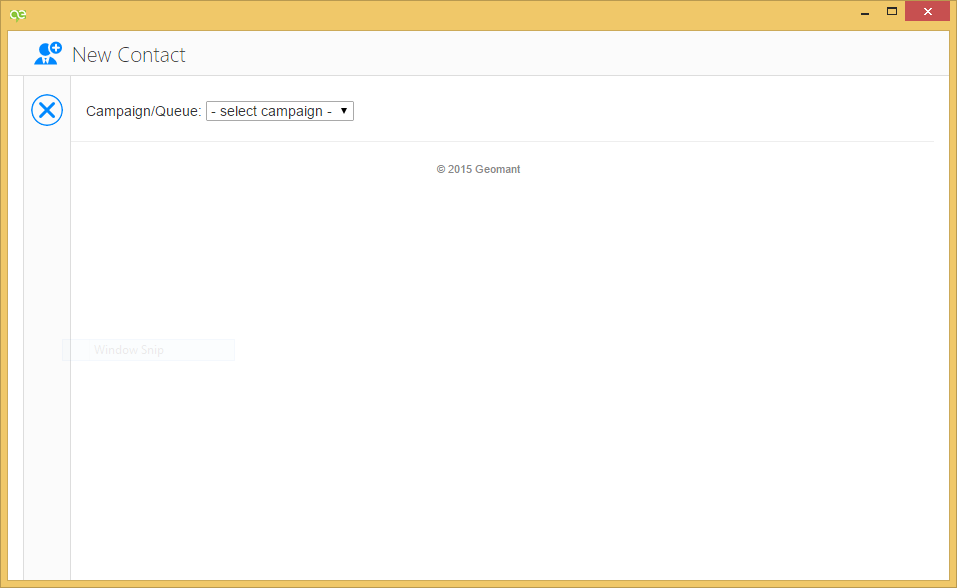
Creating New Contacts
Administrators or supervisors can determine whether you have permission to add new customers to Contact Expert or not.
Once you have reached the New Contact page, first you need to select a campaign or queue to which the customer will be assigned. After you have selected the campaign from the list, an empty data sheet will be loaded containing all campaign specific fields.
Fill the necessary fields appropriately then click
the icon to save all
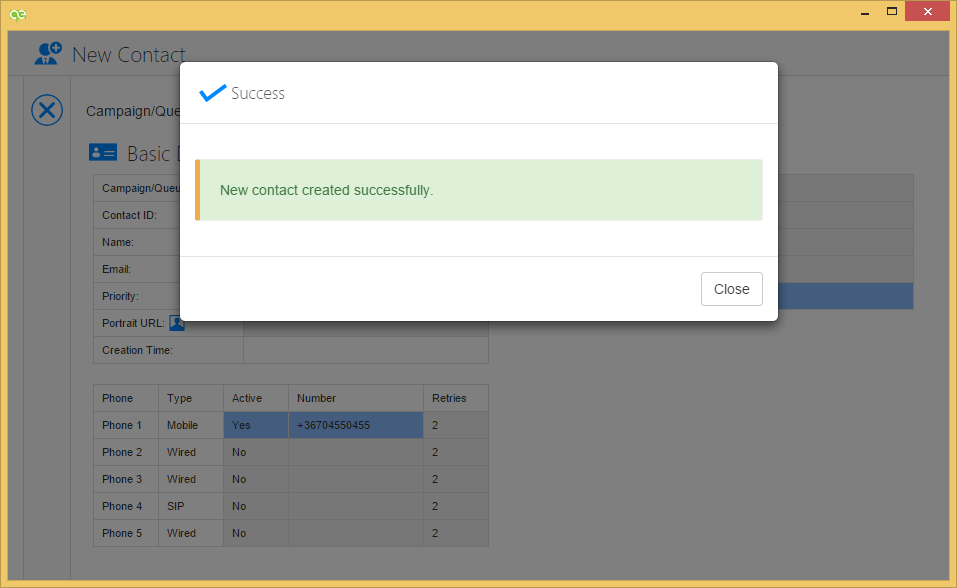
changes. If the contact has been created, a success confirmation message
will appear. Click the Close button to hide the message.
In case of the contact could not be created for some reason, an error message will be shown referring to the deficiencies. Click the Close button to hide the message, modify the wrong data then try to save the changes again.
Contact Replacement
Sometimes a customer calls in to the contact centre using another phone or initiates a call from an organization that has a central PSTN number for all of their outbound calls. In other cases, a customer sends an email from an email address which has already been used by another customer previously. Contact Expert recognizes the calling numbers and email addresses and associates those with contact records. However in this scenario the contact data provided by Contact Expert will not accurately represent the actual customer.
In several cases, Contact Expert automatically detects multiple matches and offers you to replace the contact at the beginning of the task. In such cases, the Swap Contact screen is loaded into the Web Content area of the main window. (This feature is available only in full screen mode though.)
If Contact Expert did not recognize that the presented contact did not match to the actual customer, use the Replace button on the Contacts tab to search and replace the existing contact record with the correct one.
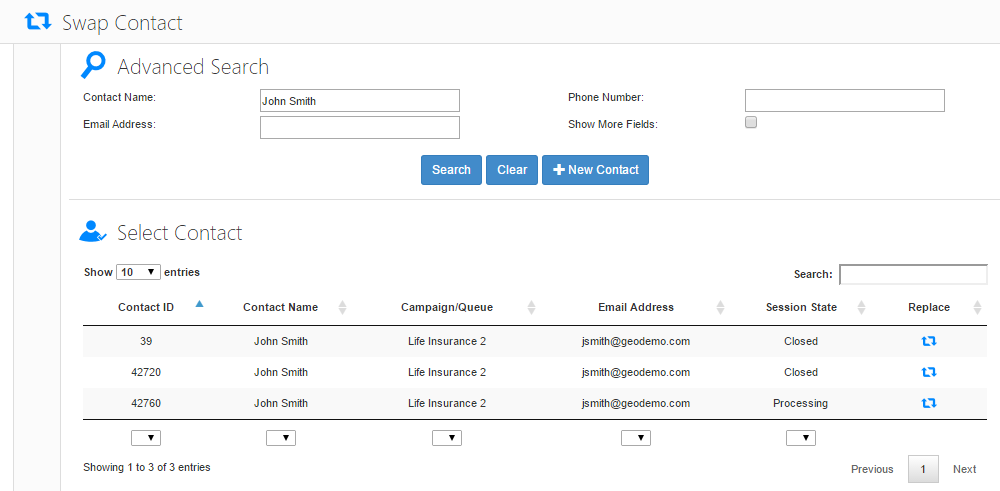
Selecting the Contact Record
The Swap Contact page is separated into two sections. Both sections can be expanded or collapsed by clicking the icon in the header. In the Select Contact section, all the matches are listed which were found by Contact Expert. To view the details of any listed contact record, double-click the table row. The Contact Details page will be popped up in a new frame.
If you have chose the right contact record, click
the  icon to replace it with the
current one. After this, all screens will be reloaded and the correct
contact information will be displayed.
icon to replace it with the
current one. After this, all screens will be reloaded and the correct
contact information will be displayed.
Using the Advanced Contact Search
If Contact Expert does not offer any contact record or the desired contact record is not presented in the list, use the Advanced Search section to find the right contact record. You can search contacts by name, phone number, email address and CRDS fields. To perform a search, click the Search button.
The contact records satisfying the search criteria will appear in a table under the search form. The results can be sorted and filtered per column. Also, you can use the general search field to filter the results across all columns. You can navigate between the table pages as well as you can set the number of entries to be shown per page. If you double click any row in the table, a Contact Details screen will be popped up containing all details related to the selected contact record.
To delete every search criteria, click the Clear button. Then all filter fields will be reset.
Creating a New Contact Record
It can happen that you did not find the contact record you had searched for. In this case, you should create a new contact record by clicking the **New Contact* *button and load the newly created one.
To get more details about how to add a new contact record to Contact Expert, go to the Creating New Contacts section.
Agent Scripts
Legacy scripting
If you are using Legacy scripting on Windows 10 build 16237, please refer to the following How to article: How to enable VBScript execution on Windows 10 build 16237, for Legacy Scripting%2C+for+Legacy+Scripting)
- to enable VBScript execution.
An agent script (workflow) is a sequence of web form nodes that contains prompts, information, and/or data entry fields to help you perform the tasks that a specific queue or campaign requires.
If a script is available for the queue or campaign you are working in, Contact Expert loads the script in the Script area of the Contact Expert Agent Client Application's main window where you can navigate forwards and backwards in the pages of the script as necessary. You can imagine the agent script as a tree or a flow where different web form nodes will be displayed to you upon your previous selections.The dialog box can be resized by dragging the window splitter.
The flows are constructed by the supervisor.
When you are using an agent script during a customer interaction, the application saves all the choices that you make and the input that you enter into the script in the contact record of the particular customer. Therefore, if a customer related data field has already been filled during a former conversation, it will be displayed next time, as well.
Working with Scripts
Were the script you work on designed to allow navigation between pages, or nodes, you will find buttons or links for this. Pressing a navigation button will load the next – or previous – node. There might be multiple navigation buttons, each button has an associated script node that can be reached by clicking it.
Working with the scripts generally means reading out specific text and/or pieces of information to the customer as well as entering data to editable fields.
Data is generally saved to the servers when you navigate away from a node.
Sometimes the data you entered is incorrect. In this case, a validation error message is shown when you try to navigate to another script node. Read the message, correct the value(s) accordingly and try to go to the next node again.
 {.image-right width="175"}
Continuing the Script
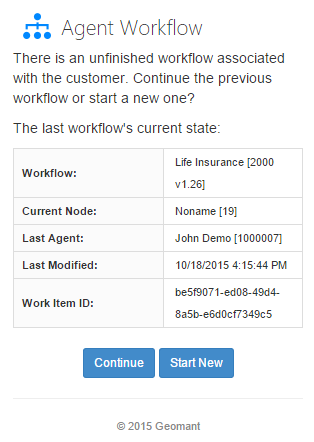
If you do not complete the script until you close the task, Contact Expert stores your current position in the workflow (the current node you see). Next time an agent will interact with the particular customer, Contact Expert can restore the saved state of the agent script, so you or any other agent is able to continue the script.
In such cases, based on your supervisor's decision, one of the following settings is applied for each campaign:
- A new agent script is started each time a task is received. The state of the previously discontinued script will be deleted.
- The previously saved script is loaded at all times.
- You can decide whether to continue the saved script or start a new one.
In the last case, before the agent script is loaded into the Script area, a selection screen is shown where you can return to the interrupted workflow by clicking the Continue button or abort the interrupted workflow and start a new one from the beginning by clicking the Start New button.
 {.image-right width="175"}
Resizing the Script Area
Contact Expert allows you to alter the dimensions of the script area if you wish to see it in a different size. Just grab the window splitter and drag it to the left or right.
Please note that the script area has a minimum width, so if you resize it to a quite small size the buttons and part of the text will not be visible.

Contacts Tab
The Contacts tab is always available during a customer interaction and is used to access and update information about the customer. You can reach any of the contact functions at any time without interrupting the conversation by selecting the Contacts tab on the toolbar and pressing the corresponding button. The available functions are described in the following sub-chapters.
The Contacts tab might be helpful if you use Contact Expert Agent Client Application in toolbar mode, as several screens are available only from this tab.

Viewing Contact History
You can access the Contact History page in a popup window by clicking the History button. In this popup mode, exactly the same functions are available as in the embedded mode.
For further details, jump to the Contact History section.
Viewing and Editing Contact Data
You can access the Contact Details page in a popup window by clicking the Details button. In this popup mode, exactly the same functions are available as in the embedded mode.
For further details, jump to the Contact Details section.
Printing Contact Data
The Print button allows you to send the contact record information (contact name/ID, campaign/queue name/ID and CRDS data) in a simplified view to a printer. You can select the destination printer using the printer icon.
 {.image-right}
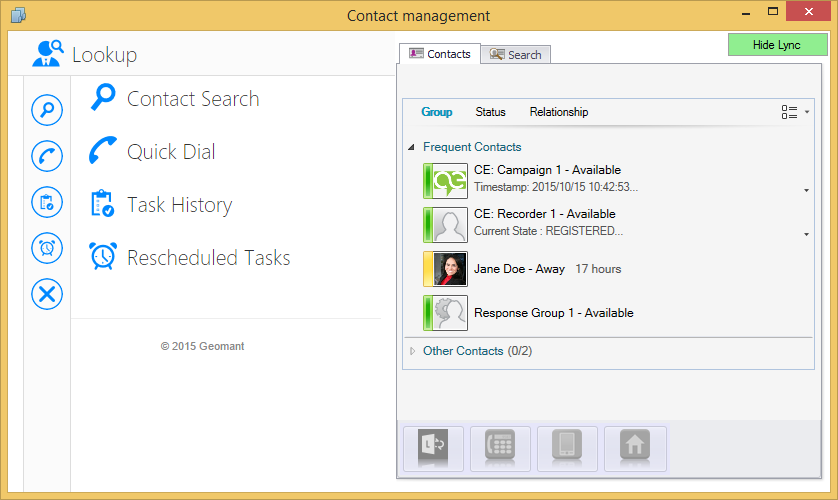
Searching and Managing Contacts
You can access the Lookup page in a popup window by clicking the Manage button. In this popup mode, exactly the same functions are available as in the embedded mode.
For further details, jump to The Lookup Screen section on the Ad-hoc Outbound Activities page.
Please note that administrators or supervisors can determine whether you have permission to use the Lookup screen or not. If this permission is not granted, despite you are able to put yourself onto a Lookup state, you cannot access the features available on the Lookup screen.
For further information on the Lookup state, please review The Lookup Mode section on the Ad-hoc Outbound Activities page.

Replacing the Contact
You can access the Swap Contact page in a popup window by clicking the Replace button. In this popup mode, exactly the same functions are available as in the embedded mode.
For further details, jump to the Contact Replacement section.
Sending an Email
Pressing the Send button allows you to send an email directly from the Contact Expert Agent Client Application. This email will be saved as part of the customer interaction history. This functionality is available on-demand – you can initiate an email at any time during a task.
If there is no email address stored for this contact then simply enter the email address directly into the To: text box.
Better yet, update the contact record on the Contact Details page. This way the contact record will be permanently updated and you can re-use the correct address later on.
Please review the Replying to Emails section of the Working with Emails article to learn more about the Write Email screen.

Reloading the Screens
Clicking the Restart button reloads all web content screens including the agent script.
If you have updated or replaced contact details and you are using a script, you must reload the pages.
Reloading the screens might be necessary if the contact details were changed by somebody else since they were loaded in the application.