How to use Power Automate with Wallboard
In this article, we will go through some steps that you need if you want to make an automated system that uploads your SharePoint list data, Microsoft Teams messages to our system, then you can work with your data on Wallboard.
(IMPORTANT! Some components are only available with a pro license.)
Contents:
- SharePoint List data upload and image download.
- SharePoint List data upload to as internal datasource
- Microsoft Teams messages upload with message trigger to the wallboard as internal datasource.
- Microsoft Teams messages upload with a keyword to the wallboard as an internal datasource.
SharePoint List Upload and image download
If you struggle to build up your flow, you can download it here.
How to Export and Import MS Flow
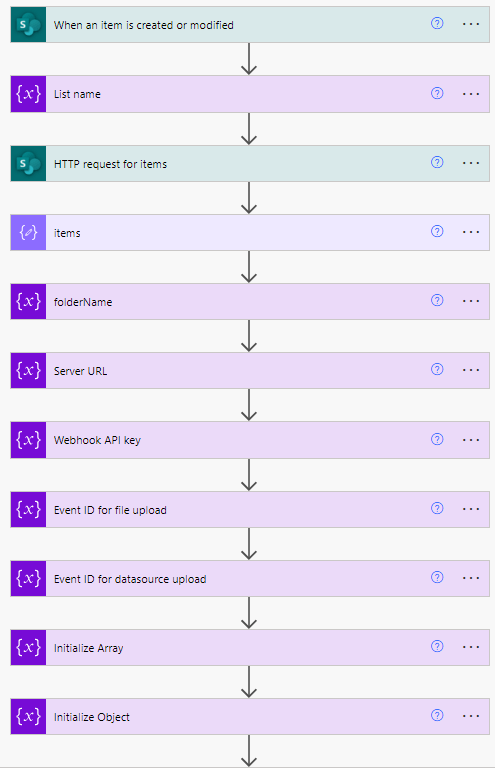
Needed Components
- SharePoint – When an item is created or modified
- SharePoint – Send an HTTP request to SharePoint
- SharePoint – Get file content using path
- Data Operation – Parse JSON
- Data Operation – Compose
- Variable – Initialize variable
- Control – Apply to each
- Variable – Set variable
- Variable – Append to array variable
- Schedule – Delay
- HTTP – HTTP
Set up your flow
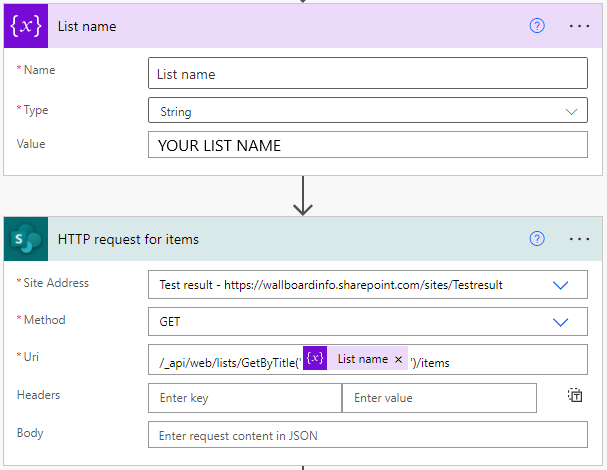
SharePoint – When an item is created or modified
Need to select your Site Address and your list’s name!

This will trigger your flow.
SharePoint – Send an HTTP request to SharePoint
Need to select your Site Address, set the method to GET and Uri path needs the be this:
/_api/web/lists/GetByTitle(‘YOUR LIST NAME’)}’)/items
You can create variables to make the flow more configurable.
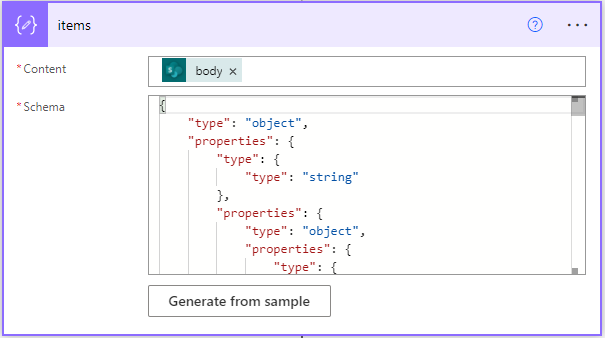
Data Operation – Parse JSON
At this point, you need to run your flow first.
When you have the Your flow ran successfully message, you need to copy the OUTPUTS information.
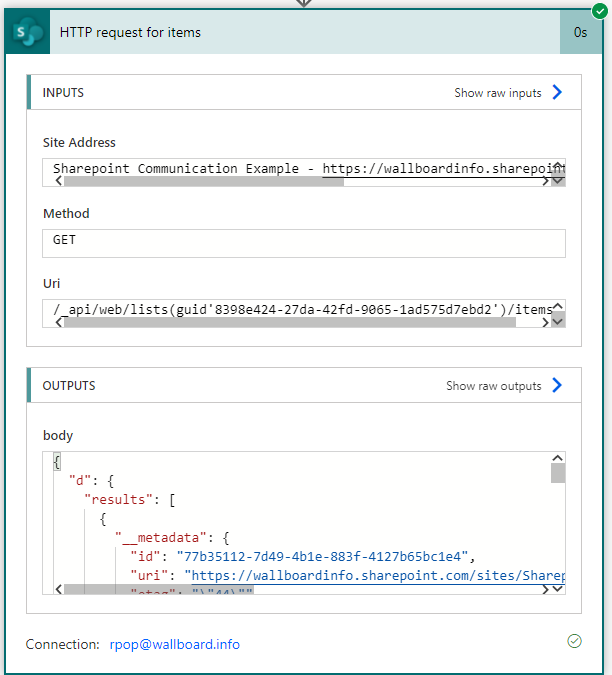
After this, you add the Parse JSON from the Data Operations, select the HTTP request for items body dynamic content. Click on the Generate from sample and paste here the OUTPUTS texts and click Done.
(The generated text may be different from the image)
Variable – Initialize variable
Here we make an Array, an Object variable, and more if we want to make our flow more readable. e.g.:
- folderName – Give the name of the folder you want to upload your pictures in the Wallboard system.
- Server URL – Your server URL e.g.: https://editor.wallboard.info
- Webhook API key – here you can give your API key
- Event ID for file upload – Your file upload webhook event ID
- Event ID for datasource upload – Your set datasource event ID
We used all of them with String type except Initialize Array and Initialize Object. There we used Array and Object types with [ ] and { } value.
Control – Apply to each
We need to go through all the values we have.

You need to select the result dynamic content or you can copy this and paste it to the field:
@{body(‘items’)?[‘d’]?[‘results’]}
(items = The name of your Parse JSON action)
Control – Condition
You will need this component to check is there a picture in your List’s row. You can’t upload if you don’t have a picture.
We need to check that our iteration’s Images element is not empty and if it does not equal to true then we run the upload process of the flow.
You have to write this in the Expression section.
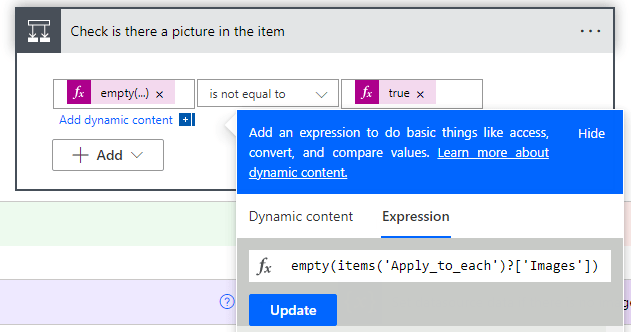
empty(items(‘Apply_to_each’)?[‘Images’])
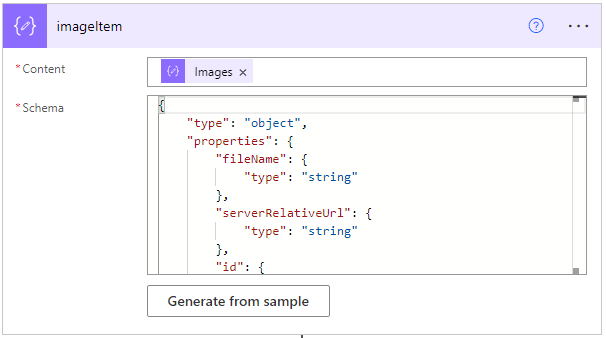
Data Operation – Parse JSON
In this section, we will get our Image data. In the example list, we have an ‘Images’ column, where we upload our images.
We need to select the from the Apply to each the ‘MainPicture’ dynamic content or you can copy this and paste it to the field:
@items(‘Apply_to_each’)?[‘Images’]}
(Apply_to_each= The name of your Apply to each action | ‘Images’ = The name of your column with images)
In the Schema copy-paste this:
{
“type”: “object”,
“properties”: {
“fileName”: {
“type”: “string”
},
“serverRelativeUrl”: {
“type”: “string”
},
“id”: {
“type”: “string”
},
“serverUrl”: {
“type”: “string”
},
“thumbnailRenderer”: {
“type”: “object”,
“properties”: {
“spItemUrl”: {
“type”: “string”
},
“fileVersion”: {
“type”: “integer”
},
“sponsorToken”: {
“type”: “string”
}
}
},
“type”: {
“type”: “string”
},
“fieldName”: {
“type”: “string”
}
}
}
SharePoint – Get file content using path
Here we will get the image content.
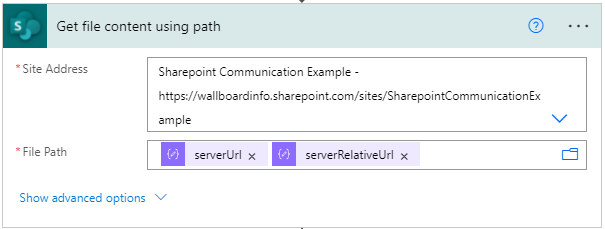
You can get serverUrl and the serverRelativeUrl from the previous action in the Add dynamic content section.
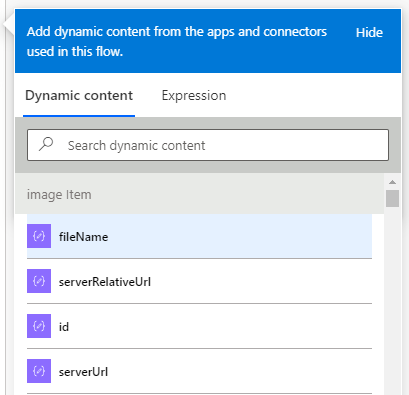
(The ‘image Item’ is the Parse JSON action’s name.)
Data Operation – Compose
Here we will configure our API call body for upload.
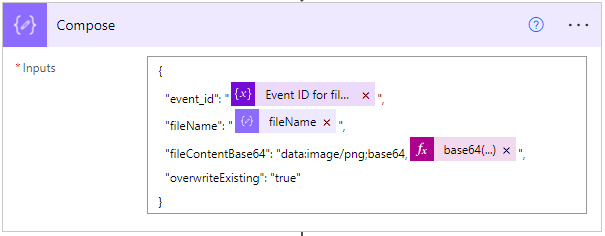
You can copy-paste this string below:
{
“event_id”: “@{variables(‘Event ID for file upload’)}”,
“fileName”: “@{body(‘imageItem’)?[‘fileName’]}”,
“fileContentBase64”: “data:image/png;base64,@{base64(body(‘Get_file_content_using_path’))}”,
“overwriteExisting”: “true”
}
HTTP – HTTP
Here you can configure your HTTP request.
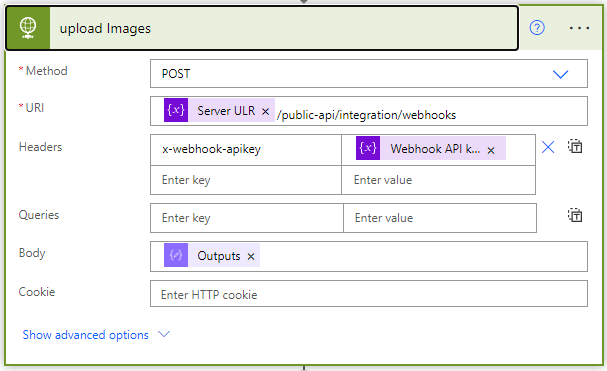
You can get the Outputs from the previous node’s dynamic content.
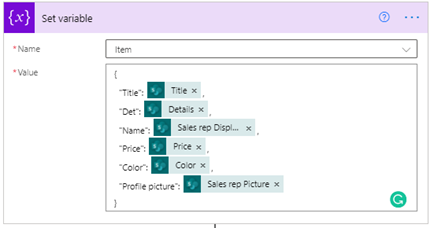
Variable - Set Variable
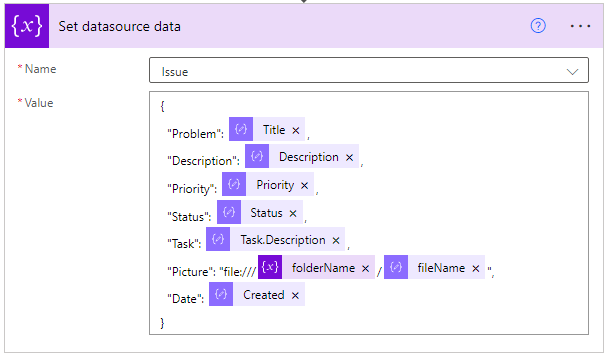
Here you can put your data together.
You can select them from the Add dynamic content section or you can add it manually with this:
@{items(‘Apply_to_each’)?[‘Title’]} , @{items(‘Apply_to_each’)?[‘Details’]}…etc
(Apply_to_each= The name of your Apply to each action | ‘Title’ = The name of your column)
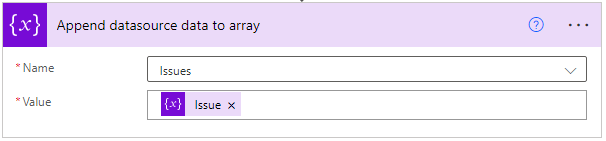
Variable – Append to array variable
We append the item to an array.
The No section of the Condition is the same except that there is only the Set datasource data and Append datasource data to array nodes here.
Schedule – Delay
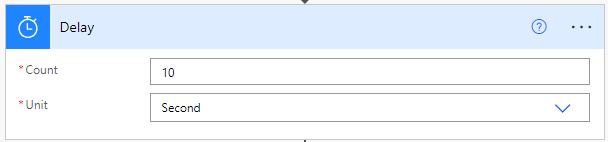
We need this node because in this way we could be sure that the images are already uploaded to our system.
Data Operation – Compose
We set our body here for the HTTP request later.
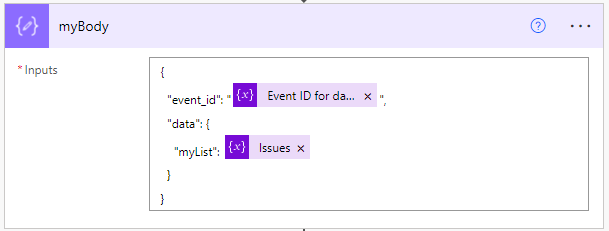
You can get your event_id from your webhook. (Use the Set internal datasource action type.)
The format structure:
{
“event_id”: “@{variables(‘Event ID for datasource upload’)}”,
“data”: {
“myList”: @{variables(‘Issues’)}
}
}
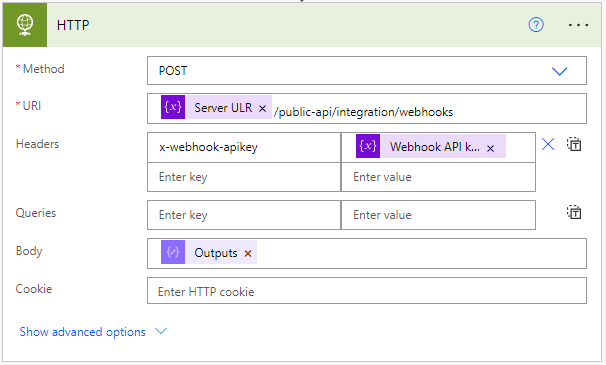
HTTP – HTTP
Here you need to set up your HTTP.
You will set your method to POST, setup your URI with your chosen server (e.g., https://yourServer/public-api/integration/webhooks).
In the headers, you need to give
- x-webhook-apikey → your API key (API key)
- You need to fill the body with your Composed data from the previous section.
SharePoint List Upload
Needed Components
- SharePoint – When an item is created or modified
- SharePoint – Get Items
- 2x Variable – Initialize variable
- Control – Apply to each
- Variable – Set variable
- Variable – Append to array variable
- HTTP – HTTP
Set up your flow
SharePoint – When an item is created or modified
Need to select your Site Address and your list’s name!
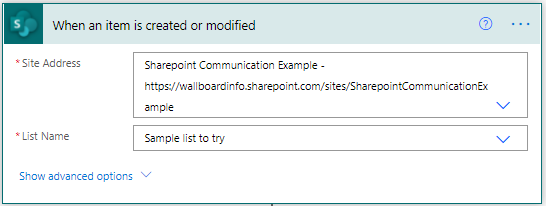
This will trigger your flow.
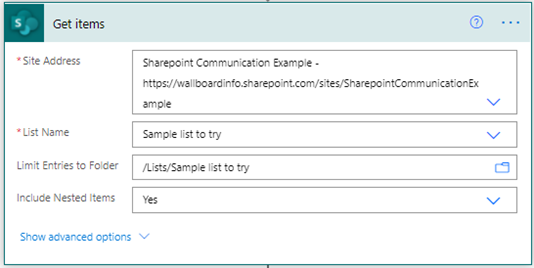
SharePoint – Get Items
Need to select your Site Address, your List Name, the Limit Entries to Folder, and the included nested items.
2x Variable – Initialize variable
Here we make an Array and an Object variable.
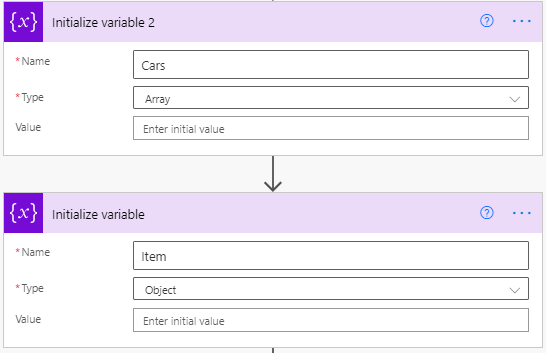
We will store all the data here.
Control – Apply to each
We need to go through all the values we have.

Inside the Apply to each
We set our data
and we append it to the array.

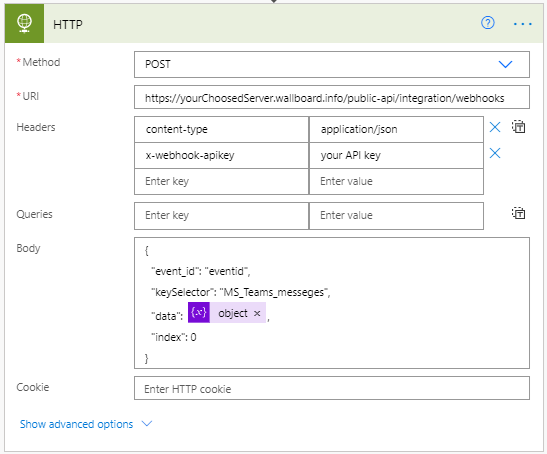
HTTP – HTTP
Here you need to setup your HTTP.
You will set your method to POST, setup your URI with your chosen server (e.g., https://yourChoosedServer.wallboard.info/public-api/integration/webhooks).
In the headers, you need to give
- content-type → application/json
- x-webhook-apikey → your API key (API key)
- You need to fill the body with your event_id and your data
You can get your event_id from your webhook. (Use the Set internal datasource action type.)

MS Teams message trigger with a simple message
Needed Components
- MS Teams – When a new channel message is added
- Variable – Initialize variable
- Variable – Set variable
- HTTP – HTTP
Set up your flow
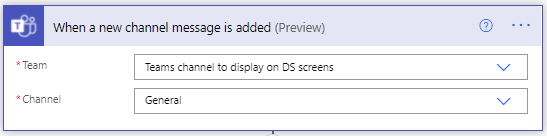
SharePoint – When a new channel message is added
You need to select the Team and the channel for your trigger.
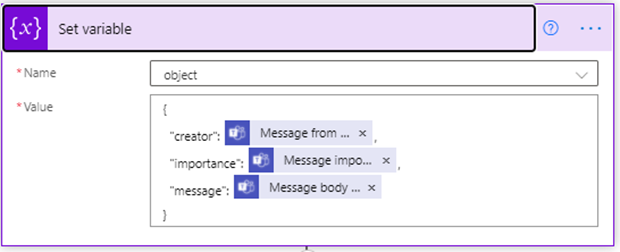
Variable – Initialize variable
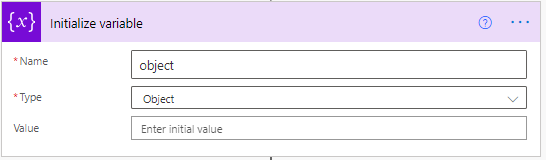
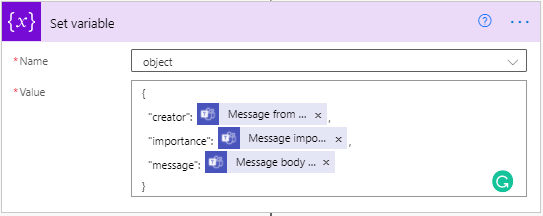
Variable – Set variable
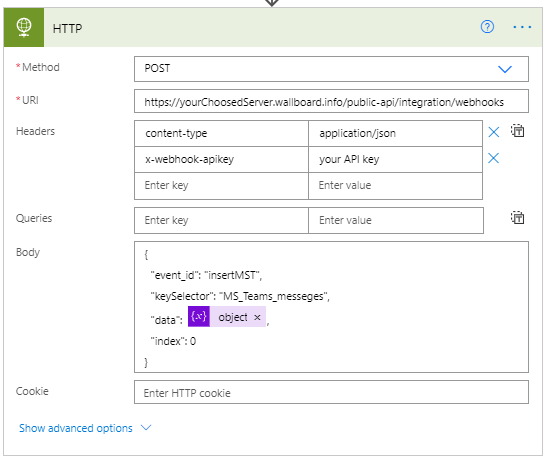
HTTP – HTTP
Here you need to setup your HTTP
You will set your method to POST, setup your URI with your chosen server (e.g., https://yourChoosedServer.wallboard.info/public-api/integration/webhooks).
In the headers, you need to give
- content-type → application/json
- x-webhook-apikey → your API key (API key)
- You need to fill the body with your event_id and your data
You can get your event_id from your webhook. (Use the Insert to internal datasource array action type.)
Our basic internal datasource looks like this

and we use the Insert to internal datasource array webhook.
MS Teams message trigger with a keyword
Needed Components
- MS Teams – When keywords are mentioned
- MS Teams – Get messages
- Variable – Initialize variable
- 2x Control – Apply to each
- Control – Condition
- Variable – Set variable
- HTTP – HTTP
Set up your flow
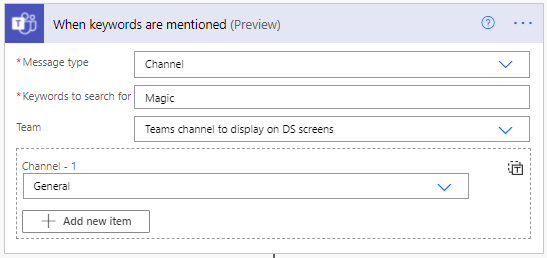
MS Teams – When keywords are mention
Need to select the message type, the keywords to search for, and the team.
MS Teams – Get messages
Select your Team and the channel.
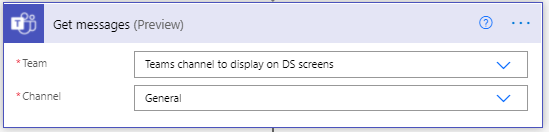
This will give us back all the messages in the channel.

Variable – Initialize variable
2x Control – Apply to each
We need to go through all the message IDs with the keywords message ID to find the correct one.
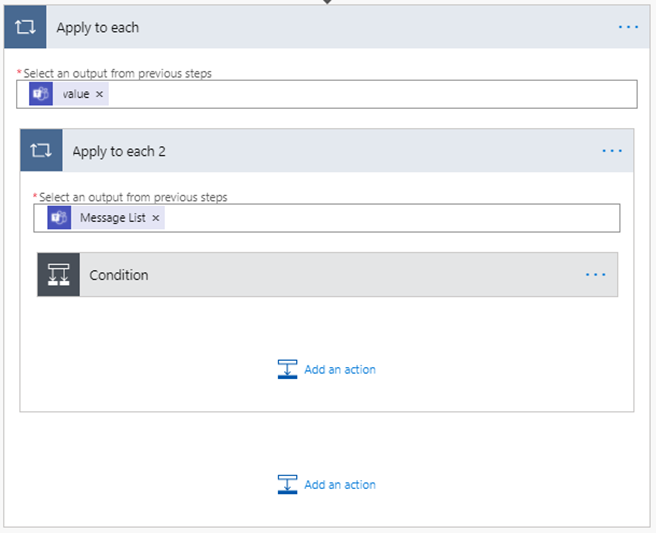
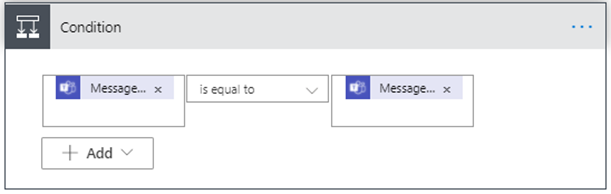
Control – Condition
We match the IDs here (All message ID and the mentioned message ID)
If the Condition is Yes (true)
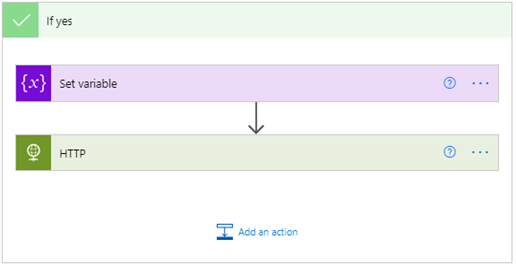
Variable – Set variable
HTTP – HTTP
Here you need to setup your HTTP
You will set your method to POST, setup your URI with your chosen server (e.g., https://yourChoosedServer.wallboard.info/public-api/integration/webhooks).
In the headers, you need to give
- content-type → application/json
- x-webhook-apikey → your API key
- You need to fill the body with your event_id, data, keySelector, index
You can get your event_id from your webhook. (Use the Insert to internal datasource array action type.)
Our basic internal datasource looks like this
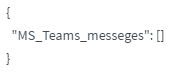
and we use the Insert to internal datasource array webhook.