Installing CE Server Roles
Contact Expert v6.1 for Skype for Business Server
First Steps
Important
Before starting the installation of Contact Expert server roles, please make sure all prerequisites (except Java JDK) are already installed on the target computer.
Perform the next steps before setting up Contact Expert server roles on CE Core Host
Make sure that CE Core Host is a member of the Microsoft Skype for Business enabled Active Directory domain.
Assign a certificate to CE Core Host by performing the steps listed in Configuring CE Certificates section.
If you intend to install any component to a location other than the default (C:\Geomant\CE), please ensure that there are no white space characters in the path. For example "C:\Program Files" might cause problems as it contains a space.
WebChat Components
The Server Roles installer package \CE\CE_Server\setup.msi deploys all components that are needed for Contact Expert Chat media channel to work with the cloud based components.
While the installer deploys the chat components, Supervisors need to perform further configuration in CE administration portal for the chat media to operate. For further details please read the Contact Expert WebChat Administration article.
Setting Up Contact Expert Administration Tools
Perform these steps to set up Contact Expert Administration & Reporting Interface
Log in to CE Core Host with domain administrator privileges.
Launch "CE\CE_Admin\setup.exe" from the Contact Expert installation media.
Accept the license agreement, enter a user name and a company name and select the "Anyone who uses this computer" option.
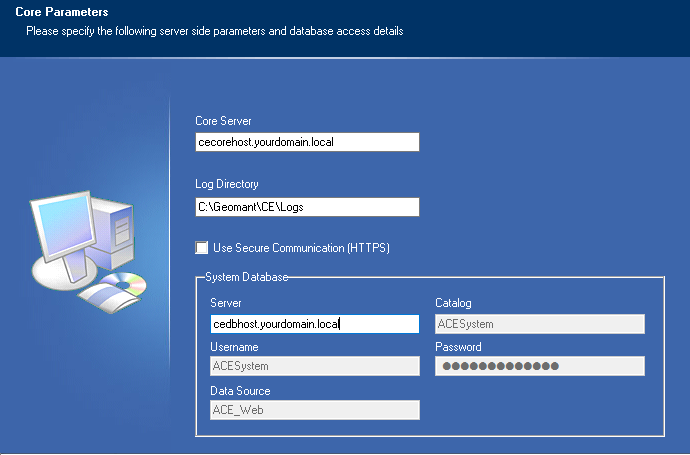
Specify the installation parameters on the Core Parameters screen as per the followings then click Next:
Core Server: enter the FQDN of the CE Core Host here.
System Database:
- Server: enter the FQDN of the CE Database Host here.
- Data Source: this field is not editable.
- User ID: this field is not editable.
- Password: this field is not editable.
- Catalog: this field is not editable.
- Log Directory: accept the default value.***
***
Select the Custom option at the next screen, click Next.
Accept the default installation path (C:\Geomant\CE), click Next.
Leave the Admin GUI feature option checked, click Next two times and wait for the install wizard to finish.
How to Enable Windows Authentication for Contact Expert
Optional
Please follow the instructions described in the articles below, if the login method will be domain authentication for Contact Expert:
- How to enable Windows Authentication for Contact Expert Part I - CEPortal -+CE+Portal)
- How to enable Windows Authentication for Contact Expert Part II - CE Agent Client Dashboard-+CE+Agent+Client+Dashboard)
Setting Up Contact Expert Server Components
Installing Java JDK
Supported Java Version
The one and only Java version which is supported by Contact Expert is always the version which is included to the Contact Expert installation media. This is currently Java 8 Update 60 (1.8.0_60) x86.
Newer Java versions (including later updates of Java 8 and any updates of the next Java versions) are usually backward incompatible, so they might cause major problems in operation. Therefore they are not supported.
To install Java Development Kit on CE Core Host
While logged on to CE Core Host with administration privileges, launch "Java 8u60jdk-8u60-windows-i586.exe" from the Contact Expert installation media and install Java JDK (the Source Code feature is not required).
Installing Contact Expert Server Components
Please note that the install wizard deploys a Contact Expert evaluation license that will limit operation to 3 concurrent operator sessions at the same time. Do not forget to obtain a production license to switch the system into full operational mode.
Perform the below steps to set up Contact Expert server components
Log in to CE Core Host with domain administrator privileges.
Launch "CE\CE_Server\setup.exe" from the Contact Expert installation media.
- Accept the license agreement, enter a user name and a company name and select the "Anyone who uses this computer" option.
- Accept the default installation path (C:\Geomant\CE).
Configuring CE Core Services
Specify the installation parameters at the Core Parameters screen, then click Next:
Core Server: enter the FQDN of the CE Core Host here.
Web Server: enter the FQDN of the CE Core Host here.
System Database:
- Server: enter the FQDN of the CE Database Host here.
- User ID: this field is not editable.
- Password: this field is not editable.
- Catalog: this field is not editable.
*****Reporting Database:*****
- Server: enter the FQDN of the CE Database Host here.
- User ID: this field is not editable.
- Password: this field is not editable.
- Catalog: this field is not editable.
Platform: select the appropriate telephony platform (Microsoft Skype for Business Server 2015 - UCMA 5).
Domain ID: accept the default value (1).
The Statistic Server needs to be installed on the CE Core Host of Domain
- If you choose a different domain, it will not be installed which can cause improper functioning.

Configuring CE Recording Services
Specify further parameters at the Recording Parameters screen then click Next:
Preferences:
- Secure Communication (HTTPS): check if HTTPS is required, otherwise leave unchecked.
- Startup Services Automatically: check to start CE services at system startup, otherwise leave unchecked.
Recording:
- Both core and recording components: select this option to install both CE Core and CE Recording services.
- Only core components: select this option to install CE Core services only.
- Only recording components: select this option to install CE Recording services only.
Recorder Server: enter the FQDN of the CE Core Host if core and recording components will be co-located on the current host. Otherwise, enter the FQDN of the CE Recorder Host.
IVR:
- IVR Type: select the appropriate option for your IVR solution (Geomant IVR or any other 3rd party solution available).
- Port: accept the default value (19970).

Completing the Installation
- Check the pre-installation summary and let the wizard install the server components.
- Let the wizard reboot the computer.
Installing Contact Expert PowerShell Tools
To install CE PowerShell tools
Log in to CE Core Host with domain administrator privileges.
Launch "CE\CE_Shell\setup.exe" from the Contact Expert installation media.
- Accept all default settings and wait for the install wizard to finish.
Prerequisite Check: Provisioning Contact Expert Services as Skype for Business Trusted Applications
If you did not perform this already, follow the steps described in the below Prerequisites sections (provisioning CE Recorder Host is necessary only if Contact Expert call recording services will be used):
- Provisioning CE Core Services as a Skype for Business Trusted Application in a Non-redundant Deployment and/or
- Contact Expert Prerequisites#Provisioning CE Recorder Services as a Skype for Business Trusted Application in a Non-redundant Deployment
For Highly Available deployments, follow these steps instead:
- Contact Expert Prerequisites#Provisioning CE Core Services as a Skype for Business Trusted Application in a HA Deployment and/or
- Contact Expert Prerequisites#Provisioning CE Recorder Services as a Skype for Business Trusted Application in an HA Deployment
Configuring Contact Expert
Configuring Contact Expert Application GRUU
Log on to CE Core Host with domain administrator privileges.
Find and open the CE Tools shortcut on the desktop and run CE PowerShell with administrator privileges.
Execute the following commands in the PowerShell window:
Set-CESfbConnectorProperties -ApplicationName "ACE" -ApplicationFqdn "[CE Core Host FQDN]" -ApplicationPort "9000" -ApplicationGruu "[CE Core GRUU]" -CertificateFriendlyName "[Cert Friendly Name]"Set-CESfbRecorderProperties -ApplicationName "ACE_Recorder" -ApplicationFqdn "[CE Recorder Host FQDN]" -ApplicationPort "9100" -ApplicationGruu "[CE Recorder GRUU]"CertificateFriendlyName: In case the certificate deployed in the prerequisites tasks has a friendly name that is different than the hostname of the CE Core Host computer, then you must use this parameter for the Set-CESfbConnectorProperties cmdlet! For example when the friendly name is the FQDN of the CE Core Host or is an arbitrary string other than the hostname, then you must use this parameter.
If on the other hand the friendly name of the certificate is set to the hostname of the CE Core Host computer, then you do not need to use this parameter, in this case it is optional.
The High Availability deployments have special needs for the certificate, that scenario is described elsewhere in the documentation.
* ApplicationGruu: You can get the application GRUU of the CE Core and Recorder services using the *Get-CsTrustedApplication cmdlet:
Get-CsTrustedApplication -ApplicationId "[ACE or ACE_Recorder]" -TrustedApplicationPoolFqdn "[CE Core or Recorder Host FQDN]"Add-CEFirewallRulesRestart CE Core Host computer.
Configuring Named SQL Server Instances and Custom SQL Server Ports
The below steps have to be performed only in case a named SQL Server instance and/or a custom port is used for storing Contact Expert databases. If you do not use named instances and/or custom ports, please skip these steps.
TCP port 1433 is the default port for SQL Server. The default SQL Server instance is unnamed.
Log on to CE Core Host with domain administrator privileges.
Find and open the CE Tools shortcut on the desktop and run CE PowerShell with administrator privileges.
Execute the following commands in the PowerShell window:
Set-CESystemDatabaseProperties -Fqdn "[CE Database Host FQDN]" -Instance "[Instance Name]" -Port "[Port Number]" -DatabaseName "ACESystem" -Login "ACESystem" -Password "MyACEP1ssw0rd"Set-CEReportDatabaseProperties -Fqdn "[CE Database Host FQDN]" -Instance "[Instance Name]" -Port "[Port Number]" -DatabaseName "ACEReport" -Login "ACEReport" -Password "MyACEP1ssw0rd"Instance and Port parameters are optional. Specify the instance if CE databases are deployed on a named SQL server instance, otherwise skip this parameter; specify the port number if fix TCP port is used, otherwise skip this parameter.
Configuring Cloud Based Scripting
Please execute the following CE cmdlets to configure all relevant components for cloud scripting:
Log on to CE Core Host with domain administrator privileges.
Find and open the CE Tools shortcut on the desktop and run CE PowerShell with administrator privileges.
Execute the following commands in the PowerShell window:
``` powershell
Set-CECloudBasedScriptingProperties -ScriptingUrl [URL of the cloud based script engine] -ScriptDesignerUrl [URL of the cloud based script designer] -ScriptDesignerLogoutUrl [URL of the logout page of the script cloud based designer]
```

All of the above URL parameters are to be received from Geomant or
affiliates.
CE Connector for the new scripting
CE 6.1 There is an additional component that must be deployed for the new cloud based scripting to operate. At the moment this can only be performed by Geomant or affiliated Business Partners.
Configuring Contact Expert
Log in to CE Core Host with domain administrator privileges.
Launch Internet Explorer and navigate to the Contact Expert Administrator interface: ***https://[CE Core Host FQDN]/CEPortal
Add this site to the Internet Explorer trusted security zone, set it as the home page, and reload the page in the browser.
Log on to the Administrator interface with the default administration credentials: administrator:ACES1stem.
Select Infrastructure→Application Servers** on the left side menu and select the application server by clicking Edit.
Update the FQDN of the CE Core Host for all "Server FQDN", "Private Web FQDN" and "Public Web FQDN" properties.
IP address is not acceptable here, please fill the fields with the FQDN.
Review the default values of the additional application server parameters (except Skype for Business Parameters) and change if required as explained in the Specifying System Parameters – Application Servers chapter. For the Skype for Business Parameters, please see the Skype for Business configuration preset information in the next section of this page, but first proceed with the next steps here.
Register a voice gateway as explained in the Specifying System Parameters – Voice Gateways chapter.
Set up an agent hunt group as explained in the Specifying System Parameters – Hunt Groups chapter.
Create at least one new skill as explained in the Specifying System Parameters – Skills chapter.
Register new agents as explained in the Specifying System Parameters – Human Agents chapter.
Create a dial rule as explained in the Designing Queues and Campaigns – Dial Rules chapter.
- Set a daily activity period that will enable the rule to be active at the time of the installation, so you can test it.
Register a recording gateway as explained in the Specifying System Parameters – Recording Gateway chapter.
Set up a recording rule as explained in the Contact Expert Recording – Recording Rules chapter.
- Set a daily activity period that will enable the rule to be active at the time of the installation, so you can test it.
Set up at least one recording channel as explained in the Contact Expert Recording – Recording Channels chapter.
Create a new campaign as explained in the Designing Queues & Campaigns chapter.
- Create an inbound voice campaign and take it into Design state.
Starting Up Contact Expert
Log on to CE Core Host with administrator privileges.
Find and open the CE Tools shortcut on the desktop and run CE Server Manager with administrator privileges.
- Wait for a few minutes while the installed components are all discovered.
- Right click the [CE Core Host FQDN] node in the navigation tree at the left and select the Start each component... item.
- Wait until each CE component gets into Using the Contact Expert Server Manager Application#Contact Expert Server Component States state. Depending on hardware and network performance, this step could take between 5 to 10 minutes.
Setting up Contact Expert Automatic Startup
The startup mechanism of Contact Expert is relying on the Microsoft Windows Server environment. It is using a single Windows service component to launch the rest of Contact Expert server components. As usual, this initial service (CE Server Agent) can be configured to start automatically whenever the operating system is finished starting up.
For production environments, Geomant advises to enable the automatic startup feature for this service after all initial configuration was performed. This will make sure Contact Expert is running as soon as possible after a computer restart.
Running Contact Expert Automatically After Windows Restart
Follow the below steps to set up the automatic startup
Log on to CE Core Host with administrator privileges.
Open Services (use the Windows Search tool to find it or alternatively you can run services.msc).
Find and right click the windows service CE Server Agent. Click Properties in the context menu.
On the General tab, set Automatic as Startup type then click OK.
Find and open the CE Tools shortcut on the desktop and run CE PowerShell with administrator privileges.
Execute the following command in the PowerShell window:
Set-CEStartupMethod -Type "auto"