Configuring CE Certificates
Contact Expert v6.1 for Skype for Business Server
Why Using Certificates?
The Microsoft Skype for Business edition of Contact Expert is connecting to the telephony infrastructure by the Trusted Application Endpoint objects of Skype for Business. Communication going through these are encrypted, requiring security certificates on CE Core and Recording servers. Creating and maintaining these certificates are prerequisites for the installation, but more importantly: the daily operation.
Invalid (e.g. expired) certificates will effectively block all communication between Contact Expert and the Microsoft telephony infrastructure – all voice, presence and other information exchange will stop immediately!
Luckily CE can be configured to provide alarms on such situations.
Configuring CE alarms and taking actions on these alarms are the responsibility of the end customer.
Creating CE Certificates
Requesting and Configuring the New Certificate
High Availability specifications
In case of a "HA" CE installation, please follow the guidance specified in the High Availability Options for Contact Expert chapters, especially the ones detailing the creation of the certificates.
There are a few parameters in the below chapters that – while work perfectly for standalone CE implementations – are wrong for Highly Available CE systems! Use the above link in such cases.
The following chapters assume a single-instance, non-redundant CE implementation.
Log on to the CE Core Host with domain administrator privileges.
Start Microsoft Management Console by entering the "mmc" command in a Command Prompt window launched with administrator privilege level.
Add the Certificates snap-in by using the "Add/Remove Snap-in..." item from the File menu, selecting the Certificates from the available snap-ins list.
Select "Computer account" as the target for the mmc snap-in, and then "Local computer" to designate the CE server you are logged on to.
Click OK to close the "Add or Remove Snap-ins" dialog.
Open the newly added "Certificates (Local computer)" node in the navigation tree at the left and open "Personal", as well.
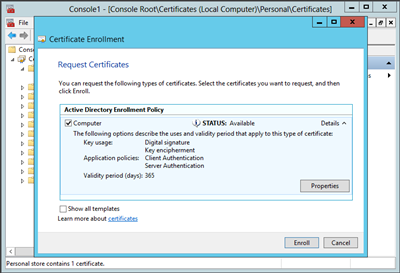
Right-click "Personal Certificates" and select All Tasks→ Request New Certificate option.
Check the "Computer" checkbox on the Enrollment screen and click "Details".
See next steps in the following sections.

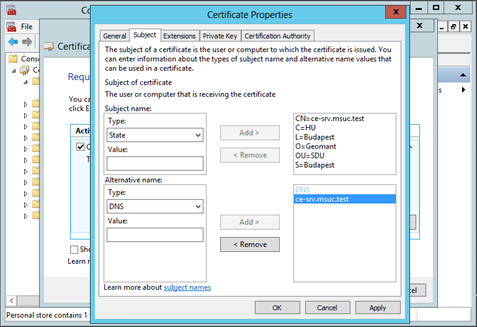
Certificate Subject
With the new computer certificate details screen open in the "Certificates" MMC click the "Properties" button and enter the hostname portion of the CE Core Host FQDN in the "Friendly Name" on the "General" tab.
Click the "Subject" tab and specify the following certificate attributes as a minimum.
- CN, C, L, O, OU, S and DNS alternative name
The "CN" subject name and "DNS" alternative attributes are especially important – both should be set to the FQDN of the CE Core Host.
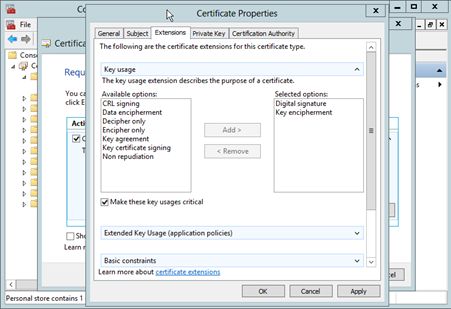
Certificate Extensions
Click the "Extensions" tab and verify that "Digital Signatures" and "Key Encipherment" are selected as "Key Usage" attributes.
Make sure that at least "Server Authentication" is selected as the "Extended Key" attribute.
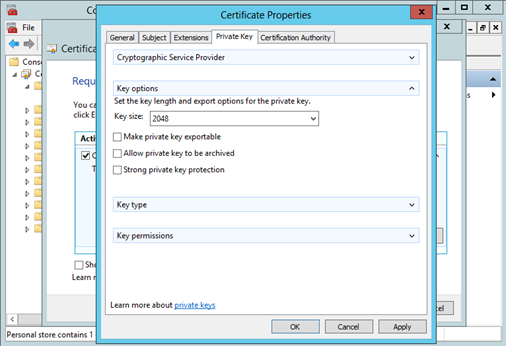
Certificate Private Keys
Click the "Private keys" tab and verify that "RSA" is selected as "Cryptographic Service Provider".
Make sure the "Key size" is 2048.
Certificate Authority
- Click the "Certificate Authority" tab and select your CA from the list.
Finishing the Certificate Request
Click "OK" and then click "Enroll".
Check that the certificate request is issued successfully, the certificate is received and that it is listed in the "Personal" certificate folder.