Handling Inbound Calls
Contact Expert v6.1 for Skype for Business Server
Answering an Incoming Call
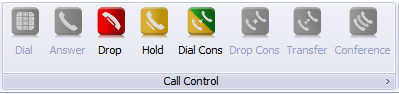
When you are ready to take calls, the toolbar will look like it is shown in the example screenshot on the right.
Your Skype for Business presence is CE - Available in this phase and whether that means a Busy or Available state depends on what setting was chosen during installation time.
Toolbar buttons are only coloured when they are active. Inactive buttons are grey.

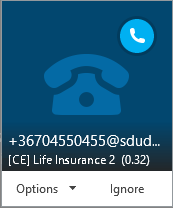
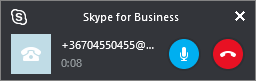
You will be notified of the incoming calls via a Skype for Business toaster appearing in the bottom right corner of your screen.
Use only the toolbar buttons when answering calls. Any other popup screen related to calls are for information purposes. Please ignore them.
 {.image-right}
 {.image-right}
If you have to pick up the calls manually (Auto answer user preference is disabled), the Answer button becomes active. Click it to take the call.
In case your agent application is set up to pick up inbound calls automatically (Auto answer feature is enabled), you do not need to hit the Answer button.
If the Agent Client Application is used in manual answer mode (i.e. you need to pick up the call manually) and the Swap Contact screen appears when the task arrives (i.e. you need to select one from the offered contacts to be loaded), you must pick up the call first, only then you can replace the contact, otherwise the call will be declined.
For further information on the Swap Contact screen, please read the Contact Replacement section of the Managing Contacts article.
Once you are being connected, continue controlling the call using the toolbar. Features like putting the caller on hold, initiating conferencing, transfers, hanging up, etc. must all be performed using the Call Control softphone buttons at all times.
While interacting with the customer, your Skype for Business presence is CE - Conversation.

Task Information During a Conversation
Once being in interaction with a customer, agents are getting real-time information about various conversation specific details in the title of the agent client application's main window and the tab label of the current task.

The following information is available (see the screenshot for the legend reference):
- Task Counter: The number of tasks received since the agent application was launched.
- Direction: The direction of the customer interaction (inbound or outbound).
- Queue/Campaign Name: The name of the inbound queue or outbound campaign in which the conversation was initiated.
- Media Type: The media type of the queue/campaign (voice, email or chat).
- Contact Name: The name of the customer (if identified).
- Caller line identification: The phone number or email address of the customer.
- Task Timer: It shows how long the current task has been active.
- Status Timer: It shows how long the agent has been in the current state (task phase), e.g. how long the agent has been connected to the customer (i.e. talk time).
- Recording ID: The ID of the voice record (if available).
Putting a Call on Hold
You can place the call on hold by clicking Hold at any time during the conversation. This will start a timer to show you how long the call is on hold. Click the Hold button again to return to the call.
Callers put on hold cannot hear you. Depending on how Contact Expert is set up, they hear music or other announcements.
Completing the Task
After resolving the customer inquiry, you can hang up by clicking the Drop button in the toolbar.
Your Skype for Business presence turns to CE - Admin (Busy).
You will not receive further calls until you have completed the wrap-up process and your state becomes active again.
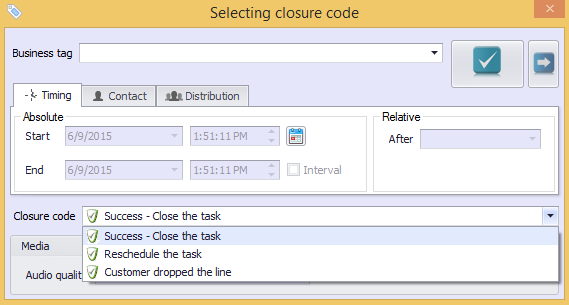
After dropping the call, a closure window will pop up where you will be prompted to specify certain pieces of information about the outcome of the customer interaction.
The Task Closure Window
Please note that the below subsections describe features which might be available or not depending on the direction, media and other attributes of the task. Some settings can be disabled or enabled by Contact Expert Administrators, as well.
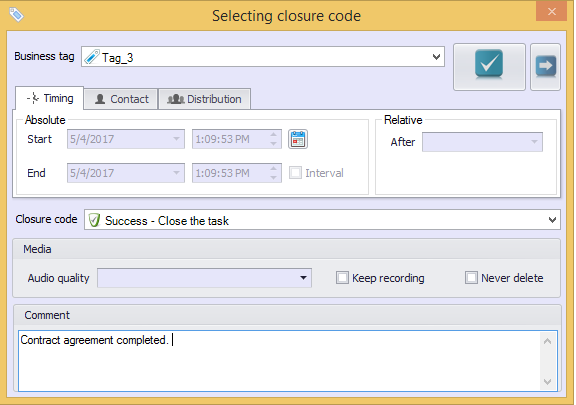
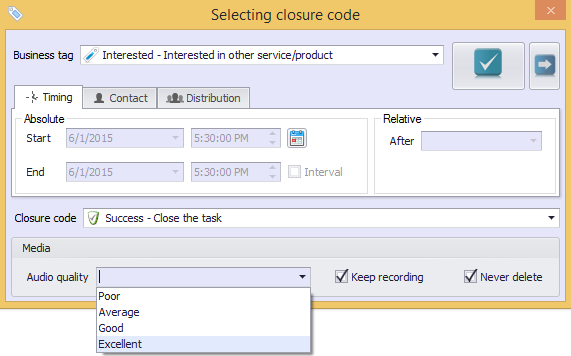
Business Tags
Contact Expert allows you to add business specific call work codes to the tasks known as business tags in Contact Expert. Business tags are set by your organization to track the business outcome of each customer interaction i.e. whether the interaction was successful from a business perspective or not.
Select the most appropriate business tag from the drop down list or start typing a phrase to search for a specific business tag.
The sort order of the business tags are shown as arranged on the Contact Expert Portal.

Closure Codes
The task closure dialog also provides the ability to assign a technical closure code to the task to report whether the call was successful (the default), unsuccessful or incomplete.
Calls are typically successful when the connection was established between the caller and an agent and information was exchanged. There is no need for agent input in such cases. However, you can report unsuccessful and incomplete call attempts by selecting Customer dropped the line or Reschedule the task entries from the drop down list.
Comments
Contact Expert allows you to add comments and short notes in the Closure dialog box before closing the task. This text is linked to the task and not to the contact, so other agents are also able to add their own comments to it.
The notes are always available, even if the task will be re-opened and handled again later.
Check any comments added to an existing task or contact by opening the entry itself and see the Comments section of the details page.
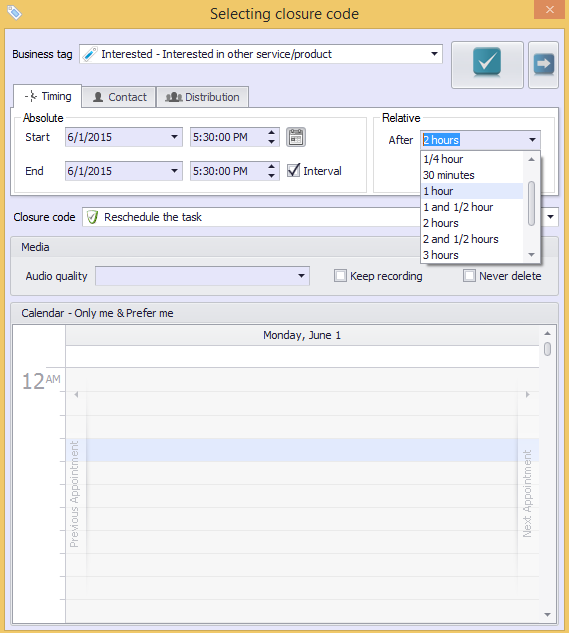
Rescheduling the Task
If Reschedule the task option has been selected, a new task will be created based on the specified parameters. This feature enables you to postpone the interaction with the customer (e.g. schedule a callback). You can specify the date and time when the new task should be delivered, the agent who will handle the task and the customer's preferred contact number or email.
The following options are available on the Timing, Distribution and Contact tabs.
Timing
| Absolute | You can define a certain date and time. The task will be delivered as soon as possible after that time. Type the desired date and time in the appropriate fields or use the date and time pickers. |
| Relative | In order to set a time relative to the current time (e.g. 2 hours later), select an item from the drop-down list. The date and time fields will be filled in automatically with the specific values. |
| Interval | You can define an interval instead of a specific time by selecting the Interval option. In this case, the task will be delivered within this interval. Type the desired dates and times in both start and end fields or use the date and time pickers. |
| Calendar | If you click the calendar icon, a calendar will appear containing all your scheduled tasks. This helps you to avoid the conflicts with another of your scheduled tasks. To hide the calendar, click the icon again. |
The default values are set to 30 minutes later.
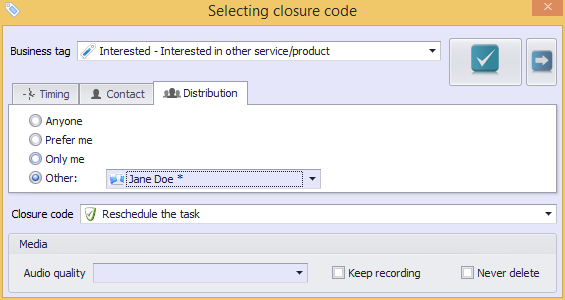
Distribution
| Anyone | If selected, the task can be delivered to any of the agents available at that time. |
| Prefer me | If selected, the task can be delivered to any of the agents available at that time, but you are the preferred one. This means if you are available at the scheduled time, you will get the task, otherwise another agent will get it. |
| Only me | If selected, the task can be delivered only to you. If the task cannot be delivered until it expires, it will not be delivered at all. |
| Other | If selected, the task will be delivered to another agent you specify. |
The default setting is set by your Contact Expert Administrator. However, you can choose another one at any time if it is needed.
The task can be checked under Lookup→Rescheduled Tasks menu within the CE Agent Application.
If you have selected theOther option, it is possible to choose any agent even if he/she has no skill for the specific queue/campaign. Agents currently having sufficient skills for the queue/campaign are marked with an asterisk (*). For example, *Jane Doe ** has skill but Jane Doe does not have.
If an agent does not have enough skills for the queue/campaign at the time the task will be delivered to him/her, he/she will not be able to handle the task, so the task will be closed unsuccessfully. This fact should be considered each time when you assign a task to another agent who has no asterisk next to his/her name in the select list.
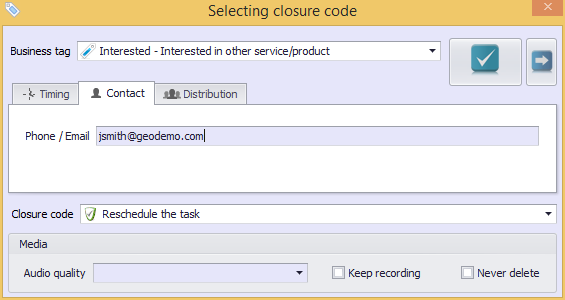
Contact
| Phone / Email | You can specify a phone number or email address which will be used when trying to reach the customer. |
The default value is the customer's currently used phone number or email address. However, you can type another one if requested.
On-Demand Call Recording
If Contact Expert call recording features are enabled in your organization, you can specify the following settings:
| Keep recording | If checked, the recorded call will be saved, otherwise the recording will be deleted immediately. |
| Never delete | Due to privacy regulations and store capacity limitations, saved recordings will be deleted after a specific period automatically. This interval is specified by Contact Expert Administrators. If you want to keep the recording permanently (e.g. for criminal evidence) even after the defined period elapsed, select this checkbox. |
| Audio quality | The audio quality of the saved recording can be specified here. |
Closing the Window
Once all parameters were appropriately set in the closure dialog,
click  in the top right corner of
the window to change your state to wrap-up.
in the top right corner of
the window to change your state to wrap-up.
To skip the wrap-up and ACW processes and change back to available state
in order to receive the next task as soon as possible then
press  instead
of .
instead
of .
Wrap-up & ACW - What is the difference?
In Contact Expert, Wrap-up and ACW are not entirely the same agent state. Wrap-up is a phase to be spent with administration work related to the customer interaction just finished. ACW is a subsequent phase for agents to have a chance to put themselves into an auxiliary state (break) or having a short rest time before being available again.
 {.image-right}
Administration (Wrap-up)
After you closed the closure screen by
, you still remain in an
administrative (non-active) status. This phase is called wrap-up in
Contact Expert. This provides a chance to do any follow-up work related
to the interaction, such as updating customer related information,
sending an email, opening a job ticket in a 3rd party CRM
application, etc.
Once you have finished your follow-up activities, click the Close button in the toolbar. The task will be completed and all related information will be saved for reporting purposes. Your state will be changed to ACW.
 {.image-right}
After Call Work (ACW)
If you clicked Close during the wrap-up state, you are now taken into the ACW phase. This allows you to take yourself out of the queue by selecting a break code.
You will not receive any calls while being in ACW state. After the ACW timer is up - that has been set by your Supervisor, your status will automatically be returned to available.
You can bypass the ACW timer manually by clicking the Next button in the toolbar. This will change your state to available immediately.
 {.image-right}