The Channel Resource
Channels are the starting points for all the conversations, allowing the use of multiple media types. They trigger powerful workflows for customer treatment and routing, designate the opening hours and holidays with timezone support, define the work item codes, the scripting flow to use, etc.
To create a new channel:
Open the Buzzeasy portal and navigate to Digital > Channels, then click New Channel.
Fill the needed fields on various tabs as per the following chapters.
Click Submit to save the new resource.
General Properties tab
| Name | A unique designation for the channel. |
| Department | The department this channel belongs to. |
| Provisioning | This controls backend media resource allocations at the time this channel is first created. It is only visible for new resources, until they are saved. Note that due to service upgrades the Auto provisioning feature is now disabled until all our components are migrated. See further details on how this affects web channels in the Web Chat Config tab chapter below. |
| Time zone | Set the time zone for this channel. Time related operations such as Opening Hours are using this value. The system is accounting for Daylight Saving Time automatically, it will always know what the actual time is in the designated zone. |
| Enabled | Allows the temporary disablement/enablement of the channel. |
| Default | Check this to mark the channel for outbound voice calls. This will de-select the same on any other channel in the tenant. Having a channel marked as Default will preselect it in the Buzzeasy Agent application's outbound dialling panel, so agents can use it right away without having to search for it. |
| Real time Service Level Target | Allows you to view and set the Service Level target in seconds for your channel. |
Opening Hours tab
Channels can designate periods of time when they are 'open'. This can be used in associated workflows to make routing decisions.
There can be multiple separate periods designated per weekdays.
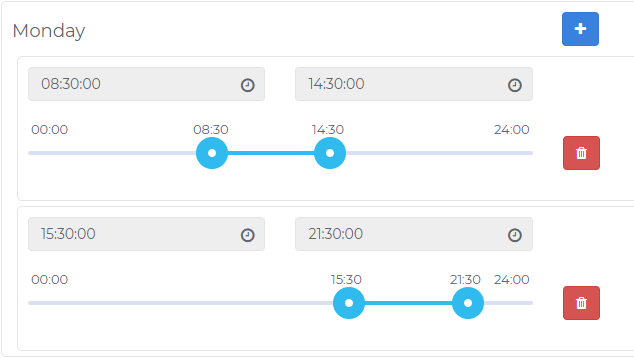
To designate a time period where the channel would be open for inbound interactions:
Click the + button for the weekday of interest.
Enter a From and To time, or use the slider control to specify this time period.
If you need multiple time periods on the same day, use the + button as needed.
Use the Delete button (Thrash can icon) to remove an existing time period.
Tip
Opening Hours are calculated using the Time Zone setting in the General Properties tab.
Holidays
On top of the weekday approach of Opening Hours, you can also control the availability of channels by defining explicit calendar days to close, or time periods of explicit calendar days to open.

Select a Date in the date picker. This can be any calendar day.
Set the Open field. When choosing Open, the entry will be used to keep the channel open. Close will mean the channel will be closed on the entire calendar day.
For Open scenarios, specify the Open Time and Close Time in
HH:MM:SSformat.Add a Comment for the entry, and click Add.
Tip
Holidays are calculated using the Time Zone setting in the General Properties tab.
Channels tab
Use this tab to select which media would you like this channel to be enabled for.
- Webchat - BotFramework (includes Facebook Messenger)
- Voice (SIP) – used for Microsoft Teams
Workflow tab
Workflows are responsible for routing the conversations to the right participant at the right time.
| Workflow | The name of the workflow to be used for this channel. |
There can be a single workflow designated for a channel.
Scripting Configuration tab
Buzzeasy Agent application can use Geomant's Cloud Scripting services to formalize the agent-customer dialogue. This helps keeping the communication in control to acquire / provide all the important information during the conversation.
Read more about the Script Designer.
Acquire the URL of the Scripting flow by copying it from Script Designer, and append all parameters as per the details below.
Paste the complete URL into the field.
Click Submit.
Scripting URL
In order to use Geomant Cloud Scripting, the designated scripting flow needs to be created in Script Designer, the base URL copied from there, with additional parameters appended to pass data from the Buzzeasy Agent app into the script flow.
The URL consists of two main sections: the base URL that you copy from Script Designer, and the parameters.
Base URL
https://script-runner-prod.geomant.cloud/?scriptId=[SCRIPT_ID]&versionId=[VERSION_ID]&isPublic=[PUBLIC_FLAG]
Where [SCRIPT_ID] is the actual script flow ID, [VERSION_ID] is the version of the flow in Script Designer, or the word active that simply means the version that is currently set as active. The [PUBLIC_FLAG] is either true or false.
Public scripts are accessible without authentication. Running private scripts require Buzzeasy services to authenticate to the Scripting services to provide an additional layer of security. Generally it is best to use private scripts.
Data Parameters
There are a couple of reserved parameters that are needed for the proper execution of the script flow. To use them, simply add these as-is to the URL – data inside are automatically populated.
| &processId={{ProcessId}} | This makes sure any data the agent already saved in a script flow is retained even after a browser refresh. Optional, but advised to use. |
| &ConversationId={{ConversationId}} | Optional. It passes the Buzzeasy conversation ID to the script for business uses (e.g. to be able to relate Scripting and Buzzeasy reporting data). |
| #{{Token}} | Mandatory for private scripts. It must be appended to the end of the URL. |
You can also pass any data field from the WorkItem and Customer datasets using the syntax &scriptVariableName={{[BUZZEASY_DATASET].[FIELD_NAME]}}.
Note
Please note that campaign data is not yet available in scripting, but part of the roadmap.
- The scriptVariableName is going to be the name of the Scripting variable in the flow. It is up to you (and/or the person designing the script) to decide what variable names are needed in the flow.
- Replace [BUZZEASY_DATASET] with either the
WorkItemorCustomerliteral strings. - Replace [FIELD_NAME] with the name of the dataset field.
Other Web Content
The Buzzeasy Agent application can display other web content in place of scripts. You need to paste the publicly accessible URL of that content into the Scripting URL field.
The third party web content needs to allow the option to IFRAME into the Buzzeasy Agent application.
Work Items tab
After a conversation is ended, agents have an option to select a work item or disposition code to be stored for analytical purposes. These are business labels to help categorize conversations.
Work Items tab shows up once a channel is already saved and you open it for editing.
Click the + button to add a new code.
Enter the code in the field that shows up.
Repeat these steps for any additional code that is needed.
Click Submit to save the information.
Voice Config tab
This tab is visible when the voice media is enabled.
The voice configuration defines the incoming number that is used to reach the channel in the voice media.
| Inbound Number | The dialled number to match for this channel. |
Web Chat Config tab
This tab is visible when the web chat media is enabled.
Web chat media type covers customer channels such as a chat widget embedded onto a corporate website, Facebook Messenger, or Microsoft Bot Framework Direct Line API.
Manual Provisioning of the Chat Resources
Edit and save the new channel.
In the list of all channels, make a note of the ID of the newly created channel.
Raise a support case with Geomant and request the manual provisioning of the chat resources for the previous channel ID.
Geomant Support creates the resources and configures the new channel to access them.
You are now ready to use the new channel.
Web Chat Advanced Settings
Clicking this button opens the following fields that can be configured for various media channels.
| Microsoft App ID | The application ID set when creating the Bot Channel registration. This can be found on Azure portal. This might be filled out automatically when the channel was created using auto provisioning method. |
| Microsoft App Secret | The app secret part of the Bot Channel registration. This can be found or regenerated on the Azure portal. This might be filled out automatically when the channel was created using auto provisioning method. |
| Facebook Page Secret | The page secret of the Facebook Page used in conjunction with the Bot Framework. This can be found in the Facebook Developer Portal. |
| Direct Line Secret Key | The Direct Line secret used with the Bot Framework. It is available and can be regenerated on the Azure portal. |
Note
Customers having the above referenced Microsoft resources located in their own Azure subscriptions can copy or in certain cases even regenerate the above details on their own Azure portal. Customers using Geomant's Production Environment will never need to deal with these values, Geomant will maintain these on their behalf.
Web Chat Snippet
Contact centers intent on offering web chat services to their customers over their corporate websites can take and embed the presented HTML/Javascript code snippet in there.
Buzzeasy portal offers a one-click testing capability, launching a simple web page containing our end-customer facing web widget.
Customizing the Web Widget
The portal provides HTML style editors for the various parameters of the web widget. Click any of the editor fields to customize the parameters.
Use the HTML color palettes to change color. Use the image uploader fields to change icons. Use the font style fields to alter the look of the various texts in the widget.
Click Use Default if you'd rather change a style back to its default setting. Each style field can be reset individually.
Click the Upload Styles button to activate all changes in the snippet code.
If you changed and uploaded any style, make sure to update the snippet you might have copied previously with the updated version.
Tip
Perform all style changes needed, and click Upload Styles at the end to make sure all changes are incorporated into the copy of the snippet you embed in the corporate website.
SMS Config tab
This tab is visible when the SMS media is enabled.
SMS media works by customers sending SMS texts to PSTN numbers Buzzeasy provides by integrating with various SMS services. Geomant needs to provision SMS numbers for customers before they can be used.
SMS messages look and feel similar to other chat media type work items on the agent user interface.
| Account | The SMS account that provides the connection to a provider. Geomant creates these. |
| SMS number | The Dedicated Long Number to use for this chat service. |
Note
Once an SMS number has been assigned to a channel, it is no longer available for other channels.
WhatsApp Config tab
This tab is visible when the WhatsApp media is enabled.
Buzzeasy provides WhatsApp connectivity using Twilio.
| Account | The AccountSID to be retrieved from the Twilio Dashboard. |
| Auth token | The Auth token from the Twilio Dashboard. |
Email Config tab
This tab is visible when the Email media is enabled.
Email media works by connecting to Microsoft O365 email services. O365 customers can set the channel to access a single O365 mailbox and forward incoming emails in there to the associated agents.
| Folder | The folder to watch e.g. Inbox |
| User | The user account e.g. jane.doe@companyname.com |
Buzzeasy needs to register itself in the Azure Active Directory of the customer in the form of an Enterprise App. This is a one time configuration and is initiated by clicking the Register App button.
Manage Mail Enabled Security Groups
Mail enabled security groups enable the granting of access permissions to resources in Active Directory.
Manage mail-enabled security groups in Exchange Online | Microsoft Docs
Follow these steps to create and configure the mail-enabled security group.
Create a mail-enabled security group in exchange. As this group also functions as a distribution group and you do not intend to use this feature use a dummy email address.
Add those accounts (mailboxes) to that group which expected to work within Buzzeasy (as an Email channel).
Create a New-ApplicationAccessPolicy to allow Buzzeasy to read/write emails on-behalf of those accounts.
AppId: Your organization's Buzzeasy Email Integration App id Buzzeasy Email Integration - Microsoft Azure.
PolicyScopeGroupId: The group you just created
AccessRight: RestrictAccess
Note
As part of the one time app registration process, Azure Active Directory will require a domain administrator's consent for this Buzzeasy app to access the customer's domain in order to fetch and load emails.
Due to the nature of the respective Microsoft APIs, the access request is wide in scope – involving the ability to access every mailbox.
Make sure you limit the scope of access to target the designated mailboxes only:
Limiting application permissions to specific Exchange Online mailboxes - Microsoft Graph | Microsoft Docs.
Twitter Config tab
This tab is visible when the Twitter media is enabled.
Within this tab, set the configuration required to enable Twitter as a channel.
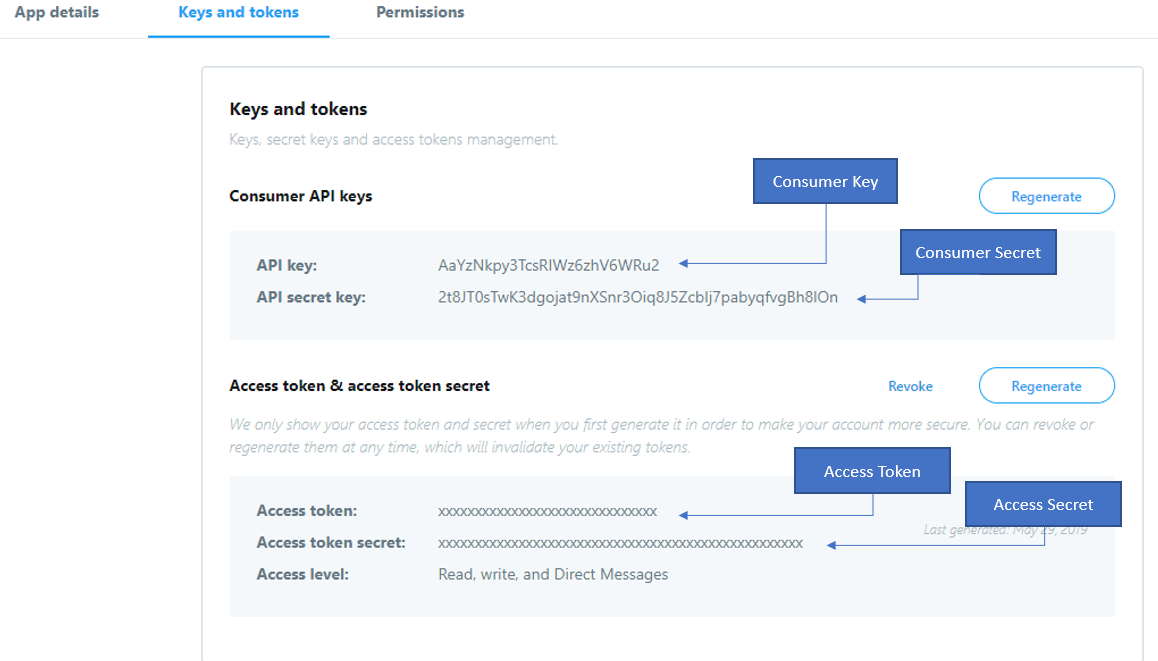
| Access Token | Twitter app Access Token |
| Access Secret | Twitter app Access Token Secret |
| Consumer Key | Consumer API Key |
| Consumer Secret | Consumer API secret Key |
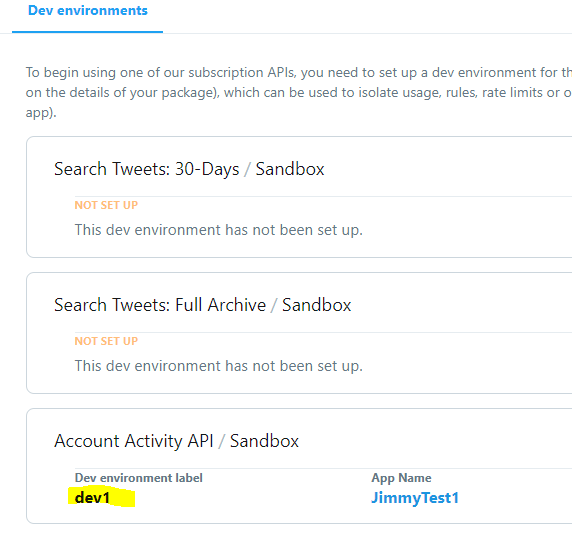
| Environment Name | Environment label |