Geomant Scripting AddOn v2.0
Designer's Guide
The Script Editor provides an easy to use graphical user interface for the creation of various textual, HTML form and multimedia elements organized into pages or visual cards that CC agents, representatives, advisors can read and manipulate (including entering data to proper fields, making selection choices, etc) during their customer conversations.
Note
For further insight into the various objects and their naming conventions used throughout this documentation please refer to the Terms article.
Audience
This document addresses the people tasked to design and manage the individual scripts in their company.
Access and Authentication
The Script Editor can be used with Google Chrome browser. For the cloud version, access is performed using Microsoft (Azure AD) authentication. This means that using the cloud edition of the scripting solution requires user accounts registered in a working Microsoft O365 Tenant.
The Script Runner presents the script screen in a browser embedded into various other Geomant software services either in the cloud or on-premises.
Note
Authentication is disabled by default for the on-premises scripting components.
Nodes and Flows
A script is a graph of various types of nodes connected in a specific configuration, using variables to exchange data with the agents and external data sources.
In simple scripts where every node is hooked up to a single other node, forming a linear chain, the agents are following the same path every time. In more complex scripts with a lot of nodes and multiple connections, where deciding which outbound connection to choose depend on data acquired during execution time, can be thought of as the pool of all the potential paths an agent can visit, and so there is no guarantee the agents will actually go through the same sequence of nodes in the same order at every execution.
Card Nodes
Cards are nodes the agents can work with to gain relevant information for their customer conversation. You need to make sure each card shows up in proper sequence to provide the relevant set of information for the agents at the right time.
Integration nodes
These allow importing and exporting data using REST APIs. A typical use case in a Contact Center environment would be to get customer related data from a backend (CRM) system at the time of the customer's call or chat request, based on the Caller Information presented by the telephony system.
The properties of the integration node are configured in the same way as for standard display cards.

The example above shows an API 'GET' command which allows the retrieval of external data that may be used to display on a card.
Other common API methods such as POST and PUT are supported and are used to facilitate the update of information shown on the cards and to export data to a 3rd party (e.g. local database, or Azure Table).
Subflows
These provide are a way to simply reference another, saved script or flow in the current script.
Start and End Nodes
These are just reference points marking the starting and finishing point of the scripts.
Logging In
In order to log on to the Script Editor, the designers navigate their browsers to the cloud URL or the on-premises URL of the service.
Navigate to the Script Editor Cloud URL, or the on-premises URL local to your deployment.
When prompted (in the cloud edition), click the Sign in with Microsoft button.
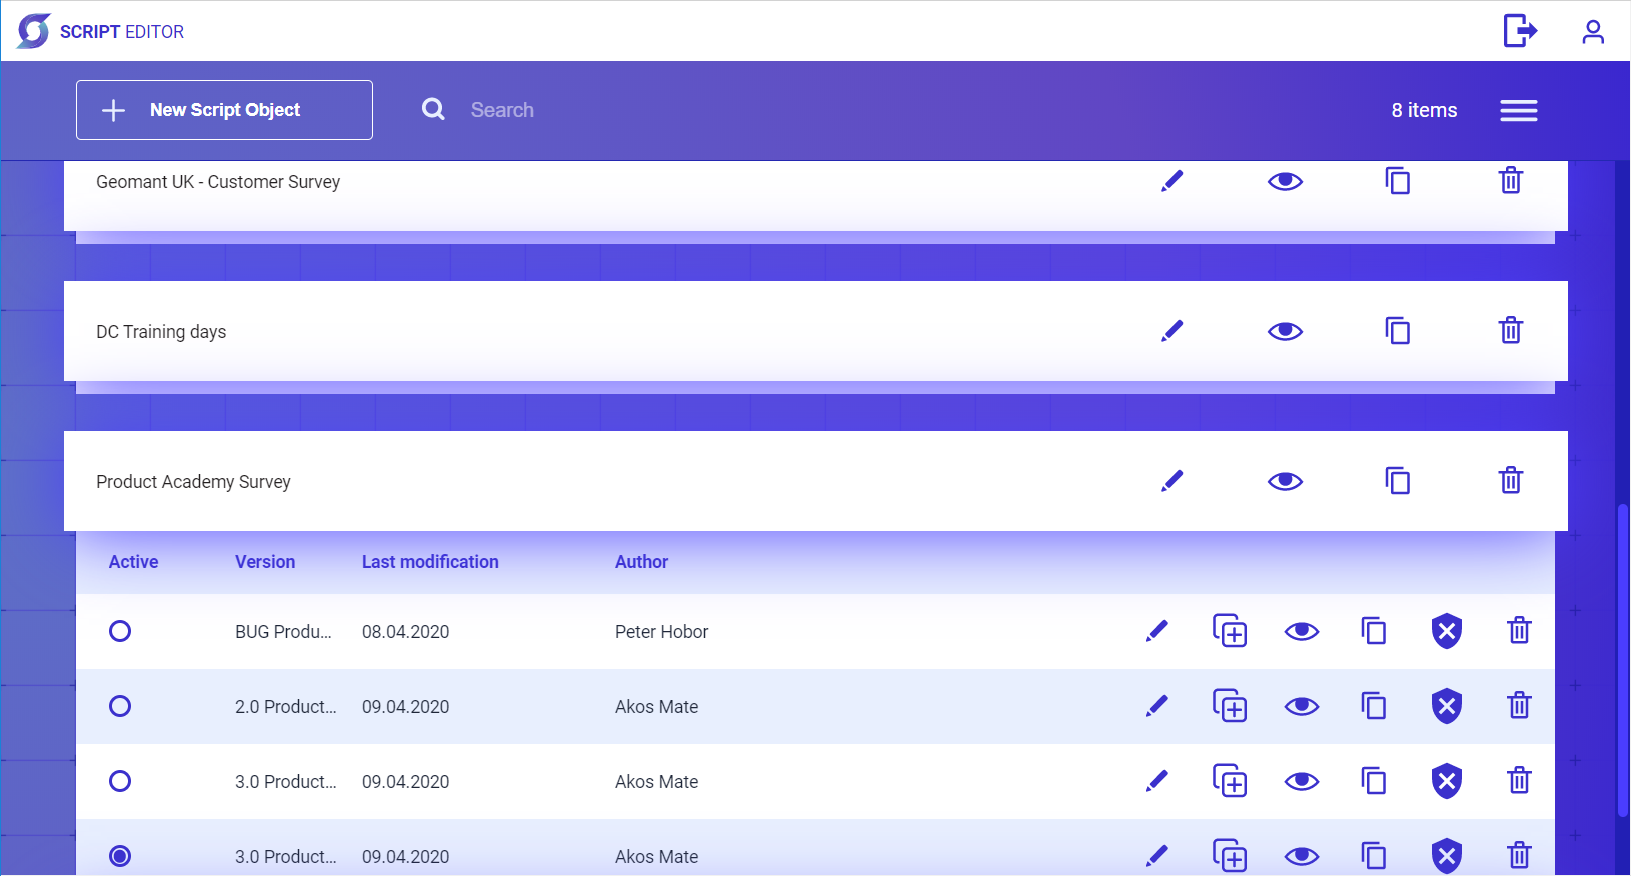
The Script List shows up providing the list of scripts available in your tenant.
The Script List
You can add new scripts or delete existing ones in the Script List. You can also select a version of a script to be the active one, and edit any of them.
Editing a Script
In the Script List click the edit icon for the script you wish to edit. This way you will edit the Active version of the script.
Or click the name of the script in the Script List to see all the versions available and click the edit icon for the version of the script you wish to edit.
The Editor shows up presenting the Workspace at the left and the Properties panel at the right.
Script Settings
Every script has a name and it also stores the person created it and the date of the last modification.
Click the Start node in the workspace and then the General tab in the properties panel.
You can change the name, review the last modification date and the author.
Design View
When clicking any node – except for the End type – in the workspace, the properties panel contains a Design tab. Clicking it brings up the Design view.
Screen Settings
You can set multiple screen sizes in the script for previewing cards. Though contents of the cards are dynamically adapting to the selected size, you will need to review each of them in the desired screen size for UI appeal. However the screen sizes can purely be used for preview purposes.
- Click the Start node in the workspace and then the Design tab in the properties panel.
- Add or modify screen sizes.
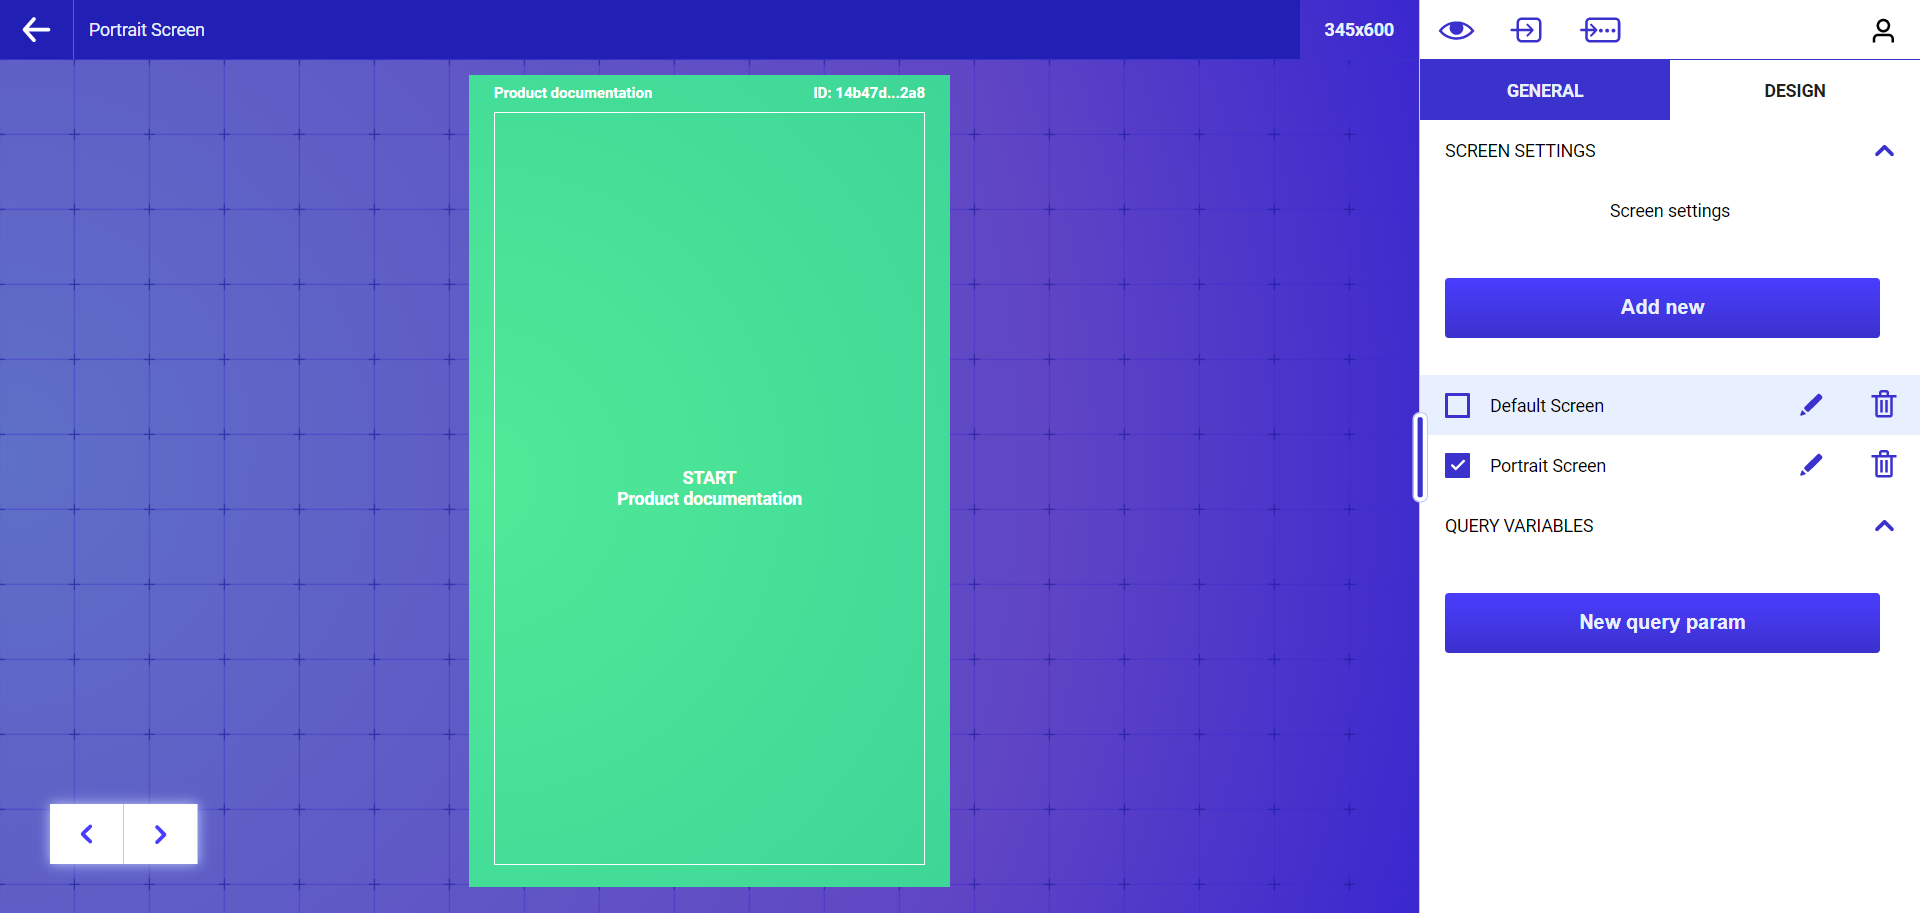 Script Editor – Screen Settings
Note
The Script Runner does not use the screen sizes defined in the Editor.
Query Parameters
You can define what query parameter supplied in the query URL is stored into which variable.
Click the Start node in the workspace and then the Design tab in the properties panel.
Add or modify query parameters.
General View
The General view provides an overall view of the web of nodes and their connections in the workspace.
The cards and their connections should be designed in a way that follows the logical flow of the conversation the agents maintain with the customers. They should present information and similarly get the agent to ask for information at the right time.
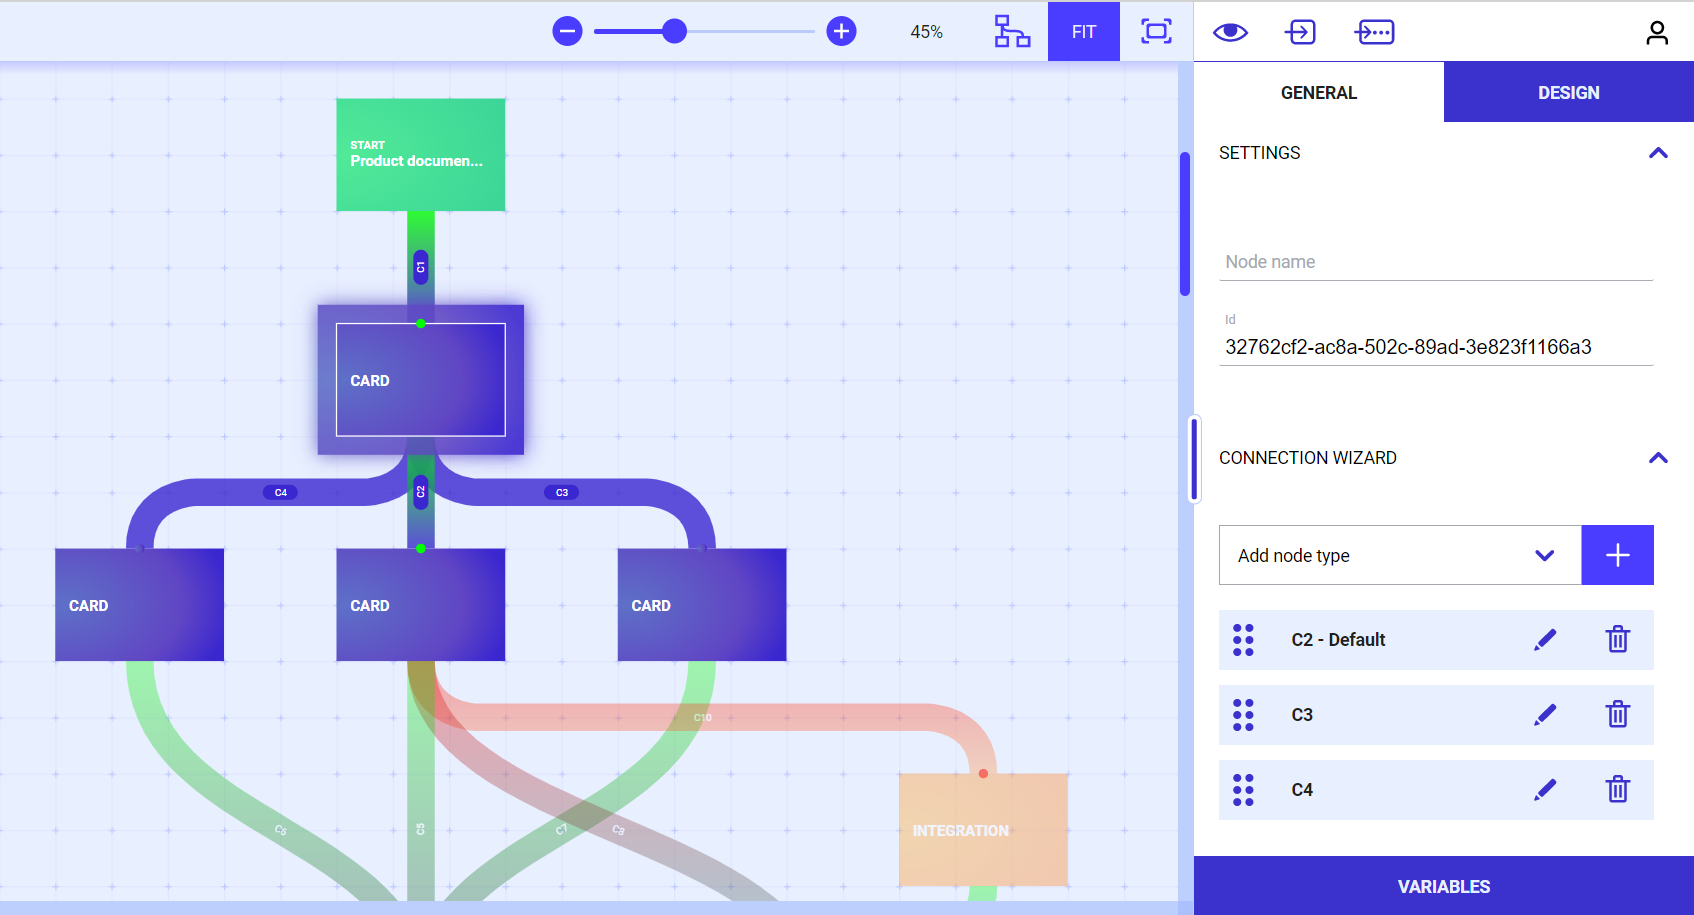 Sample script in General view
When the agent decides to navigate away from a node with many outbound connections, the routing logic applied on each connection is evaluated in the order they are listed in the General tab of the properties panel. For this, some of the data collected by the agent needs to be stored in variables.
Card Content
The content of the cards are called Elements that may be in the form of Text (including Hyperlinks), Images, Input Text, Input Number, Checkbox, and Choice Set.
Cards are designed in rows, with each row consisting of one to four columns. You can add any available element to each column and adjust the width of the column in that row (where more than one column exists) if desired.
Data displayed in all elements can be hardwired at design time. Most of the elements however can also be fed from an associated variable filled at an earlier node of the script. Also, elements capable of acquiring data from the agent store these in variables to be reused in routing logics, to display at other cards, and/or to be exported to external applications via integration nodes.
The following sections describe the different elements available.
Text
This element is for displaying static text. The formatting capabilities are simple by design to be able to use adaptive qualities – for instance, 'typical' font selection found in word processing applications is replaced with adaptive font sizing and colour templates that will be finalized at the time the card is rendered by the Script Runner. For example colors are referenced by use cases and not color names: 'warning' typically displayed in red, 'good' is for green, etc.
Features such as 'Bold' and 'Italic' as well as text alignment are also supported.
The text element is also used for adding Hyperlinks to any accessible web source, be it an internal knowledge base, external web pages, web based documents and any other supported link targets.
Images
This element is for displaying images to the agents. This is achieved by providing the URL to the image that needs to be published by a web service. Image size is adaptive based on the standard sizing options available.
Alignment is supported.
Input Text and Input Number
These elements enable the agents to add free text into the script during the conversation with the customer. This data may be stored into a variable to help with the routing logic or as a way of capturing ad hoc data for export to another application.
The Text and Number Input elements are identical in terms of their use, where the Number Input type restricts the advisor to only being able to input numeric characters within a defined range.
Checkbox
This element allows incorporating logical script flow decisions or data collection in the form of a checkbox.
Typical usage would be to highlight a piece of the script that requires special attention and therefore needs to be acknowledged (checked) by the agents before this card is closed and a next node is selected.
Its value stored in a variable, checkboxes can also alter the routing logic as well as be exported to external applications.
Choice Set
This element allows the agent to select from available choices.
Three Choice Sets are available
- Single Select (Droplist),
- Single Select (Radio Button),
- Multiple Select (Checkbox).
The Single Select (Droplist) is commonly used to provide a script flow variable, whereby the selection is usually a number of options that provides the logical decision for the next card to be displayed.
The Single Select (Radio Button) option is commonly used for 'Yes/No' type decisions. For example, the customer may be asked if they agree with a statement or disclaimer that has just been made by the advisor. If the advisor selects 'Yes', then the script flows through to the next expected section but if the advisor selects 'No' then the script could deviate to a different node.
The Multiple Select (Checkbox) option is typically used to gather data for exporting.
Node Connections
While each node can only have a single inbound (or 'previous', 'parent')) connection, there is no limit on the number of outbound ('next', 'child') connections. When discussing connections in general, we refer to these 'next' or 'outbound' connections. You can set up the connection to an existing (other) node, or to a new one.
Connecting an Existing Node
While in General view, find the node you wish to connect another node to.
Make sure the workspace zoom level is at 50% or higher.
Click the node and click the settings icon
 showing up at the lower right corner of the node.
Select the Connect Nodes icon
 . The nodes available for connection are marked by a dashed border. Click one of the available nodes to establish the new connection.
Revise and amend the routing logic for all connections on this node using the Connection Wizard in the properties panel.
Connecting a New Node
There are two ways to create a connection to a new node: using the workspace or the properties panel.
Connection a New Node Using the Workspace
While in General view, find the node you wish to connect another node to.
Make sure the workspace zoom level is at 50% or higher.
Click the node and click the settings icon
showing up at the lower right corner of the node.Select the Add Node icon
 . A new node placeholder is placed on the workspace connected to this node.
Click the new node placeholder in the workspace and select a type for it.
Click the originator node and revise its routing logic for all connections using the Connection Wizard in the properties panel.
Proceed working on the newly created node.
Connecting a New Node Using the Properties Panel
While in General view, find the node you wish to connect another node to.
Click the node and select the type of the new node in the Connection Wizard of the properties panel.
Click the add node icon
 . The new node is added to the workspace, connected.
Revise and amend the routing logic for all connections on this node using the Connection Wizard in the properties panel.
Configuring Routing Logic
Each outbound connection on a node is capable of evaluating any number of variables to determine if it will be used to select the next node.
While in General view, find and click the node with outbound connection(s) you would like to edit.
Edit the routing logic of the proper connection in the Connection Wizard.
Save the updated logic.
Each line in the routing logic evaluates the content of a single variable, however lines can be grouped in a 'logical AND' or 'logical OR' manner. Moreover there are multiple layers of such bindings to allow complex evaluation groupings. There are no limit on the number of variables to evaluate.
Eventually, the entire multi-line logic evaluates to a single true or false value which determines if this connection will participate in the eventual selection for the next node.
There can be more than one outbound connection on a node with a routing logic evaluating to 'true', therefore the list of these connections is ordered. Items in the Connection Wizard can be dragged in front of or behind others – the ones above will get preference in deciding which node is going to be the next one.
Rendering Cards
Once designed, created and published, the cards are presented for the agent within a capable application. This could be via a supported web browser or by integrating with the customer CRM / ERP system.
The script is rendered and the flow of nodes and cards are managed by the Script Runner service. The Script Editor is not involved with executing the scripts.