Stopper Widget
Geomant does not support this feature at this time. For more information about the interaction widgets, please contact us at supportdesk@geomant.com
With the stopper widget, you can easily measure your elapsed time, countdown/countup, trigger event when the widget reaches the specified time, and a lot more.
The stopper widget can be found in the Interactions section.

Options
A stopper widget always has a start from time (0 days 0 hours 0 minutes 0 seconds by default), and can also have a stop at time. It can start from a negative value, for example, if you want to start a timer a few seconds earlier, so it would display –00:03 –00:02 –00:01 00:00 00:01 00:02… etc.
It can either Count up or Count down from the start from value. It counts infinitely or until it reaches the stop at value.
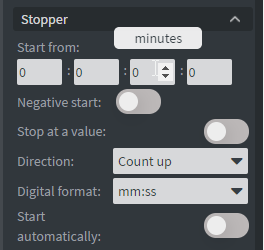
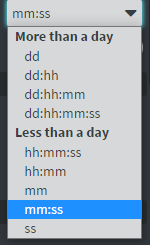
Multiple format options are available. If the time passed is 1 hour and 33 minutes, but the selected format doesn’t have hours in it, the minute’s number will be increased, e.g. it would show 93 minutes in this case.
Starting
A stopper widget can be started in multiple ways. The easiest is to turn on the Start automatically option in the properties menu. It will start from the start value at every page start (or when the widget becomes visible via an action).
Actions
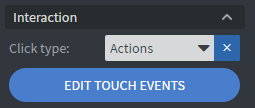
If we need anything more complex, we can use actions. They can attach to for example to Sensor events or Touch events. For testing purposes, just add some image widgets and use touch events. In the image widget’s other tab, in the interactions section, click the edit touch events button (alternatively, press ctrl+shift+e while the image widget is selected).
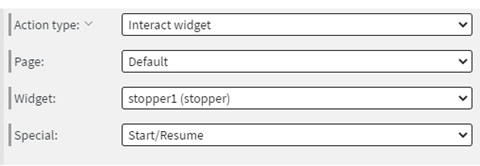
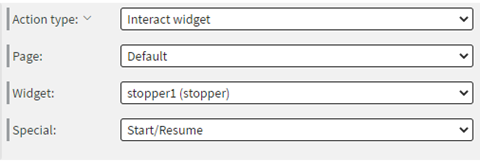
Add an Interact widget action that targets the stopper widget. There are several stopper specific actions:
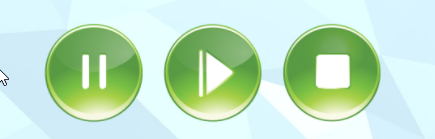
- (Re)start: Starts the stopper widget from the start from time
- Stop: Resets back to the start from time and stops counting.
- Pause: Stops counting, but does not reset.
- Start/resume: Continues after a pause from where it was paused. If it was not started yet, starts from the start from time.
- Toggle: Toggles between Pause and Start/resume actions.
- Set start at: Overwrites the start from time. If a Stop or (Re)start action is not issued ant the widget was already counting, it will act as if the time counting happened from this time. If we had a stopper start from 00:00 and is now at 02:13 and we set start from to 10:00, it will display 12:13.
- Set stop at: Changes the stop at value. Also turns on has stop at (unless each value is left empty, in that case, it turns it off!). If the stopper is counting and is already past this time, it will jump to this time and stop counting.
- Set current time: Change the currently displayed time to this time set here. It will not change other properties (e.g. start from stays the same, etc.)
Events on end actions
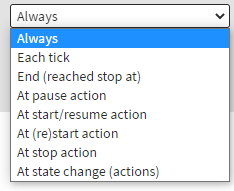
- End (reached stop at): only when stop at value is set and is reached.
- Each tick: after every change (~once per sec), at the stop, at pause.
- At pause action: When an event targeted it with pause action (or toggle paused it).
- At start/resume action: When an event targeted it with resume action (or toggle resumed it).
- At (re)start action: When an event targeted it with re(start) action or auto start started it.
- At stop action: When an event is targeted with stop action.
- At state change (actions): When any of (Re)start, Stop, Pause, Start/Resume, Set start time, Set stop time actions happen.
- Always: any of the above.
- Received value: current time as a string (in the widget’s format)
- Structure for the property of received value:
{
"config": "object used for syncing stopper widgets(more details below)",
"current": "current time as string in the widget’s format",
"details": {
"asObject": {
"hour": "number or null",
"min": "number or null",
"sec": "number or null",
"sign": "true when negative,false when positive"
},
"asSec": "current time converted to sec",
"asString": "current time as string in the widget’s format",
"digitalFormat": "‘hh: mm’ or ‘mm’ or ‘ss’,etc",
"direction": "‘countDown’ or ‘countUp’",
"paused": "true or false",
"running": "true or false"
}
}
Some use cases
Stopper widget with meter as a progress bar
Add a stopper widget.
For this to make sense, we need a timer that has a start and an end time. Turn on the Stop at value option and set an end time. You can also change the start time. For this demo, we will also turn on the Start automatically option.

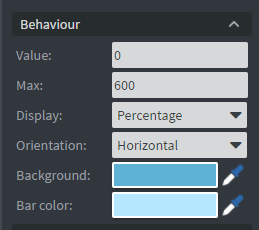
Add a meter widget, calculate the difference between the start and end time in seconds. In this case it’s (10-0) * 60 = 600. Set this number as the maximum of the meter widget. You could set the Orientation to Horizontal. Change the colors to fit your content. You could also add rounding or a mask, etc for it to look better.
You can move the meter behind the stopper widget in the Layers menu. (Tip: If you don’t want the text to show up on the meter widget, just set the font color to transparent.)
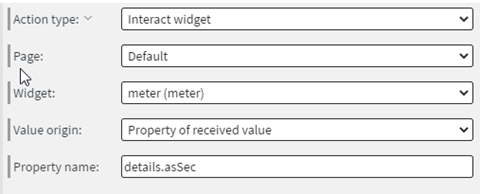
Now select the stopper widget and on the Other tab, find the Edit stopper actions button. Add a new action and choose Each tick as the Event type. Then set up the action: Interact widget, target the meter widget on the same page, Value origin should be Property of received value, and set property name to details.asSec. You may need to turn off Simplified view in the bottom corner for all the options to show up!
Now you can test it in the preview.
Later:
Stopper widgets synced through internal datasource
Add a stopper widget and set up its style, start from, direction, stop at (if you need it), etc.
We will also need some kind of action to interact with it. These could be tied to sensor events, etc. In this example, we will use touch events.
Add some buttons, for example, image widgets. Use the Edit touch events on the other tab or press Ctrl+Shift+E to open the touch events dialog. Add the corresponding Interact widget action to each of them, targeting the stopper widget with Start/Resume, Pause, and Stop or (Re)start.
Test if all these work in the preview. Resume starts from where it is, Pause stops at where it is, Stop goes back to the start time and (Re)start starts from the start time.
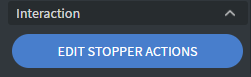
Now click the Edit stopper events on the stopper widget’s Other tab.
Add a new action and select Change datasource for action type. We can create the internal datasource right here with the plus button.
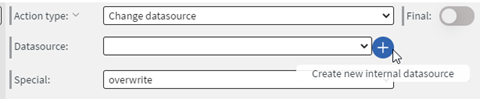
Now we need to click the Create webhook and Create API key buttons.
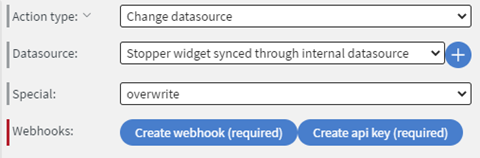
If both of these were successful, the buttons will be replaced by this text:

Now set Value origin to Property of received value and type config as the Property name. This is what you should see:
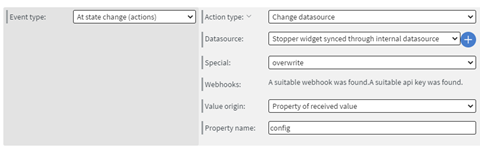
Also, set the event type to At state change (actions). It needs to be set to this to capture all the related events but not send too many unnecessary notifications.
Now open the content in the preview and start the stopper at least once. It’s important to set up the datasource with the data.
After that, we can bind any stopper widget to this data. Go to the Other tab and click the Bind anything button or alternatively use Ctrl + Shift + double click. Let’s start by binding this same stopper widget to this data. Select the Config object (for sync) option in the bind anything window.
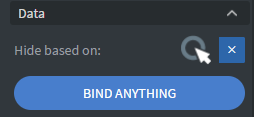


We only need to select the datasource itself. If we used overwrite property of data instead of overwrite in the change datasource action, we would need to select that level. You know you have the correct level when the Data in the picker preview looks similar to this:

Now if you open this in the preview again, it will be at the state you last left it. If it was counting, it will display the time spent since you last started it. If it was paused, it will be paused at that same second, etc. For any other stoppers you need to follow this one, only do the Bind anything step.
While using this, make sure you are only directly interacting with one of the widgets to assure it works as intended. Best is to use a different content for the master stopper and the following stoppers.
Alternatively, you could create your own external application that writes the config object into an internal datasource (via a webhook) and make all your stopper wigets follow it, just bind them to this datasource instead.
Config structure:
{
"direction": "countDown",
"hasStopAt": true,
"msFromPlayToPause": 0,
"startFrom": {
"hour": 0,
"min": 13,
"sec": 0
},
"startTimestamp": 1622706857667,
"state": "started",
"stopAt": {
"hour": 0,
"min": 0,
"sec": 0
}
}
State can be: started, stopped, or paused.
- MsFromPlayToPause is only needed when paused.
- Stop at is only needed when hasStopAt is true.
- Direction can be count Down or count Up.