How to Create Microsoft API Credentials
Creating a Microsoft application for Wallboard
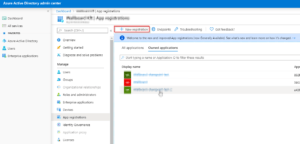
- Open azure portal.
- Select Azure Active Directory -> App registrations.
- New Registration.
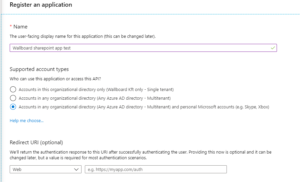
- Name your application.
- Select "Accounts in any organizational directory (Any Azure AD directory - Multitenant) and personal Microsoft accounts (e.g. Skype, Xbox)" under supported account types.
- Register.
Setting up your Microsoft application
Authentication
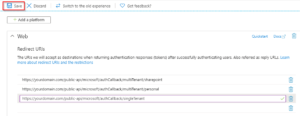
Add WEB type platform -> Set redirect URI to:
- https://{yourdomain}/public-api/microsoft/authCallback/multiTenant/sharepoint
Configure
Add more Redirect URI to support different authentication scenarios:
- Add https://{yourdomain}/public-api/microsoft/authCallback/multiTenant/personal
- Add https://{yourdomain}/public-api/microsoft/authCallback/singleTenant
- Add https://{yourdomain}/public-api/microsoft/authCallback/multiTenant/personal
Save
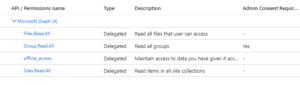
API permissions
- Add permission
- Choose Microsoft Graph
- Choose delegated permissions
- Add the following permissions
- Offline_access
- Files.Read.All
- Group.Read.All
- Sites.Read.All
- Calendars.ReadWrite (for calendar integration)
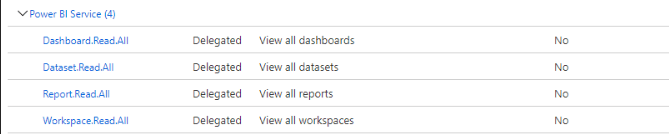
API permissions for PowerBI
- Add permission for Power BI
- Choose Power BI
- Choose delegated permissions
- Add the following permissions
- Dashboard.Read.All
- Dataset.Read.All
- Report.Read.All
- Workspace.Read.All
Certificates and secrets
- Under Client secrets -> New client secret
- Fill accordingly
- Copy the secret! (It won't be readable afterwards.)
Set up Microsoft application in Wallboard
- You need superadmin rights in Wallboard
- Open system settings
- Under Microsoft API settings - Ms API Oauth2 client-id - you can find it on the overview page of the application in the azure active directory (with name of "Application (client) ID")
- Restart the server.
- Ms API Oauth2 client-secret - the secret that you set up earlier