Development API
API usage guide
1. Overview
In this document, you can find some useful information about the Wallboard development API and the usage of it. The development API mainly follows the REST approach with OAuth 2.0 authentication and authorization standard. For the detailed description of the end-points you can use our swagger, which you can find on any of our reseller servers in the following way:
{reseller server domain}/swagger-ui.html#/ e.g. https://editor.wallboard.geomant.com/swagger-ui.html#/
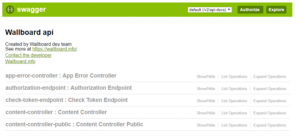
2. About swagger
Swagger is an open source API browser which can be used to understand the API through the implicit and explicit (written by developers) documentation. Opening our swagger you should see something like this:
3. End-points
We have two types of end-points:
Public
- Callable by any client
- API root starts with "/public-api/"
- No OAuth2 authorization
- Usually used with GUID based ID-s
Secured
- Only callable through OAuth2 authorization
- API root starts with "/api/"
For most of our handled resources we have a resource-based controller which mainly follows REST rules:
- HTTP GET /api/{resource}/: get all resources. (There are some unique cases when GET multiple resources is a bit more complicated, see below.)
- HTTP GET /api/{resource}/{resourceId}: get resource by the given ID.
- HTTP POST /api/{resource}/ (with object in body): create resource by given object.
- HTTP PUT /api/{resource}/{resourceId} (with object in body): update the resource by the given id.
- HTTP DELETE /api/{resource}/{resourceId}: delete the resource by the given ID.
The other calls are action based and fully custom so they won’t follow any specific rule. If you have any questions about a specific call without external documentation, please contact us.
The API only uses JSON format for data transfer objects.
The update logic usually follows the “if an attribute is null, it’s ignored” logic.
In the return value if a primitive attribute is not present it means NULL.
3.1 GET multiple resources
Our GET logic is constantly evolving to make it more generic with advanced search options, but this causes differences in the logic. The other problem is that swagger won't show all of the input parameters, like the ones used for pagination or in some cases for search. Moreover there are some cases when swagger shows invalid parameters due to it's buggy object parsing. You should not rely fully on swagger it's only a tool to discover the API. If you have any problems you want to solve please contact us, we are happy to help.
3.1.1. The customerId parameter on endpoints
If you start to discover the API you can see the customerId parameter on a lot of endpoint. This is used by admin users (or network owners-subreseller) to define which customer they want to access (get their resources). Non-admin users don't have to fill this parameter, because they can only access their customer's resources. If an admin wants to get every resource in the system set this value to "-1".
3.1.2. Pagination
For “get all” calls we use pagination which is implemented by the basic Spring pagination logic. If you don’t set any additional parameter, the API gives back the first 20 elements. You can find more information about this here.
3.1.3. Search parameter
On most of the resource getter endpoints there is a parameter named "search" (in some cases not shown by swagger). To create dynamic queries we developed a custom query language you can use to filter the resources. It's not complete yet, but it can handle the majority of the use-cases.
Currently there is no escape mechanism so don't use the following syntax elements inside the criteria values.
Syntax:
- equals: ":"
- used for strings means contains ("%value%")
- greater than: ">"
- compatible with dates
- less than: "<"
- compatible with dates
- and: ","
- or: "|"
- null value: "NULL"
- not compatible with primitive values
- not null value: "!NULL"
- not compatible with primitive values
- true: "true"
- used for boolean values
- false: "false"
- used for boolean values
Examples:
- user name contains the letter a: name:a
- device state is online and is in emergency state: state:ONLINE,device.emergencyStatus:true
- device content's name contains the substring "happy new year": content.name:happy new year
3.2 Roles
All users have a role and all of the secured API requires a minimum role to use it. The role is always hierarchical, so a user with an OWNER role can use all endpoints that require an OWNER or lower roles. We use the following hierarchy:
- ADMIN
- OWNER
- TECHNICIAN
- APPROVER
- EDITOR
- MESSENGER
- VIEWER
4. OAuth2 usage
In order to use OAuth2 authentication in swagger click on the “Authorize” button in the top right of the screen and fill the modal with valid login information. Example on the picture below:
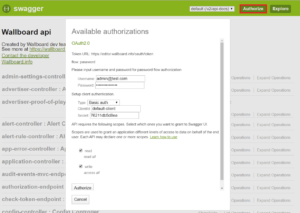
User information:
- Username: valid username in the system.
- Password: the given user’s password.
Client information (oauth client):
- Type: always chose “Basic auth”.
- ClientId: found in “oauth_client_details” database table (client_id column).
- Secret: the secret of the given client (client_secret column).
- You can use the default-client. (This is used by our front-end.)
Scopes
- Always check “read” and “write”
Finally, click the “Authorize” button. After this, the swagger will reload the page and now you can use the secured end-points as the given authorized user.
4.1. More about client details
OAuth2 uses client details to describe the different clients (like angular front-end or Android) for cases when we want to handle them differently by giving them tokens different validity times, scopes or grant types. For example, the default client’s token in our system (used by front-end) has a 20-minute access validity time and 30-minute refresh validity time.
The scopes and the grant types are ignored currently. We are planning to introduce them later.
You can either use the default-client or create a new on in the database by simply inserting a new record. If you have no access to the database we can help.
5. Terminology
We are using a bit different terminology for entities like you used to in our GUI. The following expressions mean the same:
- Device - screen - player
- Customer - client
- Subreseller - network owner
6. Examples
6.1. Assignee content on device
Our goal is to get contents and devices from a database and assigned a selected content on a selected device. Note: the user will only get its customer’s contents.
6.2. With Swagger
1. Use the “Authorize” button to log in (with a user under the selected customer/client)
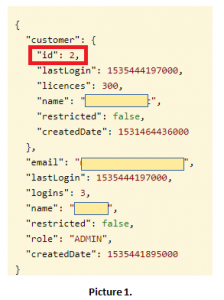
2. Optional: search “user-controller-public” and call “GET /public-api/user/checkLogin”
a. In the response JSON you can find your users customer ID (Picture 1.)
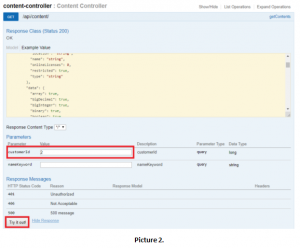
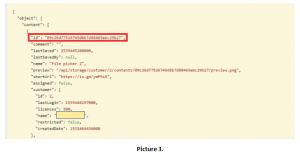
3. Search “content-controller” and call “GET /api/content/”, nameKeyword is optional (Picture 2.)
a. CustomerId is optional – if the caller user is an ADMIN it can get any customer’s contents.
b. In the given response you’ll find the first 20 elements. In the list you can find the contentId-s. (In swagger the pagination is not working yet.) (Picture 3.)
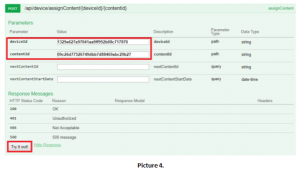
4. Do the same with “device-controller” – “GET /api/device/” call
5. Now you have a contentId and a deviceId so we have everything for assignee.
6. In “device-controller” call “POST /api/device/assignContent/{deviceId}/{contentId}” (Picture 4.)
6.3. With Postman
Postman is widely used free http request creator software. I will show the usage through Postman, because it shows every detail which needs to implement a client in any programming language or platform. The most important part of this guide is OAuth usage (what swagger hides from you, everything else is the same).
(Download link: https://www.getpostman.com/)
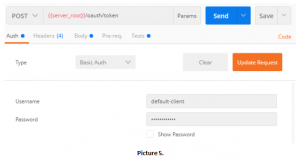
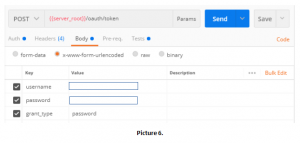
Login/getting access token (Picture 5. and 6.):
1. POST {server root}/oauth/token (like https://editor.wallboard.geomant.com/oauth/token)
2. Auth type is “Basic Auth”
3. Fill “Username” and “Password” fields
4. Click on “Update Request”
5. Navigate to “Body” tab
6. Choose “x-www-form-urlencoded” type
7. Fill the table
a. username: a user who wants to log in
b. password: …
c. grant_type: always “password”
8. Click on “Send”
a. You’ll receive a brand new token (Picture 7.)
b. For later calls we need the “access_token” property
c. “expires_in”: shows the seconds until the access token is valid
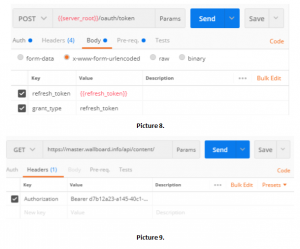
Refresh token (Picutre 8.):
1. The “Auth” part is the same as before
2. In body set “refresh_token” value to “refresh_token” from token get response
3. After refresh you’ll get a new access and refresh token
Make sure to always check validity times!!! You need to refresh token before it expires.
Example: get contents
1. Leave “Auth” part empty
2. Create a HTTP header called “Authorization” and set the value to “Bearer {access_token}” (like “Bearer d7b12a23-a145-40c1-8041-26985bcb035e”) (Picture 9.)
3. Set other parameters like we did on swagger

Useful links
https://en.wikipedia.org/wiki/Representational_state_transfer
https://swagger.io/tools/open-source/getting-started/