OnCall IVR Engine v3.3.4, part of OnCall IVR Suite v3.3.x
Preparing the Environment
The following chapters guide you through the steps needed to set up and prepare the environment for the IVR Engine deployment.
Setting up DNS Entries
The following steps are required only in case the IVR Engine will be placed in a HA pool.
Launch the DNS management administration tool on a domain controller server.
Login with a domain administration account.
Navigate to the DomainDNSZones in the tree structure on the left.
Create a new A Host record with the hostname and IP address of the IVR server that will host the IVR Engine component in the DNS zone.
This DNS record is going to be your Trusted Application Pool FQDN – the FQDN of your IVR Engine Host (or the IVR Engine Pool for HA deployments).
Enabling Microsoft SQL Server Filestream Option
Launch the SQL Server Configuration Manager for the database server that will house the IVR Engine's ucmaivr database.
Select SQL Server Services option in the navigation pane on the left side of the window.
Right-click the SQL Server (instance name) item in the right pane of the window. The instance name is either MSSQLSERVER for the default instance or the name of the custom instance where the IVR Engine database is going to be deployed.
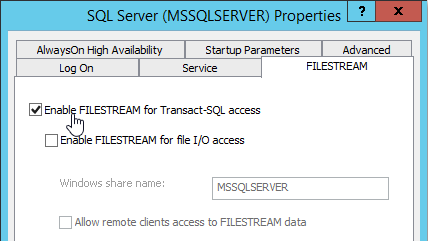
Select Properties from the right-click menu and click the FILESTREAM tab.
Check the Enable FILESTREAM for Transact-SQL access option.
Click OK and close the SQL Server Configuration Manager.
Launch Microsoft SQL Server Management Studio as 'SA' and right click the database server node in the navigation pane on the left side of the window.
Select Properties.
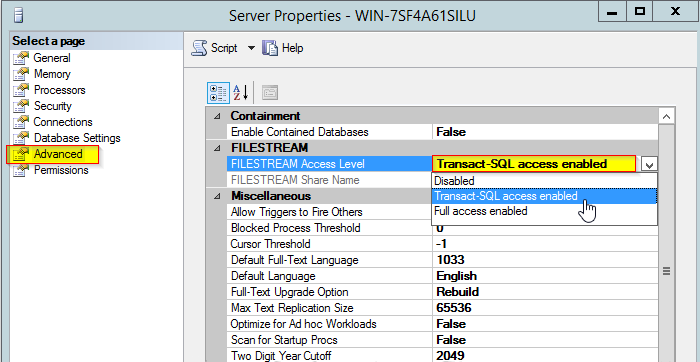
Click the Advanced item from the properties page list on the left.
Locate the FILESTREAM config section and the Filestream Access Level config parameter.
Set this to Transact-SQL access enabled and click OK.
Restart the SQL Server either from the Services admin tool, the SQL Server Management Studio, or by restarting the computer.
Restarting the SQL Server will affect in a temporary service unavailability, meaning all databases on all database server instances located on the database server will stop until the SQL Server is up and running again.


Setting up the Service User Account
Although, it is possible to use the system without it, it is recommended to set up the IVR Engine with Windows Authentication.
The relevant web application and Windows Service components will both need an explicit user account assigned as a service runner identity.
Create the service user account in the relevant corporate AD domain or local server.
You'll find further details in the Configuration Guide.
Preparing the Microsoft Telephony Infrastructure
Log on to one of the Microsoft Skype for Business Front End servers with an account possessing domain administrator and RTCUniversalServerAdmins permissions.
Launch the Skype For Business (Lync) Management Shell in elevated mode (right-click and select Run as Administrator).
Execute the following PowerShell cmdlets to create the trusted application environment:
New-CsTrustedApplicationPool –Identity "[IVR Engine Host FQDN]" –Registrar "[SfB/Lync Front End FQDN]" –Site "[Lync Site ID]"Site ID: You can list your SfB/Lync sites using the Get-CsSite cmdlet.
IVR Engine Host FQDN: this is the DNS "A" record you created in the previous section.
Site ID: Add the SfB Site ID.
New-CsTrustedApplication –ApplicationId "IVR" –Port "6000" -TrustedApplicationPoolFqdn "[IVR Engine Host FQDN]"The ApplicationId parameter is an arbitrary string that must uniquely identify the application – in this case the IVR Engine. Geomant advises to use
IVRas the value, but it can be anything as long as every relevant Microsoft trusted application object is configured with exactly the same string value.Every individual IVR menu requires a dedicated endpoint. Create one at least, so your IVR menu is available to dial:
New-CsTrustedApplicationEndpoint –ApplicationId "IVR" –TrustedApplicationPoolFqdn "[IVR Engine Host FQDN]" –SipAddress "sip:[SIP URI of the IVR menu]" –DisplayName "[name of the IVR menu or service]" -LineURI tel:[Phone Number]SipAddress: the hostname part of this URI is an arbitrary string that should clearly identify which IVR menu it corresponds to.
DisplayName: this information will be available to all SfB users via their SfB Client, so make sure it describes that this endpoint is an IVR menu and make it reflect what service the menu provides.
Preparing the IVR Host
Deploying Windows Features
The following PowerShell cmdlet applies the required Windows Server Roles and Features. You can use it to avoid checking each item individually in Server Manager. Running this cmdlet is optional. You can add the required Windows Server Roles and Features manually using other means as well (Windows Server Manager tool).
After running the cmdlet, a computer restart might be required to complete the installation.
This PowerShell cmdlet was created for Windows Server 2012 R2. It might produce runtime errors or fail to deploy all required items on a different Windows Server version. In such case, please apply the necessary roles and features manually via Server Manager. Also, there is no guarantee that this cmdlet installs all requirements on a different Windows Server version, so please run the cmdlet at your own risk.
Import-Module ServerManager

Install-WindowsFeature AS-NET-Framework, AS-Web-Support, Web-Server, NET-Framework-Features, NET-Framework-45-Features, Server-Media-Foundation, qWave, User-Interfaces-Infra, Windows-Identity-Foundation, Windows-Internal-Database, PowerShellRoot, WAS, WoW64-Support -IncludeAllSubFeature
Run the following cmdlet to verify that all required items were successfully installed:
Get-WindowsFeature
Installing the Certificate
The IVR Engine needs to communicate with the Microsoft telephony system and this communication requires secure certification. Acquire a certificate that the Microsoft components will trust.