OnCall IVR Designer v7.11.2, part of OnCall IVR Suite v3.3.x
Getting Started with IVR Designer
Product Overview
IVR Designer is an IVR flow editor tool enabling contact centre administrators to easily maintain voice response flows registered within the contact centre's IVR application.
IVR Designer
The IVR Designer is the user interface component of Geomant's OnCall IVR software solution bundle – the other major component is the IVR Engine itself.
The IVR Designer is used to create, modify and save multiple versions of the flows, maintain temporary versions while editing, and to publish them into the IVR Engine using an intuitive graphical user interface. Features like predefined templates, customized nodes and flow variables contribute to product versatility and enhanced user productivity.
IVR Designer is a web application. It is running on a web server and storing its data in a database. The application can be accessed through web browsers. When publishing a call flow, IVR Designer uploads the complete flow to the IVR Engine including all announcements.
OnCall IVR Designer Abbreviations
The following table contains the expressions related to IVR Designer and abbreviations used in this guide:
| Expression | Description |
|---|---|
| IVR | Interactive Voice Response, a technology that allows a computer to interact with humans through the use of voice and DTMF tones input. |
| GUI | Graphical User Interface, a type of user interface that allows users to interact with electronic devices through graphical icons and visual indicators. |
| Flow | Here: an IVR menu, a flowchart created using IVR Designer representing all possible decision points and routes a caller can traverse in the IVR menu. |
| Temp Flow | A temporary working copy of the currently edited flow. Any flow change can be discarded that is made between saves. |
| Flow State | The current state of the flow that is being edited. |
| Save Flow State | The state – all details – of the temp flow is stored temporarily. This prevents the user from data loss, but it does not mean the flow is stored permanently. This state is loaded into the Designer when the user logs into the application. This state is preserved until the next "Save Flow State". |
| Autosave | The Autosave function saves the flow state at regular intervals. This is equivalent to having a manual flow state save at fixed intervals. |
| FKA | Formerly Known As. |
| Open (FKA Checkout) | Loading an existing flow from the database into the Designer’s GUI. |
| Save (FKA Checkin) | Saving the current flow into the database as a new flow version. Optionally publishing the flow to the IVR Engine. |
| Publish | Converting a flow to the final (XML) format and uploading it to the IVR Engine together with all the flow announcements. |
| Close | Closing the currently open flow and deleting the temporarily stored flow state. Any previously saved versions of the flow will not be removed from the database. |
| Delete | Completely deleting a flow, which means the latest and all previous versions of the flow will be removed permanently and cannot be restored. |
| New Flow | An empty flow which will be saved into the database at the first save. The initial version of the flow is "0.0". |
| Flow Version | Each flow has a version number which is increased when saving. |
| Minor Version | The minor flow version is increased by one when saving the flow without publishing. |
| Major Version | If the flow has been published to the IVR, the major version is increased by one and the minor version is set to "0". |
| Node | An entity representing a module in the IVR. It is a basic building block in the flow. |
| Template | A group of nodes for solving a complex task a single node can not achieve, however is displayed as single node in the GUI. |
| Path | A directional connection between two nodes and/or templates specifying the order of the nodes the customer will be visiting. |
| Attribute | A property of a node or template which can be set if the node is in edit mode. |
| Variable | Variables can be assigned to nodes or templates and can be used as node/template parameters. Information can be passed along between nodes using variables. |
| Announcement | A short message that can be heard in the IVR menu. It can be a compatible sound file in a WMA format, or TTS. |
| TTS | Text-to-speech, a technology that allows the conversion of a written text into an artificially synthesized speech sound stream. |
| Global | This keyword indicates that an announcement, variable, announcement, etc. can be reached globally (from any flow). |
| Local | This keyword indicates that an announcement, variable, announcement, etc. can be reached only from the flow in which it is created. |
| Flow Comment | A short descriptive message which can be associated to the current flow. It helps identifying the flow. Flow comments are uploaded to the IVR Engine during publishing and displayed in the flow list when opening a flow. |
| Note | A memo which can be added to the flow. Notes are for storing and displaying technical or business remarks for yourself or other users who edit the flow. They do not alter the customer experience traversing the flow in any way. Think of them as "post-its". Do not confuse them with flow comments. |
| Stage | The canvas area in the GUI in which the nodes and templates are placed. |
| Toolbar | The right-side accordion pane in the GUI which contains the following toolsets: Nodes, Templates, Announcements, Variables, Notes. |
| Menu | The menu strip at the top of the GUI. |
| Debug | A process verifying the current flow is correct, complete and contains no errors. It is initiated on the Designer interface in an ad-hoc fashion. |
| Debug Error | A debug message indicating an issue which prevents IVR Designer from publishing the flow. |
| Debug Warning | A debug message indicating a potential or low-level issue which does not prevent IVR Designer from publishing the flow. |
| Login | The method by which the users authenticate into IVR Designer. |
| Logout | The method by which the users de-authenticate from the IVR Designer. |
IVR Administration
After publishing an IVR tree using the Designer, it can be managed using the IVR Administration web application on the IVR Engine server. This application helps with the management of complete IVR trees by maintaining automatic version tracking, activation-deactivation, backup as well as keeping the call history.
Note
Please note that the IVR Designer is not compatible with the old Announcement Wizard tool. Using both software simultaneously causes inconsistency in tree version numbering and can lead to unexpected IVR Engine operation!
Logging in to the IVR Designer
To log into the IVR Designer, open a web browser (we recommend the latest version of Google Chrome, Mozilla Firefox or Microsoft Internet Explorer).
- Load the URL of the IVR Designer application within your browser (e.g.: http://cedemoivr.domain.com/IVRDesigner).
- If Active Directory authentication has been set up, you will be automatically logged in. Otherwise a login dialog will appear, in which case type the user name and password required and click OK.
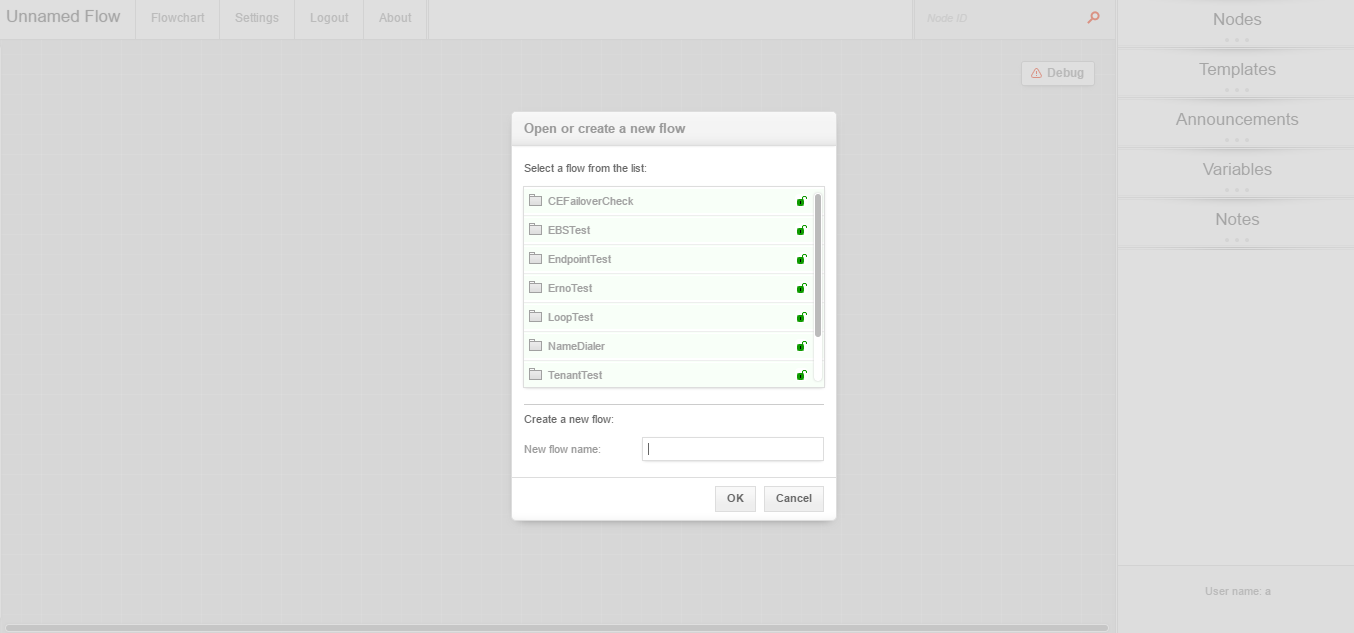
- If the user has no flow opened yet, a new dialog is shown. Select an existing flow version from the Flowchart list or create a new flow by entering a flow name, then click OK.
- If the user had already opened a flow during the previous visit to the page, IVR Designer automatically opens the flow that was edited the last time. The flow selection dialog does not appear in this case.
- If the login was successful and a flow has been selected, the main layout is displayed with all functions available to the user account.

Tip
Keep a single web browser window or tab opened for editing a flow. Modifying the same flow in multiple browsers, windows or tabs simultaneously may lead to unexpected issues and faulty flows!
IVR Designer Layout
Main layout
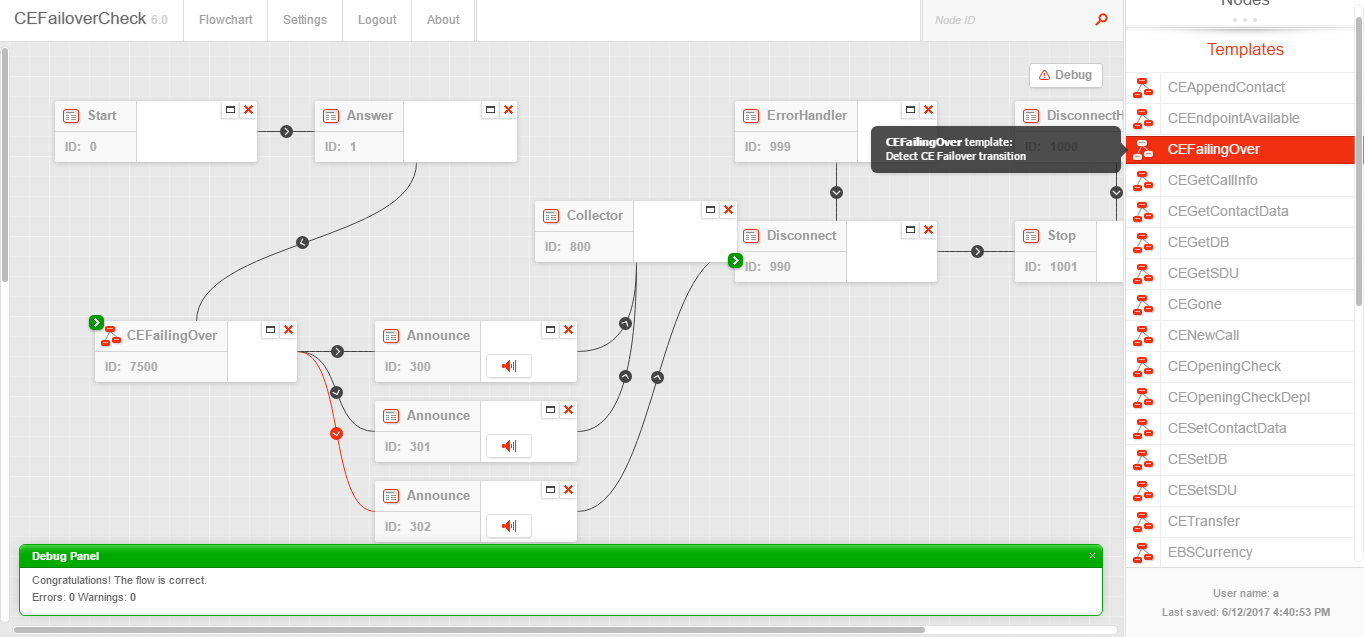
The main layout of IVR Designer is built up from three regions:
- Menu: The menu ribbon is located at the top section of the page.
- Toolbar: This pane is at the right side of the page.
- Stage: This is the largest region of the page where the flow can be edited.
In addition, there are numerous popup dialogs helping with individual tasks and almost every element in the visual interface utilizes tooltips – small descriptions or hints appear when the mouse cursor is hovered over an item.

Menu Ribbon
The menu strip is made up of the following items.
Flow Name
The name of the currently edited flow is displayed near the left edge of the menu.
Flow Version
The major and minor version of the flow is displayed next to the flow name.
Menu Item
The main menu which contains the following items:
| Menu | Description |
|---|---|
| Flowchart | Containing sub-menus for flow management: Open, Save & Publish, Save Current Flow State, Close, Delete |
| Settings | Settings of the user interface can be modified here. |
| Logout | Users can log out from the IVR Designer. |
| About | Displays product version and copyright information. |
| Search Box | The text box in the upper-right corner of the menu ribbon. Type the node and template ID to find them and have them brought into the viewable area of the stage. |
Toolbar
The toolbar is located on the right side of the page and contains five collapsible menu palettes and an information area. The palettes can be expanded / collapsed by clicking on the headers.
| Nodes | The node palette with items that can be dragged and dropped onto the stage. |
| Templates | The template palette with items dragged and dropped onto the stage. |
| Announcements | A collection of announcements to be associated to Announce nodes. |
| Variables | A collection of user defined variables to be used by nodes and templates. |
| Notes | Simple text field for any memos or remarks related to the flow. |
| Information Section | This section is located under the toolbar. It shows the name of the user logged in and the last time the flow was saved. |
Stage
This is the main area with a grey background and a white grid, where the flows can be created or edited. Flow elements from the toolbar can be dragged and dropped here. The stage is dynamically resized when a new item is dropped in.
| Flow | The flowchart containing nodes, templates and the connections between them. |
| Debug Button | This button is located in the upper right corner of the stage. The correctness of the flow can be checked by clicking the Debug button. |
| Debug Panel | Clicking the Debug button triggers this panel listing any errors and warnings found. |
| Scroll-bars | Use these bars to move across the canvas area in case the flow grew larger than the size of the visible area. |