OnCall IVR Designer v7.11.2, part of OnCall IVR Suite v3.3.x
Assembling a Flow Using IVR Designer
This document provides information on how to build an IVR flow using the IVR Designer. The set of flow elements is provided by the Toolbar and the flow can be assembled on the Stage.
Tooltips are displayed when hovering the mouse over an item on the stage or in the toolbar.
First let's examine the potential elements of a flow.
Flow Elements
The following objects are available from the Toolbar: Nodes, Templates, Announcements, Variables and Notes
Tip
It is not possible to modify the Toolbar palette using the IVR Designer user interface. However Geomant professional services or certified Business Partners can alter the objects available or add new ones if required.
Nodes
Nodes are the basic building blocks of an IVR flow or menu (or tree). Each node has a different purpose, some are needed in every flow (e.g. Start, Stop, etc.) and some are optional. Nodes are then connected together to create a flow.
- After opening a blank stage, navigate to Toolbar→Nodes palette.
- Select the preferred node from the list.
- Drag and drop the selected node item from the palette into the stage.
- A new node instance will be created on the stage at the cursor position.
Templates
Templates are similar to nodes but have different icons – these are effectively multiple nodes tied together to perform more complex tasks, showing up as a single object on the stage.
- Navigate to Toolbar→Templates.
- Select the preferred template from the palette.
- Drag and drop the template to the stage.
- A new template instance will be created on the stage at the cursor position.
SuperNode template
The SuperNode template is playing announcements, collecting user input to select the next node, handles timeout and bad selections. It works similar to the PromptJump node, but it has additional features:
- It can announce three different announcements with individual timeouts.
- The badselection branch can be routed back to the SuperNode to make repeat at error functionality.
The second and third announcements and timeouts are optional. If only the first announcement is set and the timeout_second and timeout_third set to 0, then it works similar like the PrompJump node.
Announcements
Announcements are objects representing a single voice message that can be played to the caller when associated to an Announce node.
Announcements have a usage scope, they could either be global or local. Local items can only be used in the flow in which they have been added, but global announcements can be used in every flow.
Announcements can also be of two types: TTS or WMA. A TTS announcement is a simple text uttered to the caller using text-to-speech synthesis, a WMA announcement is a sound file recorded earlier.
Note
Please note that Announcement management requires explicit permissions.
Create an Announcement
- Navigate to Toolbar→Announcements.
- Click the Global or Local tab.
- Click the + icon of the preferred announcement type (WMA or TTS).
- Enter the name of the announcement and fill any other fields as required.
- For WMA: Click the upload icon and browse to the appropriate sound file.
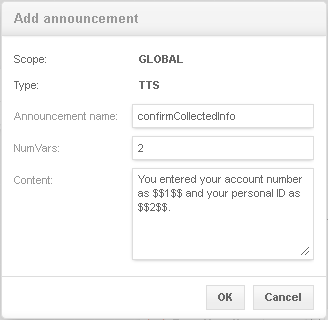
- For TTS: Specify the text in the Content field. This text will be announced by the system. The Number of variables can also be set if you intend to have the system read customer related information (IDs, balance, any short data). See below for further details on using variables in announcements.
- Click OK – the announcement is now added to the IVR Designer application (though not yet saved into the database).
Important
The IVR Designer saves announcements when the flow is saved, uploading it to the IVR Designer does not implicitly save it.
Please also note that closing a flow without saving it first will cause the loss of all changes made to announcements.
The timestamp of the upload is added to the WMA file names.
Adding variables to TTS announcements
OnCall IVR is able to use TTS technology to speak the contents of variables that might have been filled with call specific information in a previous node. In order to inject variable data into the text of TTS announcements, you need to tag and index these so the system knows which variable's content to utter when.
- Create a variable that will be storing data to speak as part of the announcement (see below for further detais on how).
- Navigate to Toolbar→Announcements.
- In the NumVars field, enter the number of variables this announcement will need to speak. If you wish to add 2 variables to speak, you enter the value 2. If you do not wish to add any variable, keep this value at zero.
Formulate the text to speak and inject the index of the individual variables at the right places of the Content field by using the "$$" escape characters, for example:
Edit an Announcement
- Navigate to Toolbar→Announcements.
- Select the preferred announcement.
- Click the edit icon (pencil) next to the announcement name.
- All attributes can be changed in the Edit announcement dialog window, except for the name of the announcement.
- Click OK when finished.
The WMA file can also be replaced, if necessary.
Use of an Announcement
- Navigate to Toolbar→Announcements.
- Select the preferred announcement.
- Drag the selected announcement item from the palette and drop it to the speaker icon of the target
Announcenode. - Click the speaker icon once to play the announcement.
The Announce node provides feedback on whether an Announcement was already associated or not:
| Announce node association icon | Description |
|---|---|
| Gray speaker icon | No announcement is assigned to the node yet. |
| Red speaker icon | The node has an assigned announcement. |
| No speaker icon | The node cannot have announcements assigned. |
More details on the announcement will appear as a tooltip when hovering the cursor over a red speaker icon.

Tip
Announcements can be assigned to unlimited number of nodes and templates.
Associating Variables to Indexed Tags
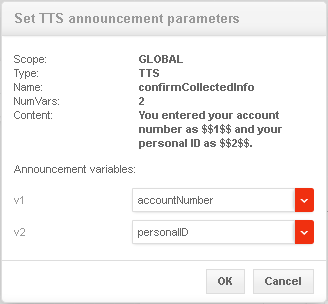
In case the announcement associated to the Announce node contains variable indices, you must reference actual flow variables to each of these.
- Move the cursor over the red speaker icon in the
Announcenode you created. The tooltip shows up letting you know that clicking the icon will allow you to edit the variable references. - Click the red speaker icon.
- Select the flow variable for each variable reference the announcement is defined to use.
The variable indices refer to the actual placeholder tag in the Content field, with "v1" referring to tag "$$1$$" in the announcement text, "v2" to "$$2$$", etc. You need to make sure you associate the correct variables.
Delete an Announcement
- Navigate to Toolbar→Announcements.
- Select the preferred announcement.
- Click the delete icon (red X) next to the announcement name.
- Click OK in the confirmation dialog window.
Variables
Variables are used to store information that are transferred between nodes within an IVR flow. Variables have a name and a value that can have one of a few data types. In order to pass data from one node or template to another, variables must be associated to these nodes as parameters.
Tip
A variable belongs to the current flow only. There are no global variables available for all flows running in the IVR Engine.
Hovering the mouse cursor over a variable in the toolbar will display it's initial value.
IVR Designer does not automatically save the changes made to a variable. Variables are saved only when the flow is being saved.
Warning
Closing a flow without saving it first will cause the loss of any changes made to variables since the previous save.
Variable Data Types
Variables can hold the following data types:
| Data type | Explanation |
|---|---|
| String | Any alphanumeric data. |
| Secure string | Same as String but the system protects the data from printing into debug logs, etc. by default. |
| Integer | Integer numerical data. |
| Double | Decimal type numerical data. |
| Boolean | Logical yes / no data. |
| Announcement | Variable type to hold announcement references. |
Note
While the system does not reveal the value of Secure String variables by default, developers of custom nodes can still write code to print these explicitly. IVR menu developers will need to be vigilant to avoid leaking sensitive information.
Create a Variable
- Navigate to Toolbar→Variables.
- Click + Add variable on the Variables palette.
- Enter the variable name and specify its type and if needed, its initial value.
- Click OK.
- It is added to the list of existing variables.
Edit a Variable
- Navigate to Toolbar→Variables.
- Click the Edit icon (pencil) next to the name of the variable.
- The Add or edit a flow variable dialog window appears. You can change all attributes of the variable, except for the ID – this is used to identify the variable within the flow.
- Click OK when done.
Use a Variable
- Navigate to Flowchart→Open.
- Load a preferred flow to the stage.
- Click the Edit icon of the node or template:

- Select the variable of your preference from the related drop-down of the node / template.
Delete a Variable
- Navigate to Flowchart→Open.
- Load a preferred flow to the stage.
- Click the delete icon X next to the name of the variable.
- The variable will be deleted immediately – no confirmation message will pop up.
Notes
Users can add notes to the current flow. It does not affect the behavior of the flow, it should be used for remarks and any details to remember regarding the flow.
Notes are multi-line entities, you can add line breaks.