Omni-Channel Integration
Overview
Omni-Channel is a flexible and comprehensive approach that allows the call center to route any type of inbound work item to agents based on a FIFO (First In First Out) method. It manages the capacity and type of assignments, so that agents receive only the number of work items they can handle. Work items can have an assigned priority - the higher the priority, the sooner the work item gets distributed.
Omni-Channel configuration for your Salesforce organization is not implemented or maintained by Geomant. Omni-Channel configuration requires specific expertise to implement and maintain. Do not attempt to implement Salesforce Omni-Channel based on this guide. Refer to Salesforce documentation for generic Omni-Channel information. This guide describes setting up integration between a completed Omni-Channel setup and DC4CRM.
Purpose
The purpose of this document is to provide an overview on the Omni-Channel Salesforce feature and a detailed description of how DC integrates to that, from both configuration side and user perspective.
Omni-Channel Configurations in Salesforce
Presence Statuses
The Presence Status indicator shows whether the user is available for inbound work items or not.
Presence statuses are synchronized with Desktop Connect states and vice versa.
If the state of the Desktop Connect application is changed, the Omni-Channel presence will shift to the state associated with the DC status.

How to Use Omni-Channel?
The Omni-Channel module only works in Console mode.
Presence Status Change in Omni-Channel
Presence Status Change
Open the Omni-Channel module from console mode by clicking on its icon located in the bottom right-hand corner next to the Desktop Connect application's icon.
Select a presence state from the drop-down list.
If you are logged in to Desktop Connect, its status will switch to the one that is paired up with it in the Omni-Channel Mappings.
Status Change in Desktop Connect
Status Change in Desktop Connect
While logged in to Desktop Connect, select a state other than your current one.
The Omni-Channel presence state will switch to the one paired up with that particular state.
Responding to New Work Items
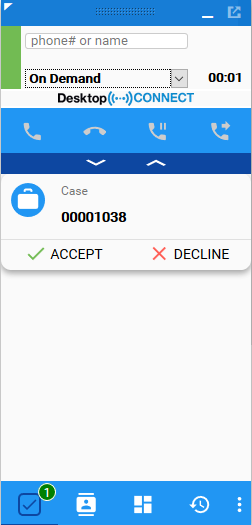
Different types of work items are transferred to the agents via the Omni-Channel module. Such work items are Leads, Cases or live chats.
New Work Items
New Work Item
The Omni-Channel module will blink if there is a new work item assigned to the agent.
Open the Desktop Connect application.
Choose either to accept or decline the item.


Accept Work Item
Accept New Work Item
Click on Accept* **in the Desktop Connect* when a new work item is being assigned to you.
The item will load in Salesforce.
Handle the case as usual.
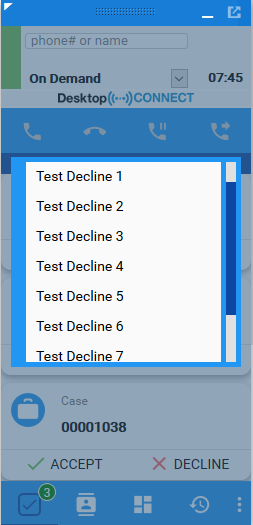
Decline Work Item
Decline New Work Item
Click on Decline in the Desktop Connect application when a new work item is being assigned to you.
Select a reason code for not accepting the work item.
The work item will disappear from the list.
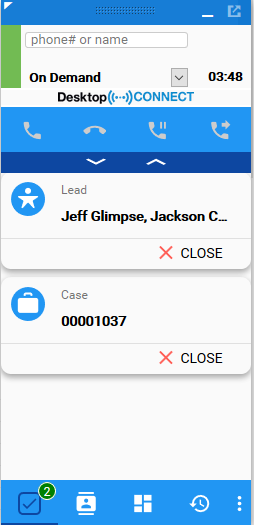
Display the Number of Work Items
When you have assigned work items, it is presented on the Desktop Connect application in an information bubble.
Login to Desktop Connect.
Click on the Omni-Channel panel.
The list of your assigned work items are displayed.
You can close your work items from here - the related items will be closed in Salesforce, as well.
