Geomant Call Center Settings in Salesforce
Setting up the Geomant Call Center
Installing Geomant Call Center Administration Managed Package
Installing and configuring the Desktop Connect managed package requires general Salesforce expertise and various privileges/permissions on the Salesforce user. It should be installed either by the organizations Salesforce administrator, or with continuous consultation between the installing engineer and the organizations Salesforce administrator during the project.
Desktop Connect installs various custom objects and adds custom fields to the Task object. It is permitted to develop workflows and APEX triggers using these custom objects and fields, but unless specifically agreed upon, Geomant is not responsible for the maintenance or correctness of custom code outside the package. It is recommended to notify Geomant before developing such extensions.
Geomant Desktop Connect Cloud edition brings a managed package that partially automates the installation and configuration process required on Salesforce.com.
The managed package can be installed by accessing the download URL: https://login.salesforce.com/packaging/installPackage.apexp?p0=04t0N000000Y17E
Managed package adds the following objects to Salesforce.com
- Call Center definition required by Desktop Connect for Salesforce.com
- Custom fields required in the phone call activity to store CTI information
- Custom fields required to store the recording playback URL
Package installation requires a Salesforce.com login to access the App Exchange.
Login details
Make sure to use the correct login when accessing the app exchange to install Geomant Desktop Connect: Avaya Telephony Connector.
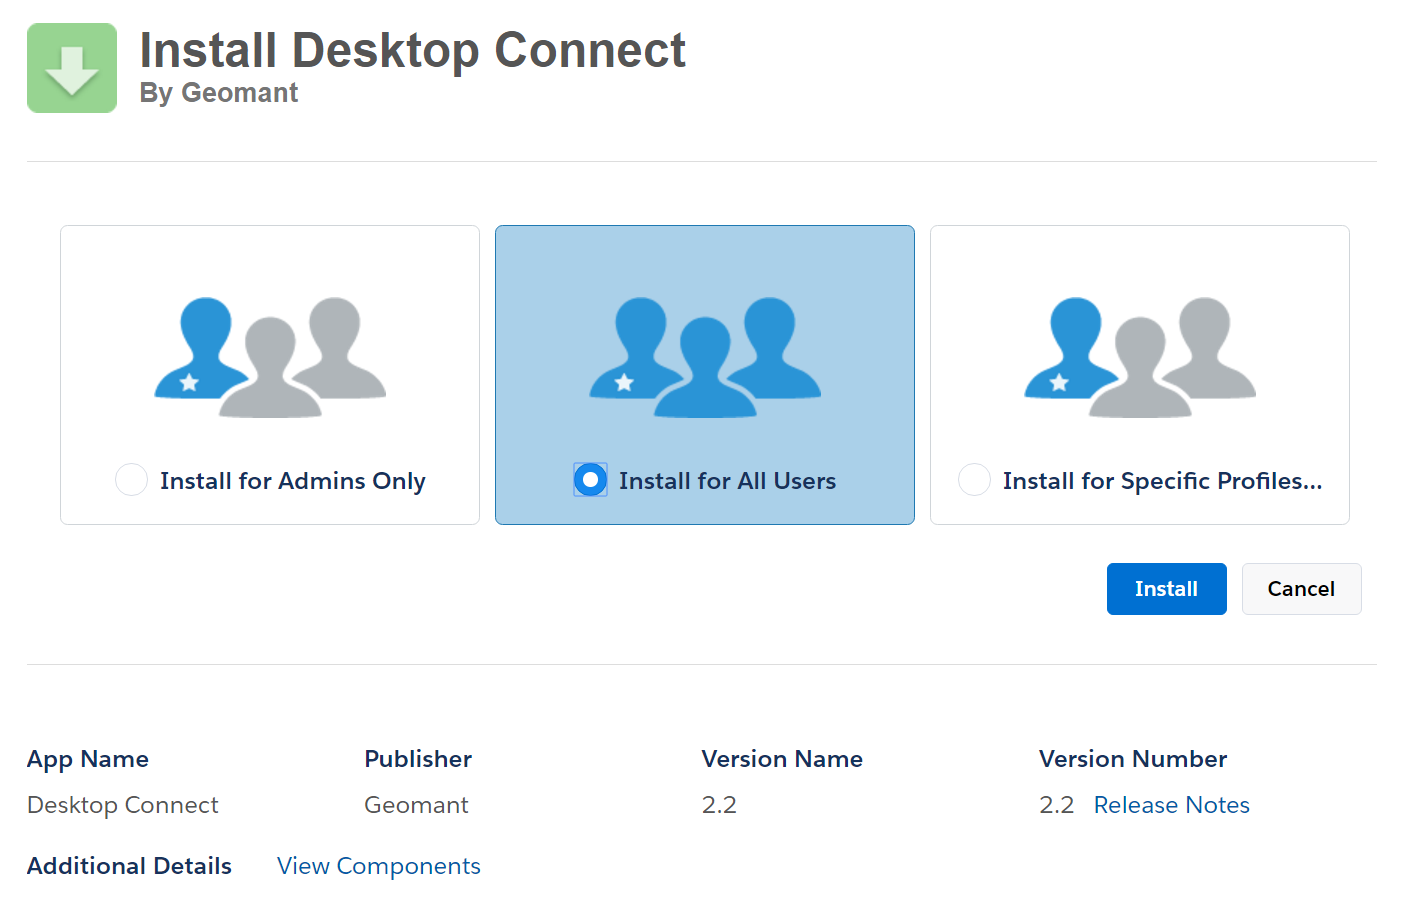
On the package install landing page review the package details:
- App Name: Desktop Connect
- Publisher: Geomant
- Version Name: DC4CRM 3.1.4
- Version Number: 3.11
- View Components: Details the fields and resources that will be added to your Salesforce.com instance
The following components are added to your system:
| Name | Description | Parent object | Type |
|---|---|---|---|
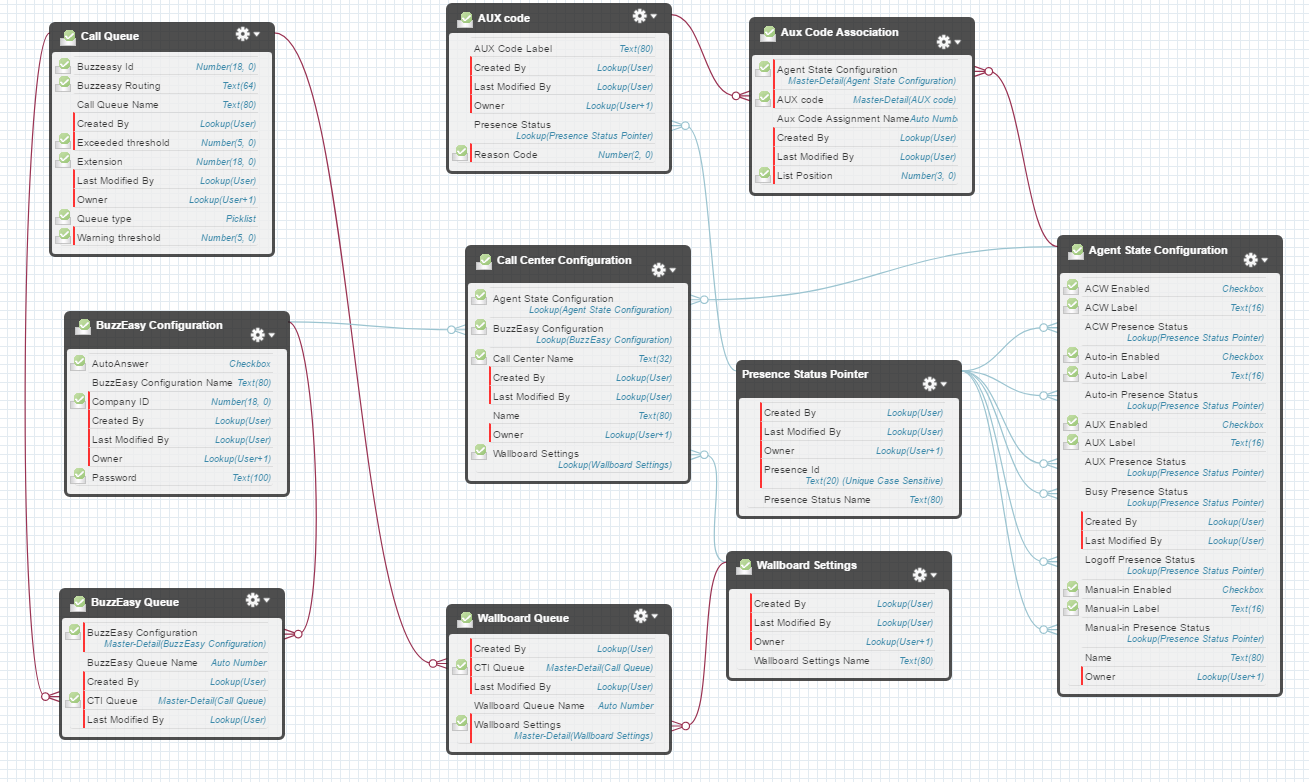
| Call Center Configuration | Functions as a relationship object between the Call Center and other configuration objects (Agent State, Wallboard, and Buzzeasy Configuration), every Call Center should have one Call Center Configuration created for it. Call Centers are special objects that cannot be selected with Lookup type custom fields, so the Call Center and it's Configuration is linked by copying the Internal Name of the call Center to the "Call Center Name" field. | Custom Object | |
| Agent State Configuration | Allows the agent state drop-down list to be customized by setting labels and hiding/showing states. | Call Center Configuration | Custom Object |
| AUX code | Represents an Avaya AUX reason code. These can be assigned to Call Centers indirectly, and the label will appear on the agent state drop-down list under the AUX section. | AUX Code Association | Custom Object |
| AUX Code Association | Relation Object, linking AUX codes to Agent State Configurations. | ||
| Wallboard Settings | Object that represent a wallboard, a list of Call Queues displaying agent and call statistics. | Call Center Configuration | Custom Object |
| Wallboard Queue | Relation object, linking Call Queues to a wallboard configuration. | Custom Object | |
| BuzzEasy Configuration | Object that allows connection to Buzzeasy Cloud Services enabling agents to consume and schedule callbacks to a list of pre-configured service queues (Call Queue). | Call Center Configuration | Custom Object |
| BuzzEasy Queue | Relation object, linking Call Queues to a Buzzeasy configuration. | Custom Object | |
| Call Queue | Representation of PBX queues used for queueing and delivering calls to agents. | Custom Object | |
| Extension | PBX unique identifier of queue (VDN/huntgroup). | Call Queue | Custom Field |
| Queue Type | Details the type of the queue, which can be one of the following:
|
Call Queue | Custom Field |
| BuzzEasy Id | Unique Buzzeasy Service Queue identifier. | Call Queue | Custom Field |
| Wallboard Settings | Wallboard display name. | Wallboard Queue | Custom Field |
| CTI Queue | List of Call Queue objects. | Wallboard Queue | Custom Field |
| Auto Answer | Indicates if Buzzeasy callbacks are to be accepted automatically. | BuzzEasy Configuration | Custom Field |
| BuzzEasy Configuration | Buzzeasy configuration display name. | BuzzEasy Queue | Custom Field |
| CTI Queue | List of Call Queue objects. | BuzzEasy Queue | Custom Field |
| Call started | Call start time stamp. | Activity | Custom Field |
| Call ended | Call end time stamp. | Activity | Custom Field |
| Call ID | Avaya PBX call identifier. | Activity | Custom Field |
| Called | Dialed number. | Activity | Custom Field |
| Calling | Calling number identification. | Activity | Custom Field |
| Collecting device | VDN number where digits have been collected if any. | Activity | Custom Field |
| Delivering device name | VDN name/ DNIS name. | Activity | Custom Field |
| Delivering device number | VDN/DNIS number identification. | Activity | Custom Field |
| Distributing device name | VDN/ Huntgroup name where the call was routed. | Activity | Custom Field |
| Last redir. device | VDN/Huntgroup number where the call was last routed. | Activity | Custom Field |
| Recording | Recording playback URL for Verint or Avaya Call Recorder. | Activity | Custom Field |
| Remote number | Caller number identification. | Activity | Custom Field |
| UCID | Avaya PBX universal call identifier. | Activity | Custom Field |
| UUI | User to User Information provided with the call. | Activity | Custom Field |
| DesktopConnect | Call Center definition. | Call Center | |
| DesktopConnect | Exposed API methods that help retrieve user information. | Apex Class | |
| DCCallCenter | API method to get configuration from objects linked to the Call Center Configuration object. This includes BE and WB info previously handled by the two classes below | Apex Class | |
| WallboardQueues | Exposed API methods that help display wallboard information. Included for backward compatibilty reasons. | Apex Class | |
| BuzzEasyConfig | Exposed API methods facilitating consumption and scheduling of callbacks. Included for backward compatibilty reasons. | Apex Class |
Salesforce Custom Objects Relationships
Select Install for All Users option as shown on the following screen, and proceed with the installation.
After a successful installation, the package will be listed in the following path: Setup → Build → Installed Packages.
Set APEX plugin user
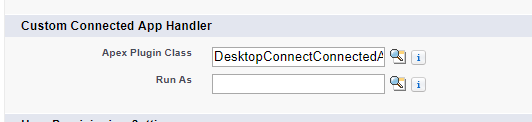
Authentication with Salesforce requires an APEX plugin in the Connected App that adds the user's Call Center ID to the token response. This APEX plugin needs to run with an administrator user's privileges.
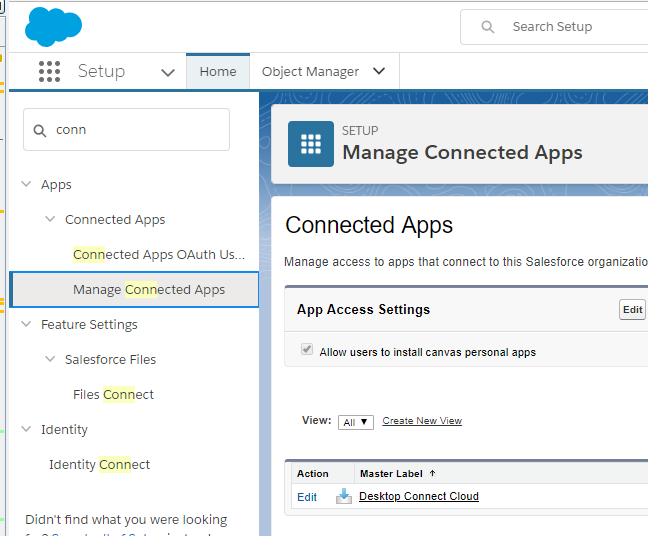
1, Navigate to Setup → Connected Apps → Manage Connected Apps and click on Desktop Connect Cloud
2, Press "Edit Policies"
3, In the "Custom Connected App Handler" section, fill out the "Run as" field with a user that has administrator privileges
4, "OAuth policies" allows the administrator to specify
- All users may self-authorize - users are allowed to consent if they provide their cerdentials for authorization on usage of Desktop Connect - this is done in form of a popup window that will require consent from the user.
- Admin approved users are pre-authorized - administrator can specify the user profiles - Connect App Access - that are authorized for using Desktop Connect; Popup in consented automatically, providing the user credential for authorization.
5, Press "Save".
Please note that in order for the authorization process to be succesfull popup originating from Salesforce must be allowed.
Manual Setup
This step is performed automatically by the managed package described in section Installing Geomant Call Center Administration Managed Package
A call center corresponds to a single instance of a CTI system within an organization.
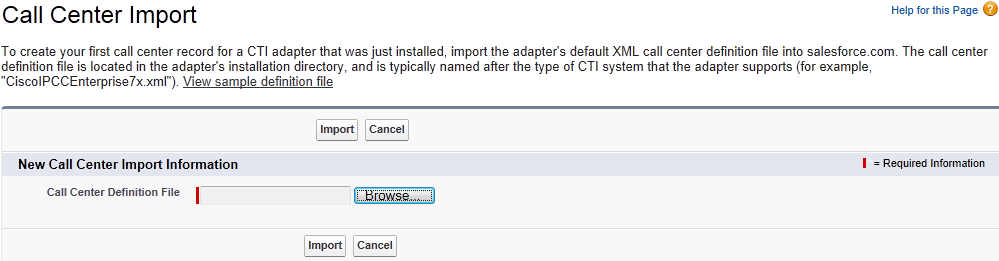
Before starting to work with the Geomant Desktop Connect for Salesforce.com, the Salesforce.com System Administrator needs to set up the Geomant Call Center by importing the definition file (See sample definition provided in this section).
Definition File
A call center definition file specifies a set of fields and values that are used to define a call center in Salesforce for a particular CTI adapter.
Salesforce uses call center definition files in order to support the integration of Salesforce CRM Call Center with multiple CTI vendors.
The first instance of a call center record for a particular CTI adapter must be defined by importing the adapter’s call center definition file. Subsequent call centers for a CTI adapter can be created by cloning the original call center record.
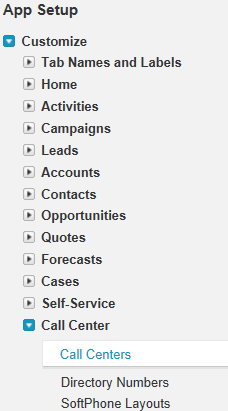
- Navigate to Your Name → Setup → Customize → Call Center → Call Centers in Salesforce.
- If the Introducing Salesforce CRM Call Center splash page appears, click Continue.
- Use the Import button to import the definition file.
- Go to the Call Center Definition File field.
- Use the Browse button to navigate to the call center definition file. GeoCC.xml - which is part of the installer.
- After the install, navigate to the installation folder. If the definition file is not provided, please find the content below to create your own definition file.
- Use the Open button to enter the path in the Call Center Definition File field, then click Import.
Sample Call Center Definition Expand source
 <callCenter>
    <section sortOrder="0" name="reqGeneralInfo" label="General Information">
        <item sortOrder="0" name="reqInternalName" label="InternalNameAAA">DesktopConnect15</item>
        <item sortOrder="1" name="reqDisplayName" label="Display Name">Desktop Connect 1.5</item>
        <item sortOrder="2" name="reqAdapterUrl" label="CTI Adapter URL">https://services.geomant.com/dc4crm/index_sf.html?aesindex=3</item>
        <item sortOrder="3" name="reqUseApi" label="Use CTI API">true</item>
        <item sortOrder="4" name="reqSoftphoneHeight" label="Softphone Height">300</item>
        <item sortOrder="5" name="reqSoftphoneWidth" label="Softphone Width">200</item>
    </section>
    <section sortOrder="1" name="reqDialingOptions" label="Dialing Options">
        <item sortOrder="0" name="reqOutsidePrefix" label="Outside Prefix">9</item>
        <item sortOrder="1" name="reqInternationalPrefix" label="International Prefix">00</item>
        <!-- if INTERNATIONAL format is preffered for local numbers too, put "-" here -->
        <!-- sometimes NATIONAL format can be dialed directly, if so, leave this empty -->
        <item sortOrder="2" name="reqLongdistancePrefix" label="Long Distance Prefix"></item>
        <item sortOrder="3" name="reqInternalPhoneLength" label="Internal Phone Length">6;5;4</item>
        <item sortOrder="4" name="reqCountryCode" label="Country Code">GB</item>
        <item sortOrder="5" name="reqLookupFormat" label="Lookup Format">E164</item>
        <item sortOrder="6" name="reqClickToDialEnabled" label="C2D enabled">true</item>
        <item sortOrder="7" name="reqUUISeparator" label = "UUI Separator"></item>
        <item sortOrder="8" name="reqUUIPosition" label = "UUI Position"></item>
        <item sortOrder="9" name="reqACRHost" label = "ACR host"></item>
    </section>
    <section sortOrder="2" name="reqCustomLogOptions" label="Call Log Custom Fields">
        <item sortOrder="0" name="reqFieldForucid" label="UCID">geomant__geoUCID__c</item>
        <item sortOrder="1" name="reqFieldForcallid" label="Call ID">geomant__geoCallID__c</item>
        <item sortOrder="2" name="reqFieldForuui" label="UUI">geomant__geoUUI__c</item>
        <item sortOrder="3" name="reqFieldForcalled" label="Called">geomant__geoCalled__c</item>
        <item sortOrder="4" name="reqFieldForcalling" label="Calling">geomant__geoCalling__c</item>
        <item sortOrder="5" name="reqFieldForremotenumber" label="Remote number">geomant__geoRemoteNumber__c</item>
        <item sortOrder="6" name="reqFieldForvdn" label="Dist. VDN name">geomant__geoDistName__c</item>
        <item sortOrder="7" name="reqFieldFordistaddr" label="Dist. VDN extension">geomant__geoDistNum__c</item>
        <item sortOrder="8" name="reqFieldFordelivacd" label="Delivering device extension">geomant__geoDelivNum__c</item>
        <item sortOrder="9" name="reqFieldFordelivering" label="Delivering device name">geomant__geoDelivName__c</item>
        <item sortOrder="10" name="reqFieldForlastredir" label="Last redir. device">geomant__geoLastRedirNum__c</item>
        <item sortOrder="11" name="reqFieldFordigits" label="Collected digits">geomant__geoDigits__c</item>
        <item sortOrder="12" name="reqFieldForcollectvdn" label="Collecting device name">geomant__geoCollectName__c</item>
        <item sortOrder="13" name="reqFieldForstarted" label="Started">geomant__geoCallStarted2__c</item>
        <item sortOrder="14" name="reqFieldForended" label="Ended">geomant__geoCallEnded2__c</item>
    </section>
</callCenter>
How to Display Desktop Connect Custom Objects in Salesforce.com
Desktop Connect managed package installs custom objects that are used by Desktop Connect for Salesforce.com
- Call Queues
- Wallboard Settings
- Buzzeasy Configuration
The new custom objects are not displayed by default and need to be accessible only for users with permission to configure Call Center settings.
Follow these steps in order to change Salesforce.com layout and display the new custom objects for all the above mentioned objects:
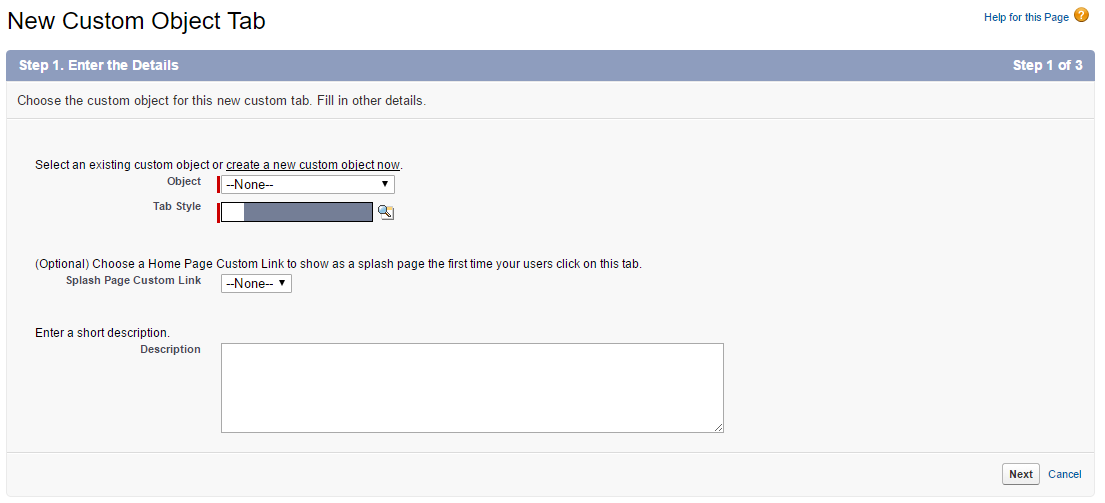
- Navigate to Your Name → Setup → Create → Tabs
- Select New on Custom Object Tab.
- Select Call Queue as a the new custom object to be displayed.
- Specify to which user profiles you want to add this new custom object.
- Choose for which custom applications will the new tab be available.
Configuration of the Geomant Call Center
Once the Geomant Call Center is created (installed via the managed package or created manually) the following sections need to be setup (if necessary):
- General Information
- Dialing Options
- Reason Codes Enabled and the reason code sections
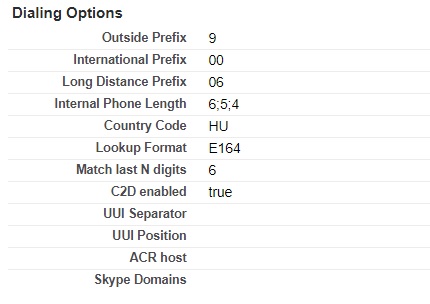
The picture on the left displays a valid CTI Server Info Section. All these fields can be edited by selecting the EDIT button at the top of the chart.
- Navigate to Your Name → Setup → Customize → Call Center.
- Select the preferred Call Center for modification.

General Information
- Navigate to Your Name → Setup → Customize → Call Center. 2.Select the preferred Call Center for modification.
Specify the following in the General Information section:
- InternalNameAAA: Unique name of the call center definition
- Display Name: Display name of the call center definition
CTI Adapter URL: Desktop Connect for Salesforce.com server published URL e.g.:
'crmType' specifies the instance of the CRM system can be one of the following
- sfdc - Salesforce.com used in classic and console mode
- sfdcLightning - Salesforce.com used in Lightning mode
- dynamics - Any supported version of Microsoft Dynamics CRM.
- dynamicsUci - Apps designed for Microsoft Dynamics 365 Unified Interface.
- Use CTI API: True if Open CTI API is to be used.
- Softphone Height: The height of the softphone displayed within Salesforce.com console application
- Softphone Width: The width of the softphone displayed within Salesforce.com console application
Dialing Options
- Navigate to Your Name → Setup → Customize → Call Center.
- Select the preferred Call Center for modification.
Specify the following in the Dialing Options section:
| Setting | Description |
|---|---|
| Dial out prefix | Public network access e.g. 9 to dial out from the call center |
| International prefix | Used to replace the plus sign in international numbers |
| Long distance prefix | Trunk access code; Some regions need a prefix before numbers before the number formatting library can recognize it. The recommended value is '-' to disable calling local numbers in 'national' format. Empty string value will enable this but not append anything to the number) |
| Internal phone length | Semi-colon separated list of possible number of digits in extensions |
| Country code | Default region for number recognition |
| Lookup format | Store format of phone numbers within the CRM system. Possible values: E164, INTERNATIONAL, NATIONAL, anything else is considered to mean 'as is' with no formatting |
| Match Last N Digits | Specifies the number of digits to list screen pop results, which are based on the last X digits of the caller's phone number |
| C2D enabled | Click to dial enabled if set to “true” |
| UUI Separator | Controls if the screen pop should be done based on the UUI information and specifies the separator that can be used to split the UUI information to extract the CRM unique identifier that can be used for customer identificaiton |
| UUI Position | Position of the contact identifier in the array |
| ACR Host | Recorder system IP address or FQDN where applicable. Desktop Connect support Verint Recording System 11+ and Avaya Call Recorder 12+ |
| Skype Domains | Specifies the local domain of the user. Users can login with an SfB account if the domain they belong to is specifically defined here. |
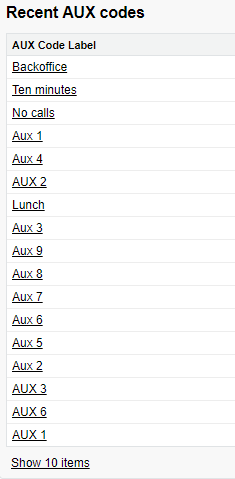
Reason Codes (AUX Codes)
- Navigate to AUX Codes from the menu ribbon of the page.
- Edit the labels as needed.
- Save the modifications.
This section contains the reason codes that are displayed to the agent and the numeric value that is sent to the switch.
Call Log Configurations
- Navigate to Call Center Configurations in the menu ribbon of the page.
- Select a slot of the template list under Call Log Configurations.
- Specify the text of the template.
- Save the configuration when finished.
This step is performed automatically by the managed package described in section Installing Geomant Call Center Administration Managed Package

Desktop Connect for Salesforce.com creates Task objects with Type set to Call. These will show up in your SF.com Call Center reports and in the activity feed on the related objects, if applicable.
Logging can be enabled/disabled for inbound / outbound / internal calls.
| Call log switch | Description |
|---|---|
| Log Outbound Calls | Creates a call activity task for all calls that are made towards an external destination |
| Log Inbound Calls | Creates a call activity task for all calls that are recevied from an external party, including external calls received as a transfer |
| Log Internal Calls | Creates a call activity task for all calls that are considered internal calls, based on the number of digits specified in the Dialing options - turning this feature on results in having a call activity logged for the internal leg of a call transfer made or received |
Outbound and inbound calls present the agent with a set of options configured here. These are added to the Disposition field of the Task.
The following fields are filled out by default:
| Call Object | Name of the call center. |
| Status | 'Completed' |
| Activity Date | Date and time of the call activity. |
| Call Duration | Period of the call activity. |
| Description | Any comments. |
| Subject | Case of the activity. |
| Call Type | Inbound or Outbound. |
| Who Id | Identification of the contact. |
| What Id | Identification of the object. |
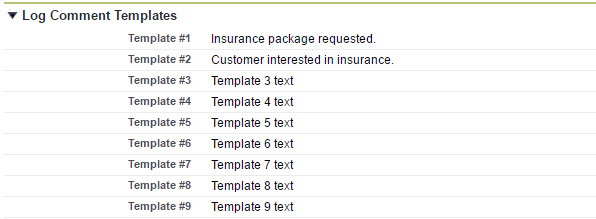
Log Comment Templates
Create predefined custom templates agents can use when adding a comment to the call activity, so they can wrap up similar calls or tasks easier and in a time consuming manner.
- Navigate to Call Center Configurations in the menu ribbon of the page.
- Select a slot of the template list under Log Comment Templates.
- Specify the text of the template.
- Save the configuration when finished.
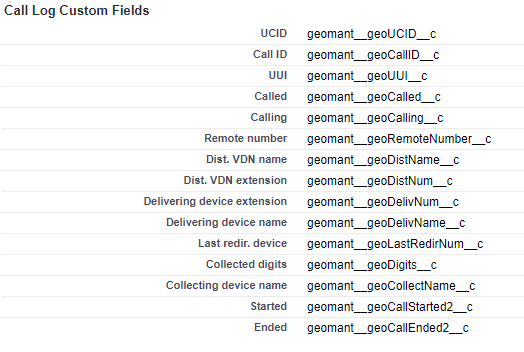
Creating Custom Fields in the Task Activity Object
Create custom fields in the Task Activity object or use the package provided by Geomant to let DC4SF save additional CTI information.
The package contains fields for all available CTI information and can be used with the default configuration shown in the picture below.
Setting the field name to an empty string disables logging that CTI info.
If you already customized your Task object and want to use old custom fields, set its name in the configuration including the '__c'.
The Started and Ended fields must be Date Time type, all others must be String type.
Preferred Object Types
Administrators have the possibility to decide which kind of Salesforce object to display as screen-pop when multiple matches found.
- Navigate to the Call Center Configurations in the menu ribbon of the page.
- Select a slot of the template list under Preferred Object Types.
- Add the preferred objects for all 3 call types.
- Inbound
- Outbound
- Internal
- Save the modifications.
Possible object types are Lead, Contact, Case, Account, Opportunity,etc.

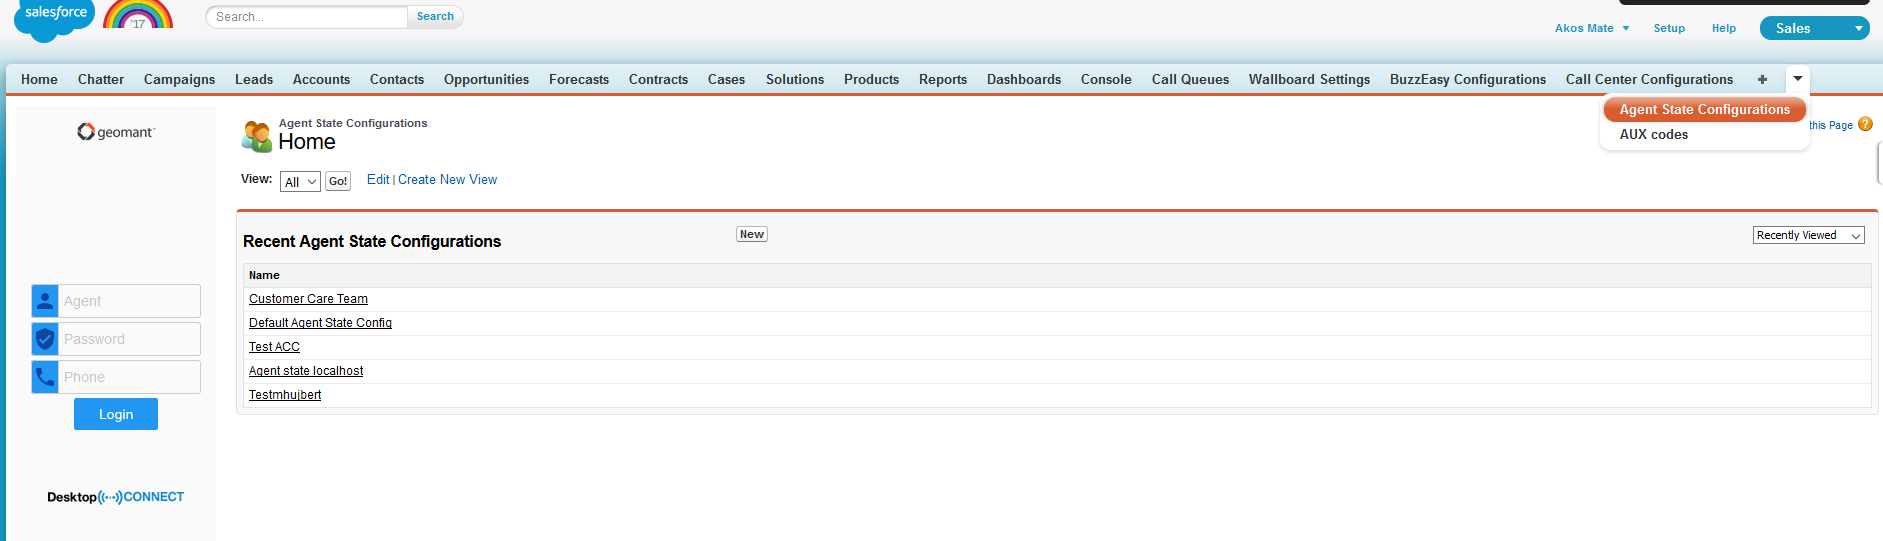
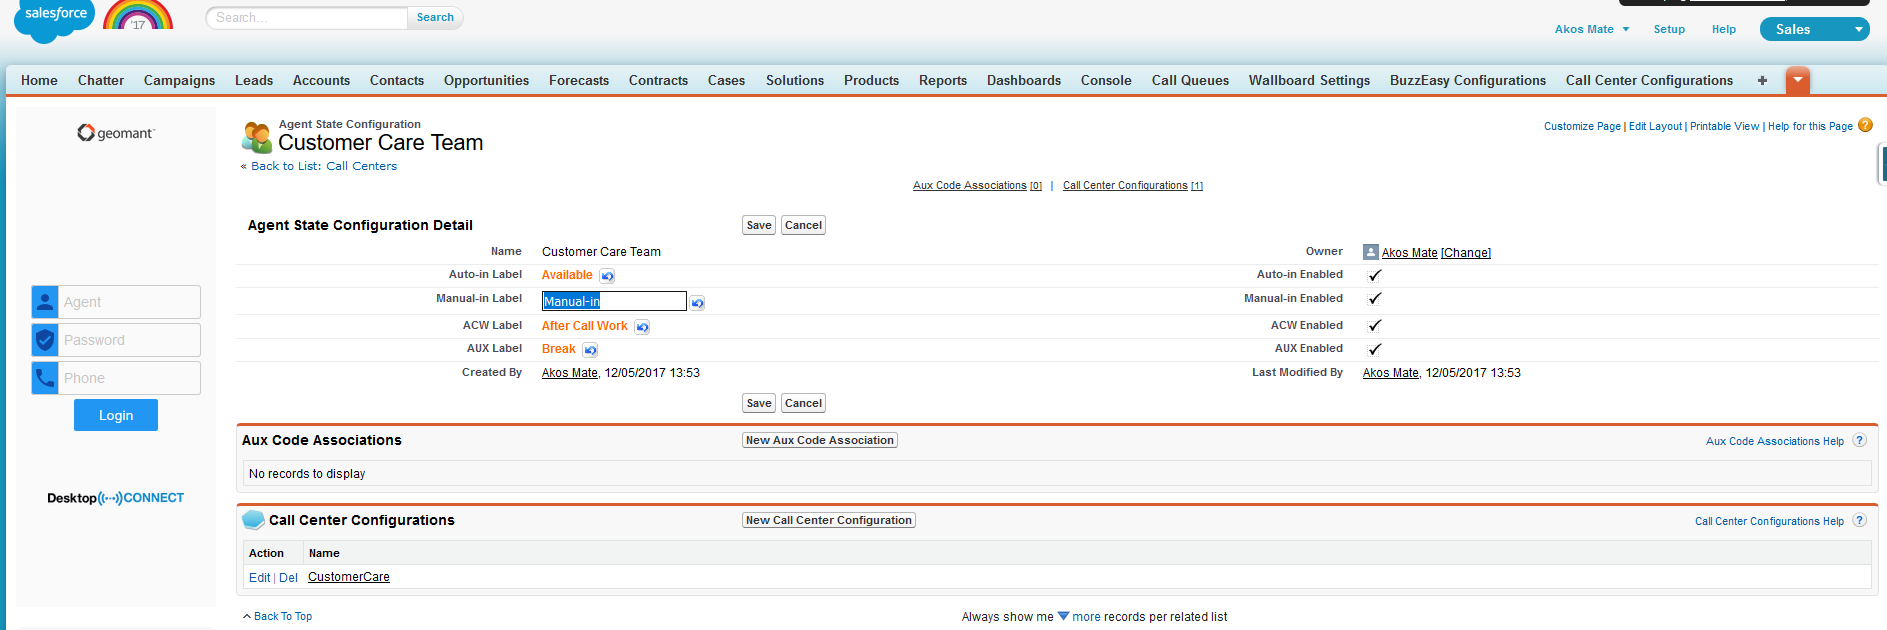
Agent State Configurations
Geomant Desktop Connect allows CRM administrators to define different agent state labels via Salesforce.com.
- Navigate to the Agent State Configurations in the menu ribbon of the page.
- Select the preferred Call Center.
- Edit the labels you wish to rename.
- Assign AUX code associations.
- Save the modifications.
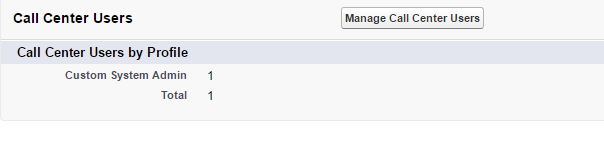
Assigning Users to a Call Center
Salesforce users must be assigned to a call center before they can use the SoftPhone application.
Follow these steps to assign user to a Call Center:
- Navigate to Your Name → Setup → Customize → Call Center → Call Centers.
- Click on the name of the call center to which you want to assign users.
- Click on the Manage Call Center Users at the bottom of the page in the Call Center Users related list.
- Click on Add More Users.
- Specify criteria to find the users who should be assigned to the call center and click Find.
- Select the checkbox next to each user who should be assigned to the call center.
- Use the Add to Call Center button assign these entries to the Call Center.
All users who already belong to a call center are excluded from search results because a user can only be assigned to one call center at a time.
Concerning the modification the Call Center relation of a user, it is necessary to remove the related user entry from the current Call Center first, and then add them to the new Call Center.
You can view a user’s Call Center on the User detail page.
Defining a Softphone Layout
Desktop Connect for Salesforce.com screen pop behavior can be defined on the standard Salesforce.com Softphone Layout. Similar to page layouts, it is possible to design custom SoftPhone layouts and assign them to Salesforce CRM Call Center users based on their user profile.
Visit the Designing a Custom Softphone Layout web page for more information.
Defining Directory Numbers
Desktop Connect for Salesforce.com queries Directory Numbers that belong to the same Call Center of the current user.
- Navigate to Your Name → Setup → Customize → Call Center → Directory Numbers to check these numbers.
- Start typing the name of one of these and a list will appear with the number / name pairs matching the beginning of that name.
- Click on an item to select the text.
- Press Dial, Transfer or Conference.
- The name will be translated to the number.
Short names (e.g. *1, *2 etc.) can be used to implement a speed dial functionality. Descriptions are set to appear when hovering on an element of the list.
Please note that Directory Numbers is currently not available in Salesforce Lightning
Starting the SoftPhone
The SoftPhone application automatically loads in the upper left corner of the Salesforce.com website or on the bar at the bottom when using in Console mode if:
- Geomant Desktop Connect for Salesforce.com is installed
- Configured
- Running
- A browser is running
- Salesforce.com Call Center-enabled user is logged in.