Accessing Microsoft Exchange Online Mailboxes Using OAuth
This document describes how to configure:
Microsoft Azure AD
Office 365 Exchange Online and
CE
in order to let CE to connect to Exchange Online mailboxes using OAuth.
Configuring Microsoft Azure AD
Azure AD tenant administrator should perform the following steps in order to register CE as a trusted enterprise application. An application which has the required email access permissions inside the tenant.
Select the “App registrations” option in the left side menu and create a new application representing CE e.g. with name “CE Email”.

Write down the following application properties as they will be required by the Exchange Online administrator:
Application (Client) ID
Directory (tenant) ID
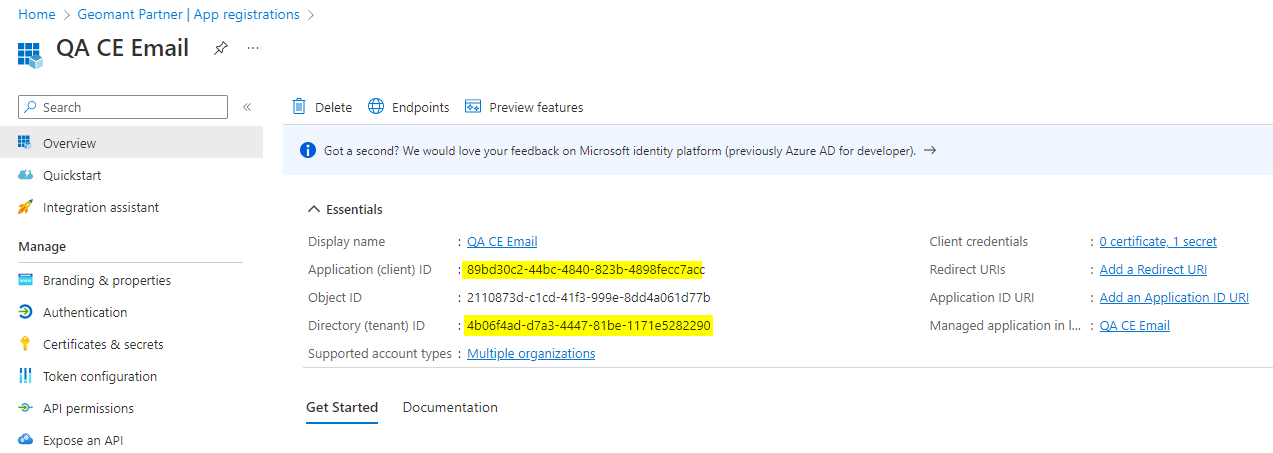
Select the link under the application property “Managed application in local directory” (the “CE Email” link in our case)
Write down the Object ID application property as it will be required by the Exchange Online administrator:
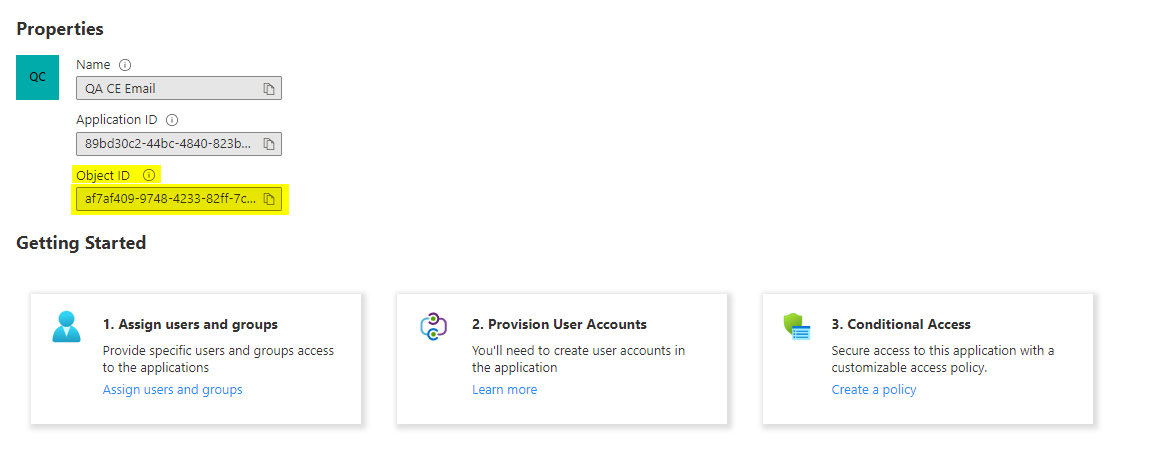
Go back to the previous page in the browser; to the main page of the application
Select “Certificates & secrets” option in the left side menu and create a secret for the application by clicking the “New client secret” link
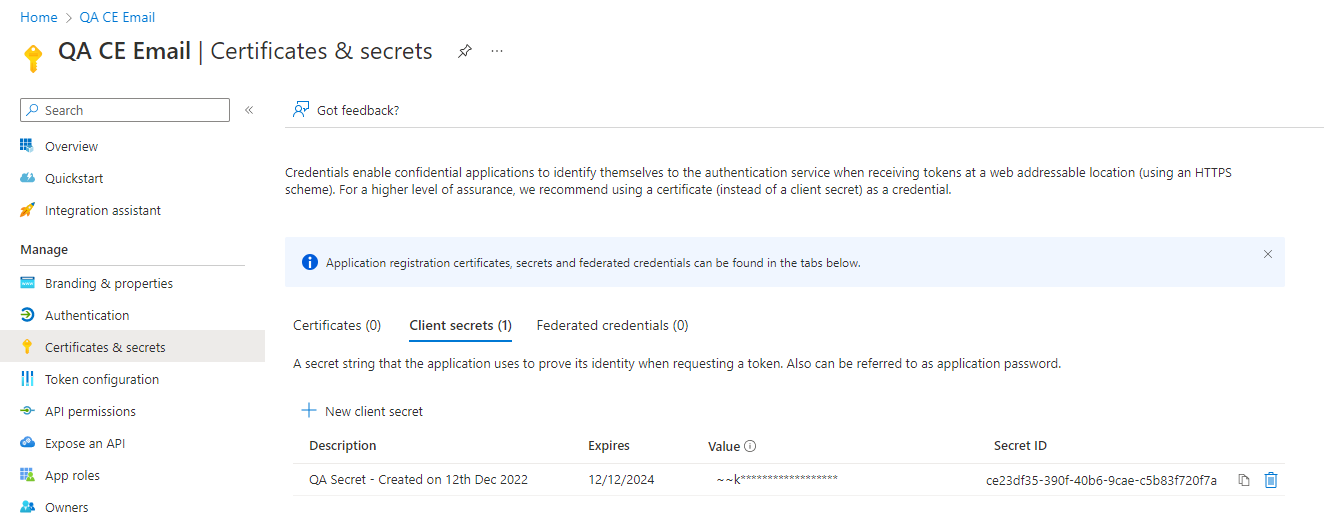
Copy and paste secret “Value” as they will be required by CE administrator. We will refer it as Client Secret.
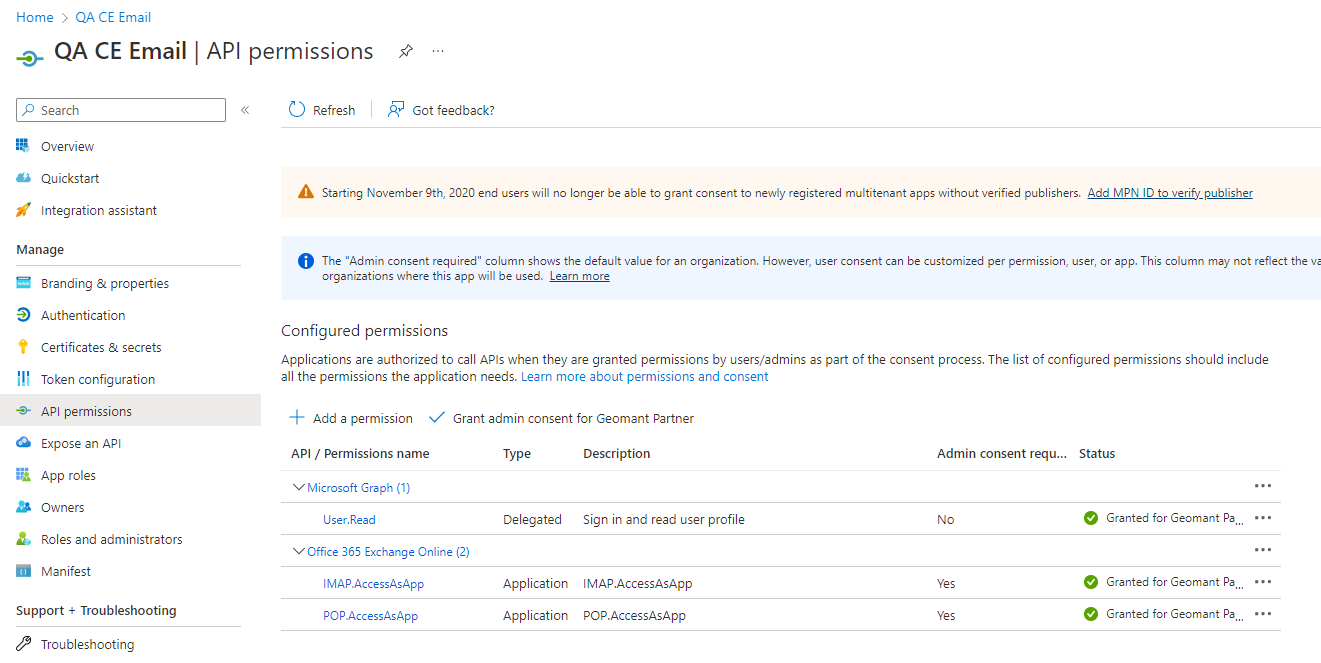
Select the “API permissions” option in the left side menu and add the IMAP.AccessAsApp, POP.AccessAsApp permissions to the application by performing the steps:
Click the “Add a permission” link
Select the “APIs my organization uses” category
Search for “Office 365 Exchange Online”
Click that and select “Application permissions”
Check the permissions
IMAP > IMAP.AccessAsApp
POP > POP.AccessAsApp
Click “Add permissions” button
The final set of API permissions should look like this
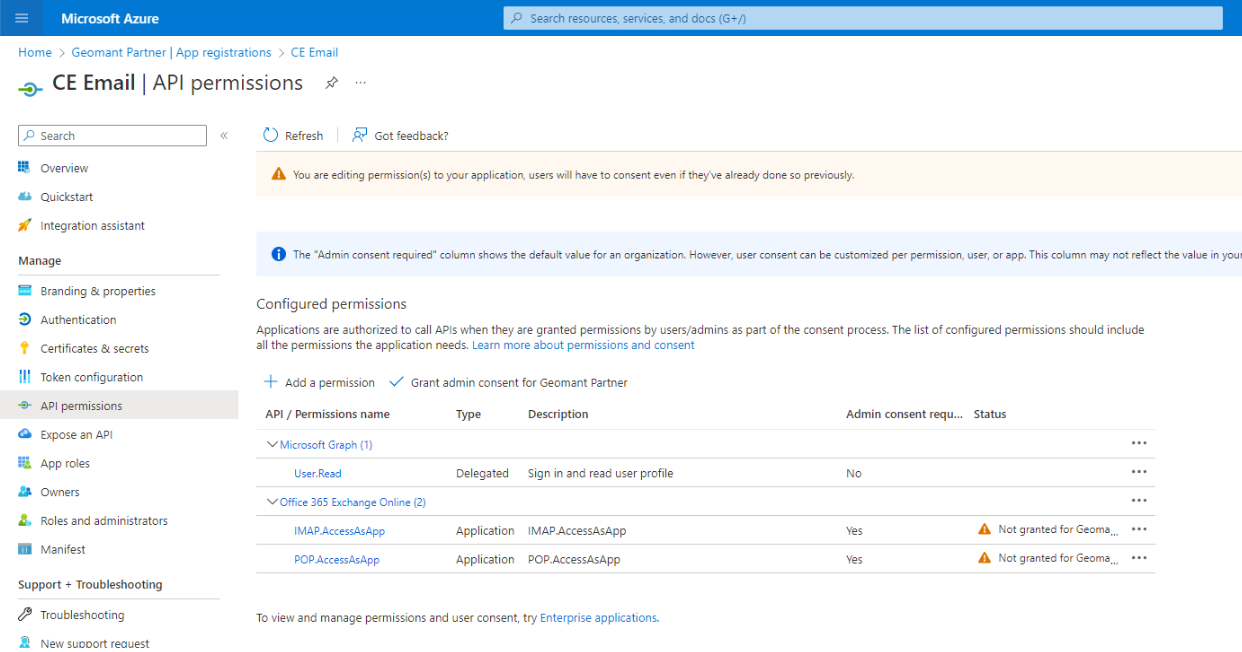
Grant this set of API permissions to the application by clicking the button “Grant admin consent for [tenant name]” appearing above the list permissions.
Make sure all the permission set is granted to the application now (aka. green icon appears next each permission)
Configuring Office 365 Exchange Online
Office 365 Exchange Online tenant administrator should perform the following steps in order to let CE as a trusted enterprise application to access the intended mailboxes.
Start PowerShell
Make sure $PSVersionTable.PSVersion says you are running PowerShell 7.x
Run
Install-Module -Name ExchangeOnlineManagement -AllowPrereleasRun
Import-Module ExchangeOnlineManagementRun
Connect-ExchangeOnline -Organization [Directory (tenant) ID]Run
New-ServicePrincipal -AppId [Application (Client) ID] -ServiceId [Object ID] -Organization [Directory (tenant) ID]Run
Add-MailboxPermission -Identity [mailbox address] -User [Object ID] -AccessRights FullAccesswhere “mailbox address” is the email address associated with the mailbox you want to let CE to access. Having multiple such mailboxes requires this command to be executed for each mailbox one by one.
Configuring CE
CE deployment administrator should perform the following steps on the Portal:
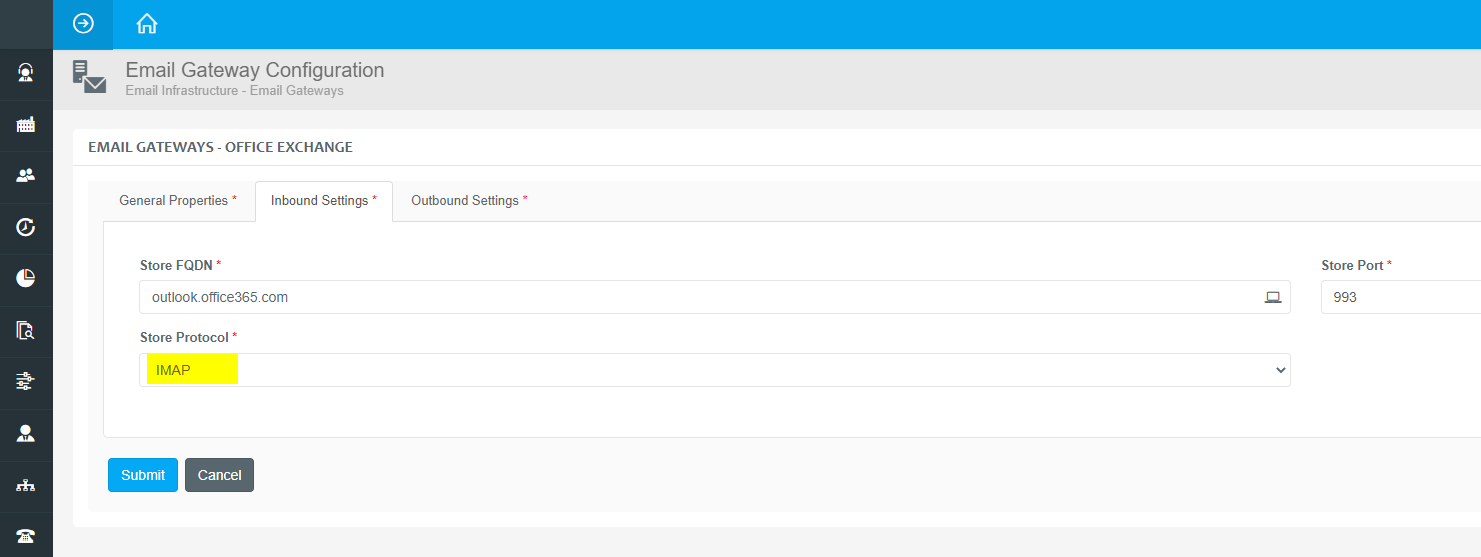
- Select the Email Infrastructure > Email Gateways menu and select the Exchange Online gateway OAuth will be used with. If no Exchange Online gateway is configured yet than create a new email gateway with the proper values to access Exchange Online (inbound: outlook.office365.com, 993, IMAP; outbound: smtp.office365.com, 587). Make sure IMAP is specified as the protocol to download incoming emails. This is a requirement as CE does not support OAuth for POP3.
CE tenant administrator should perform the following steps on the Portal:
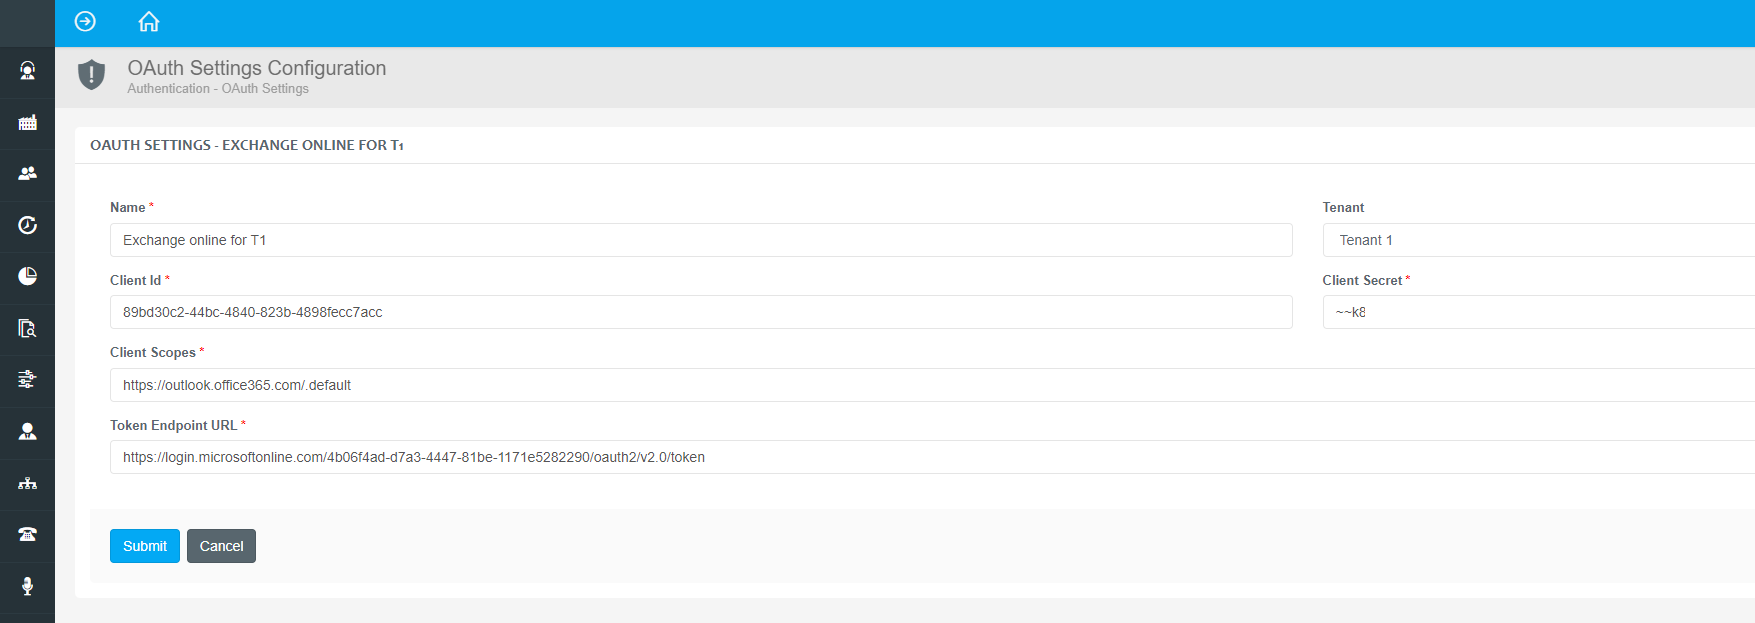
Select the Email Infrastructure > OAuth Settings menu and create a new OAuth settings by specifying:
Application (Client) ID as client id
Client Secret as client secret
https://outlook.office365.com/.default as client Scopes
https://login.microsoftonline.com/[Directory (tenant) ID]/oauth2/v2.0/token as token endpoint URL
Select the Email Infrastructure > Email Connections menu and select the email connection associated with the Exchange Online email gateway we looked at above and the tenant you want to enable OAuth for. If no such email connection exists yet than create a new email connection. Click its OAuth Setting tab of the email connection and assign the OAuth settings to the email connection we just created previously. Check the “Use OAuth to receive emails” checkbox. Do not check the “Use OAuth to send emails” checkbox as Exchange Online does not support OAuth (client credential grant flow) for SMTP yet.

Select the Server Updates menu and initiate a batch update. After the batch update is successfully performed all the incoming emails from all the Exchange Online mailboxes associated with the given email connection will be retrieved/downloaded using OAuth as the authentication protocol. Outgoing emails via Exchange Online still will be sent using basic authentication; using the user name and password specified on the mailbox level.
How to test outbound email sending with SMTP
- Start Powershell on the CE core Host
- run
$cred = Get-Credential. Provide the username and password for the mailbox. - Run
Send-MailMessage -To "TO_MAIL_ADDRESS" -from "FROM_MAIL_ADDRESS" -Subject "Test" -Body "Test message" -BodyAsHtml -SmtpServer smtp.office365.com -UseSsl -Credential $cred -Port 587 - The Send-MailMessage command should complete without errors
- Check that the email has arrived at the mailbox gives as the destination