Management of Contact Records and Contact Lists
Contact Expert v6.1 for Skype for Business Server
Managing Contact Records
Contact Expert has a component called Contact Manager Service dedicated to govern all aspects of the contact objects including, but not limited to the creation, modification, deletion, as well as the import and export of these objects. These chapters describe each contact related feature in detail.
System administrators can use the Operations→Customers** menu item to manage contact records.
Contact Records
Users with sufficient permissions (administrators or supervisors) can add or remove contact records. They can also change the contents of existing records including campaign specific information (CRDS).
Navigate to Operations→Customers→Contact Records.
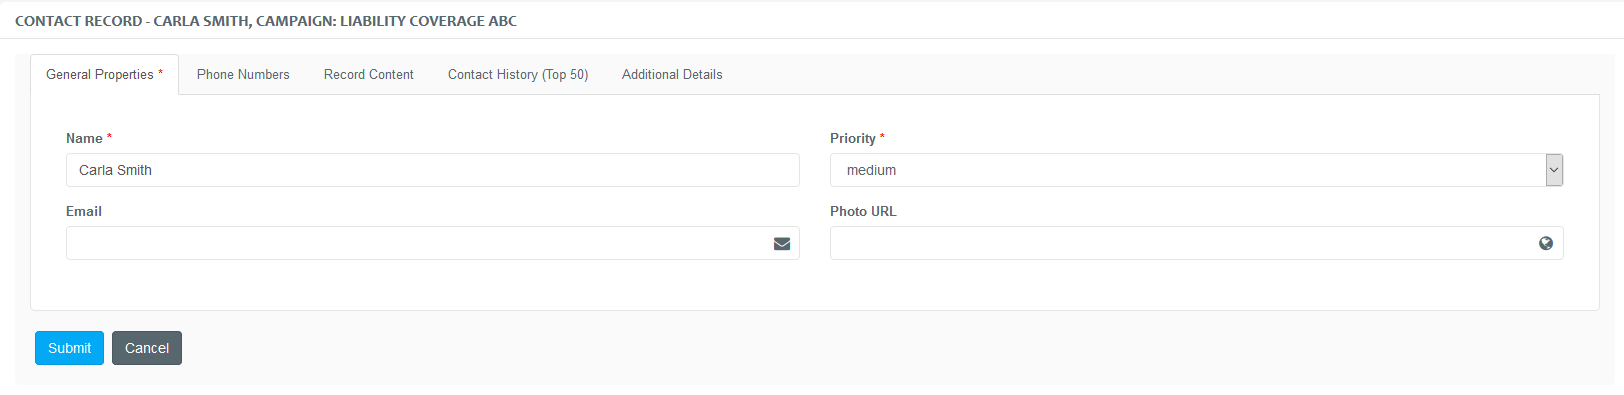
Use the General Contact Properties tab to build a search criteria and specify the following details:
Affected campaign
The name, phone number and email address of the contact(s)
Use the Contact Record Content tab to refine the search criteria by specifying data in the campaign specific contact fields (CRDS).
Click **Search **to load the contact records meeting the above criteria.
Use +New Contact button to add a new item to the campaign.
Click Submit to save the modifications to the database.
Select a campaign on the General Contact Properties tab first for the New Contact button to show up.
After clicking Edit on a contact, you will be able to check the history of the contact and under the Additional Details tab you can find detailed information about the contact ("Created By", "Last Agent" etc).


Modification of a Contact Record
After finding the preferred contact record you have the possibility to alter the details of the entry.
Perform steps 1-4 described in the section above.
Select Edit of the desired contact entry from the list.
Modify the record as needed.
Click Submit to save changes.
| General Properties | Basic contact details, such as name, email address, contact priority classification and the link of the contact photo. |
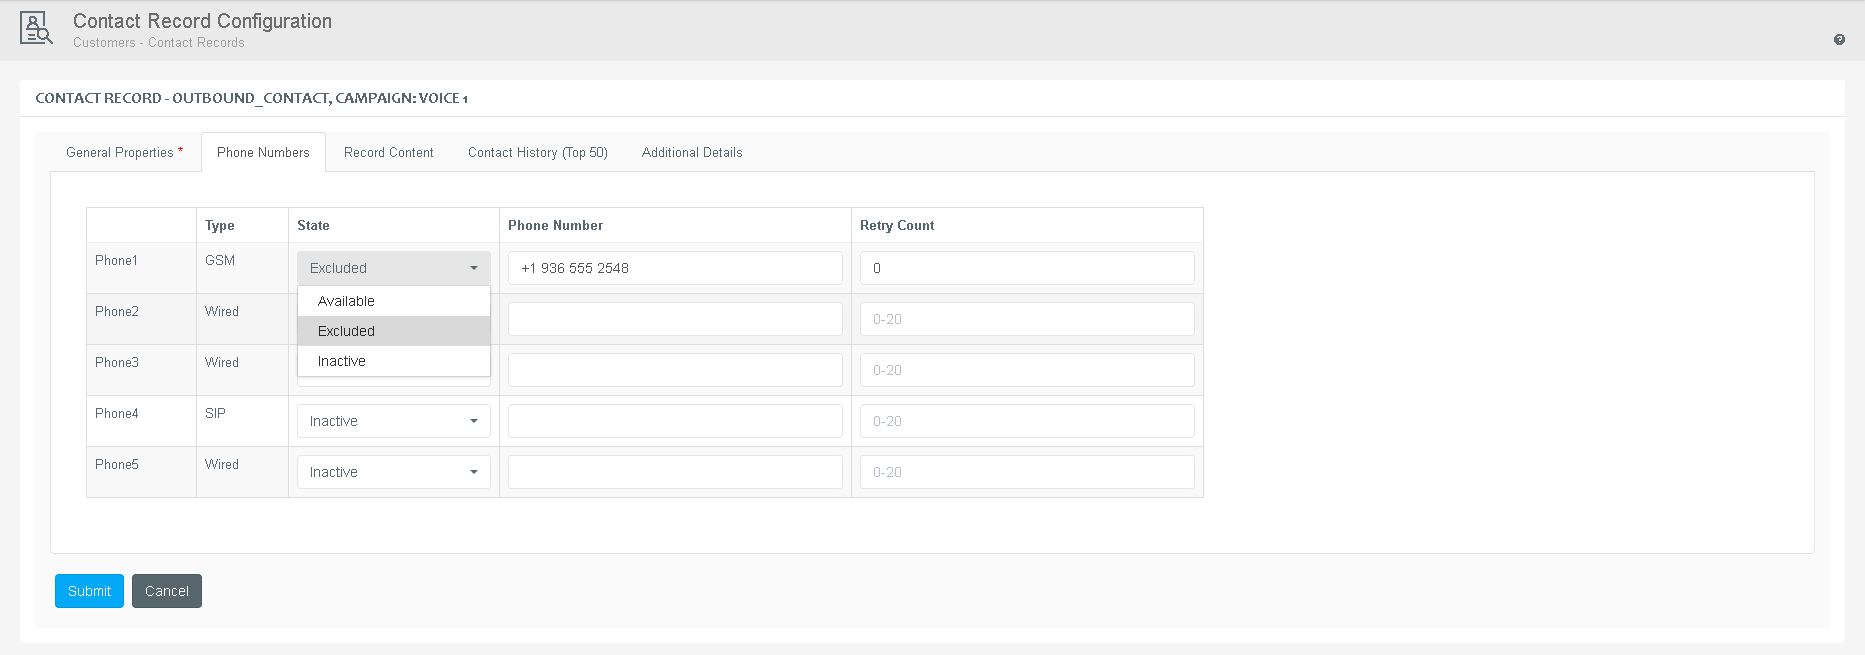
| Phone Numbers | If a contact has several different phone numbers in use, like landline and mobile numbers, you can edit them here. Editing phone numbers will automatically change the State to Active (and the Retry Count to 0). Would you like the number to be Inactive or Excluded, you need to set this when finished editing. |
| Record Content | Contact related data fields can be modified on this tab. |
| Contact History | This tab displays the latest 50 contact activity including event outcome, business tags and comments besides the basic contact details. |
| Additional Details | The current status of the contact record and its specifications, like scheduling details and create time. |
Contact List Processes
Contact Expert Portal offers a view on active and past scheduled import, export and delete processes.
Navigate to **Operations→Customers→Contact List Processes to check the status of the above mentioned processes.
The table displays the following information:
- Process ID
- Scheduled time of the process
- Type: Import, Export or Delete
- Campaign: name of the campaign for which it was issued
- User: Issuer user
- Status: status of the process: pending, running, finished, cancelled
- Progress: progress of the process in percentage
- Start time
- End time
- File: File that contains the records that have been processed (import file, export file, deleted contacts), the file can be downloaded from here
- Details: brief overview of the process
- Number of contacts imported and records that have failed from the import file
- Number of contacts matched the export criteria and exported
- Number of contacts match the deletion criteria and deleted
- Action: Processes in pending and running mode can be cancelled
The export files can be downloaded by clicking the download button at the end of the files.
Downloading the exported contact list in a Highly Available CE can only be performed on the CE server used to initiate the export process!
Contact Status Change
Contact records go through a number of states during their life cycle participating in the work performed by the affected campaigns. Often times contacts in the system are put into a dormant state and need to be re-activated manually. This can happen, because the called phone number from an outbound campaign was busy/unavailable at the time, for example. Contact Expert provides this reactivation ability via the Status Change option.
Navigate to Operations→Customers→Contact Status Change .
Use the General Contact Properties tab to build a search criteria and specify the following details:
- Affected campaign
- State (e.g. Closed, Inactive, Postponed, etc.)
- Major Reason Code assigned by the system (e.g. Call Disconnected, Routing failed, Agent cannot serve the request, Suspended, etc.)
- Minor Reason Code assigned by the system (e.g. Abandoned in queue, Callback in queue, Queue size limit, etc.)
- The name, phone number and email address of the contact(s)
Use the Contact Record Content tab to refine the search criteria by specifying data in the campaign specific contact fields (CRDS).
Click Search to load the contact records meeting the above criteria.
When satisfied with the list of contact records, use the following controls available in the top part of the Search Results pane to alter certain parameters of every contact found:
- New Record Status and/or the New Contact Priority drop-downs to update these values
- Set the Clear Retry Count checkbox to reset the retry count of every phone number in all contacts found.
- Set the Activate excluded phone numbers checkbox to set the state of every phone number to Active in all contacts found.
Click Update Contact Status to perform the changes.
Contact Expert can assign the following states to contact records: Remaining or Inactive.
The status change operation can be performed on campaigns in Running status.

Contact Master Data Fields
The default database structure of the contact records are collectively referred to as Master Data. These contain straightforward, common fields such as Name, Phone number(s), Email address, etc. Contact Expert provides the ability to add custom database fields to the default Contact Master Data and will create these custom fields in the campaign specific contact database of every new campaign created later on. Contact Master Data Fields are available for campaigns of the same tenant or business unit.
Navigate to Operations→Customers→Contact Master Data Fields .
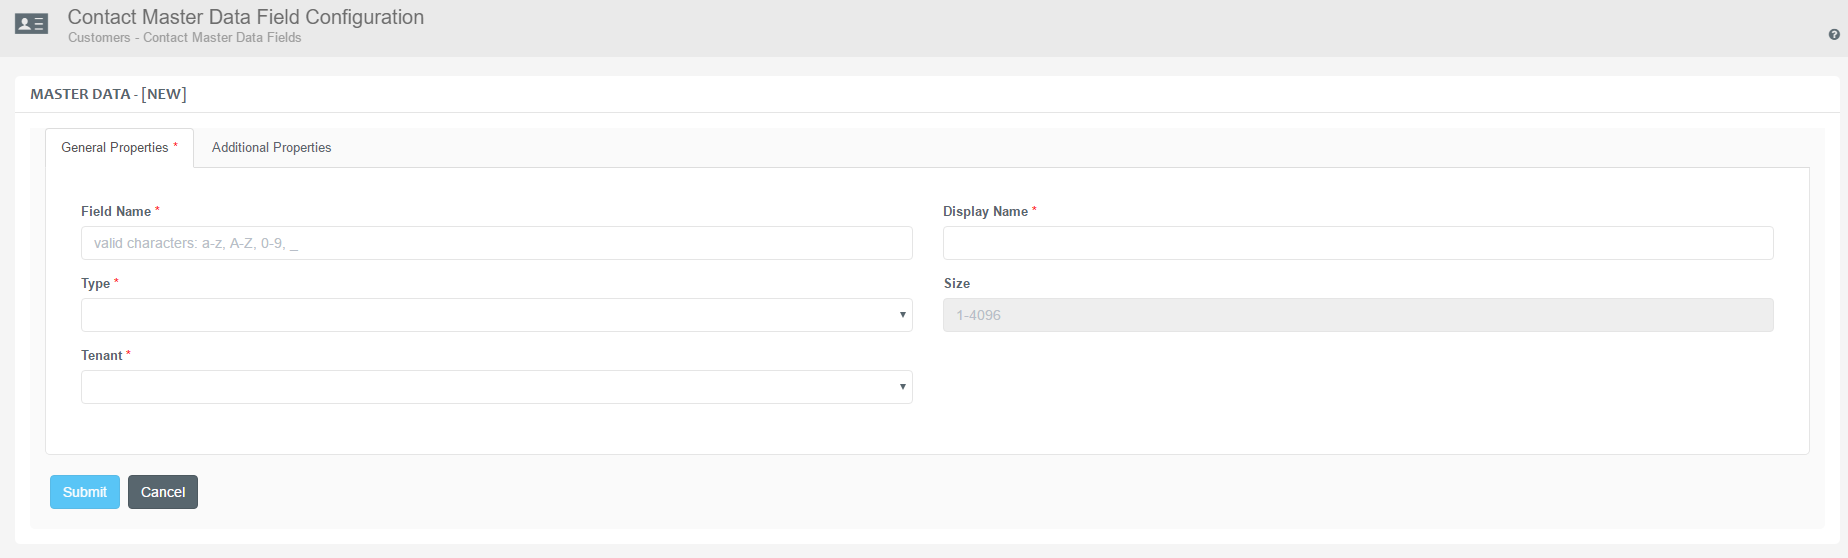
Use the +New master data button to create new CRDS fields.
Specify the properties specified below.
Click the Submit button to save the modifications to the database.
Custom field properties:
| Field Name | Database column name. |
| Display Name | Display name of the field. |
| Type | Data type. |
| Size | Maximum data size. |
| Valid Values | Only available for Choice data type. Separate valid entries by semicolon. |
| Required | Specifies whether the agent must fill this value before going to the next script page. |
| Unique | Specifies whether the column should store unique values. |
| Multi-line | Specifies whether to display the data in multi-line textbox. |
Creating a new master data does not have any effect on your existing campaigns - they will not be added. Master Data Fields exist in different tenants are independent from each other - meaning they have no affect on other tenant's CMD fields.
The system does not allow the creation of duplicated master data fields within the same tenant.
Blacklists
It is possible to forbid specific customers to reach your call center by adding their numbers or other contact details to a Blacklist. Each tenant has its own separate list.
Navigate to ********Operations→Customers******→*Blacklists* to manage the list of forbidden customers.
Use the +New blacklist entry button to create new items in the list.
Specify the properties described below.
Click the Submit button to save the modifications to the database.
The Blacklist is applied for the automatically distributed outbound calls only. It is ignored in any other cases, like when the agent handles rescheduled or inbound tasks.
Specify the following properties:
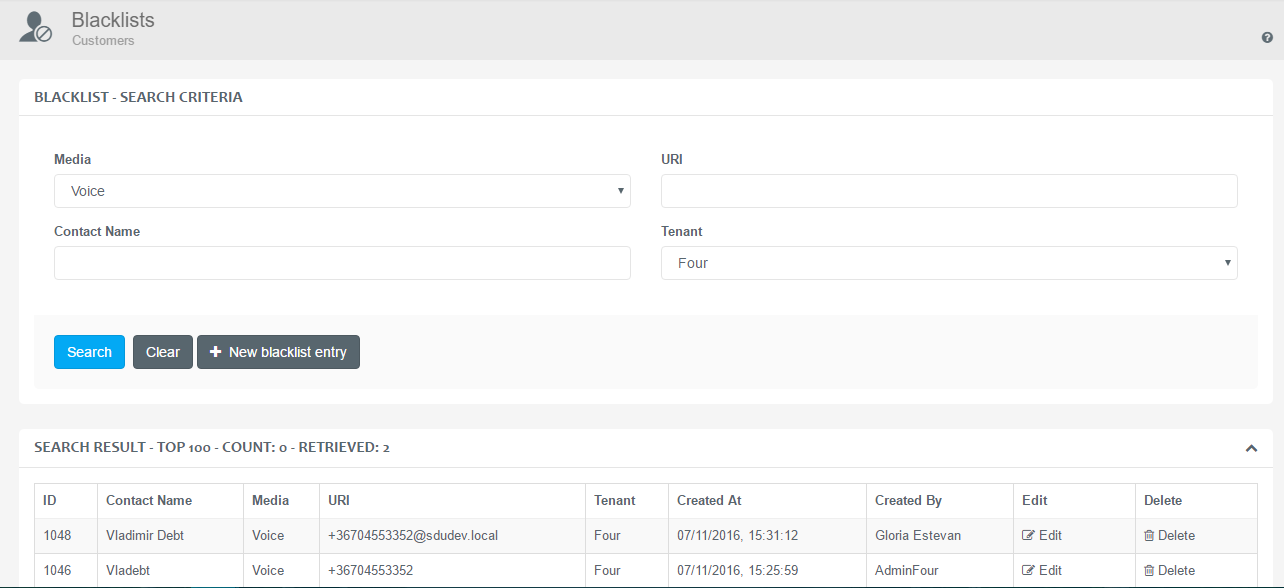
| Name | Name of the person to blacklist. |
| Media | Media type which you would like to lock the user out from. |
| URI | Phone number or email address of the person to be blacklisted. |
| Tenant | Choose the tenant associated with the Blacklist. |
You can also search through existing entries using these properties. Specify the search criteria, like Media or Tenant and click Search.
Leave all of the search fields blank and click Search in order to list all blacklist contacts.

Scheduled Tasks
It is possible to list tasks that are waiting for automatic reactivation at a given schedule (e.g. callbacks or email tasks rescheduled).
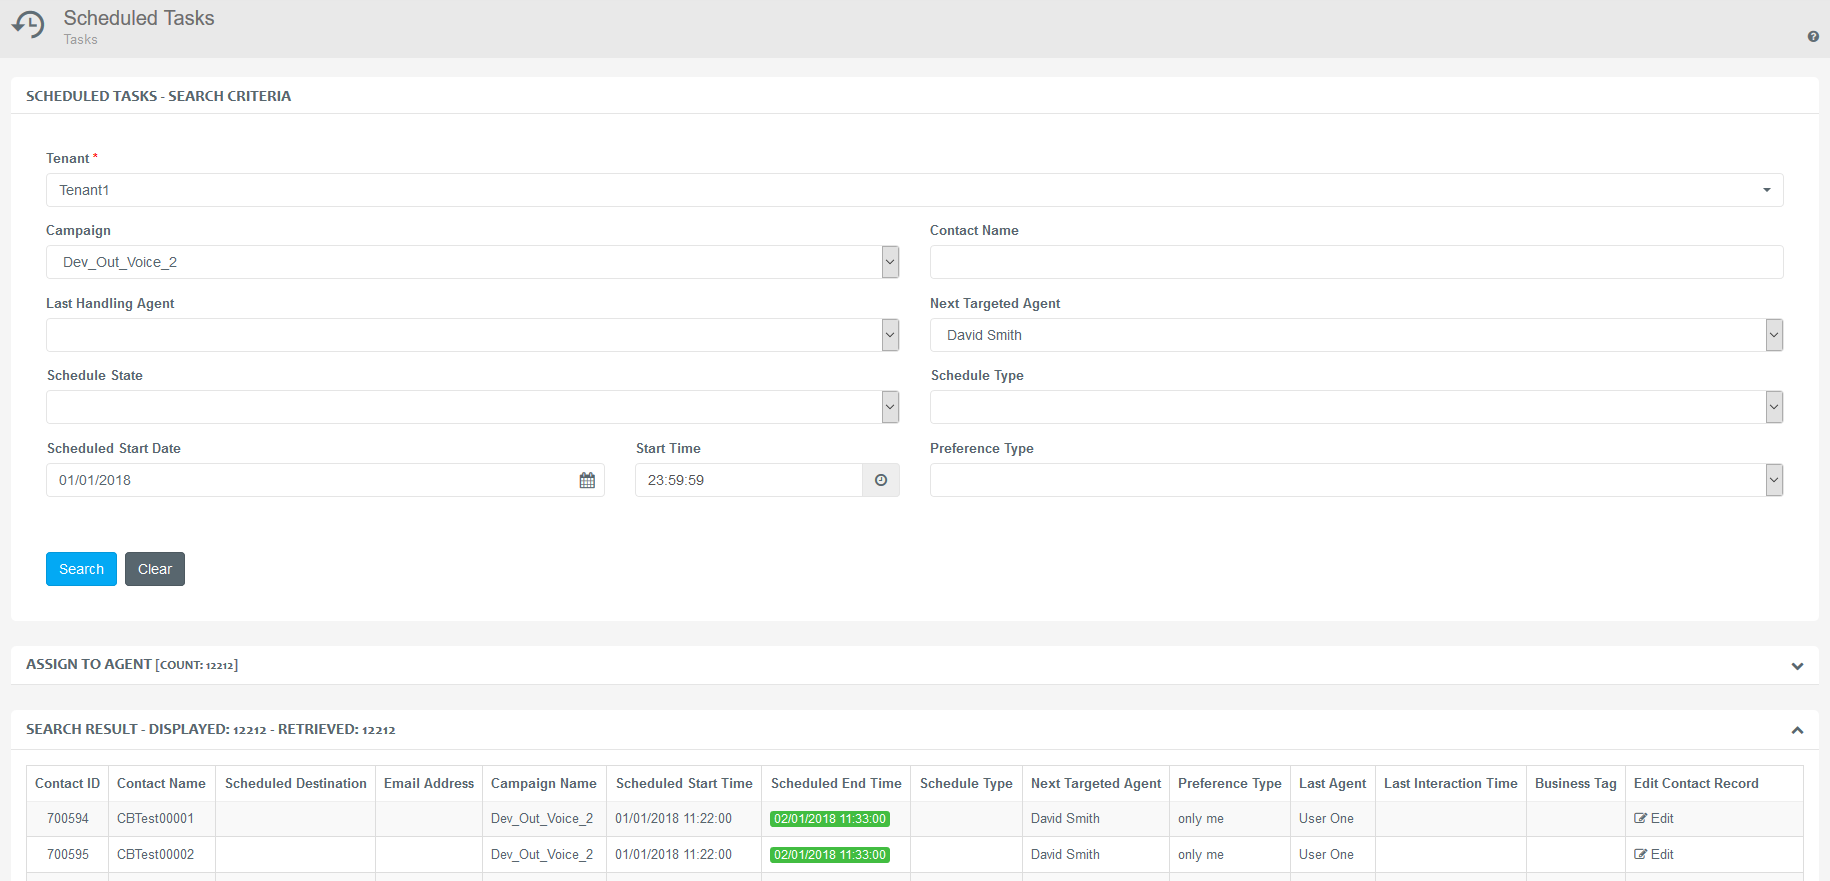
Listing Scheduled Tasks
Navigate to Operations→Tasks*→Scheduled********* Tasks menu with a user account granted with the sufficient permissions.
You can specify a number of parameters to focus the search for the designated task(s) only. See the description on the search filters below.
Click the Search button to retrieve records meeting the provided criteria.
Click Show to list all the items found.
Click Edit on any of the contact records to review or edit its parameters.
The scheduled states are differentiated with certain colors in case a record reaches or passes the predefined Scheduled Task Delivery Time threshold or the end date of the scheduled time.
The states are the following:
| Scheduled State | If a record is rescheduled and has not passed any thresholds or end date, it would be in Scheduled state. There are no highlight color for these records. |
| Due State | If a record is about to reach the start date of its schedule time, it would be in Due state. The record will be highlighted with green . |
| Delayed State | If a record has passed the predefined threshold, but has not been processed yet, it would be transitioned into Delayed state. The record will be highlighted with yellow . |
| Expired State | If a record has passed the end date of its rescheduled time, it would be transitioned into Expired state. The record will be highlighted with red . |
| Closed | The scheduled task is closed. Either the agent closed it in agreement with the customer, or it is closed by the system automatically after its expiration. This state is not visible on the CE Portal. |
Search Filters
There are a number of different filtering options to narrow down your search results.
The query lists 1000 results at a time.
If you are dealing with a large number of records, it is highly recommended to apply as many filters as possible for your search query to reduce the volume of the results.
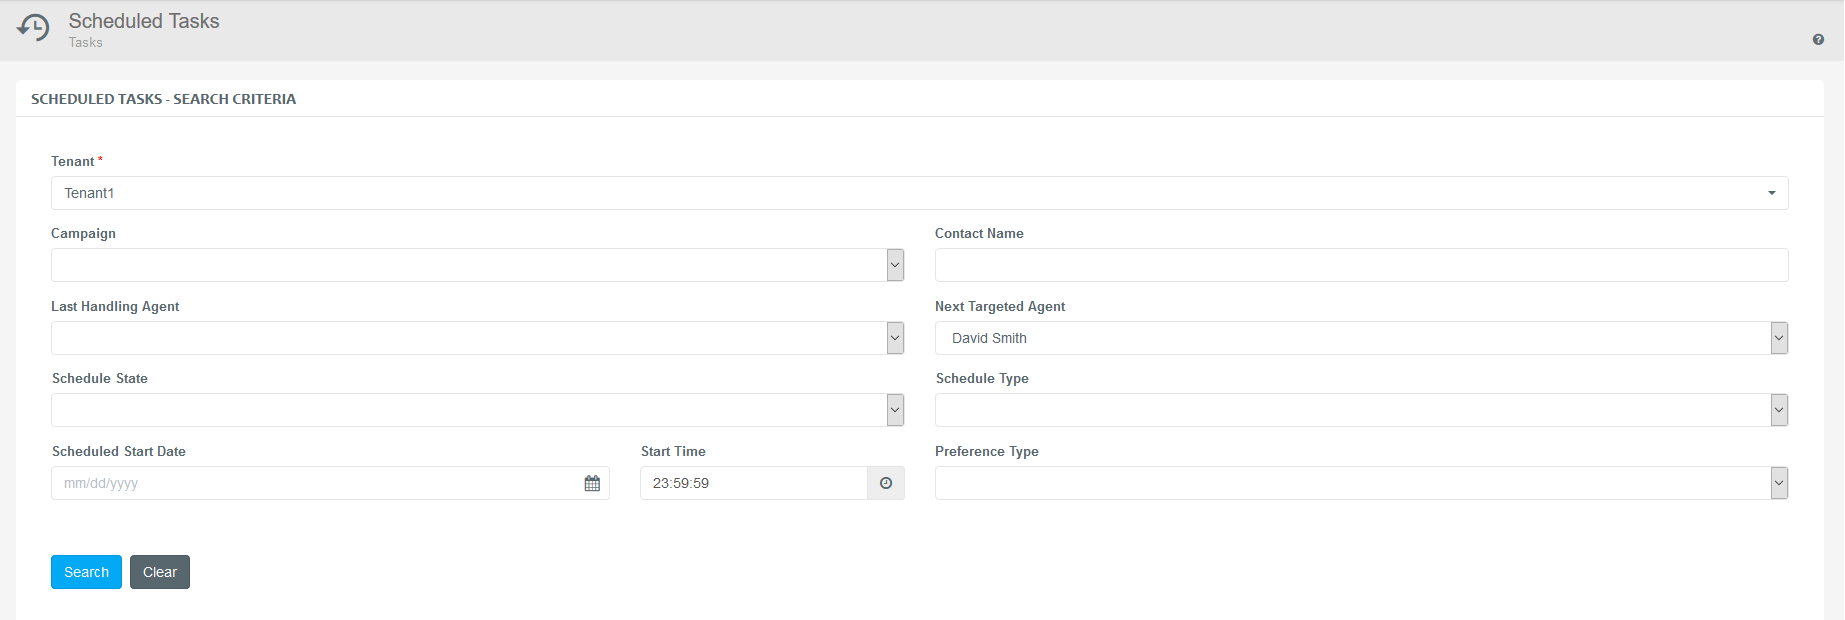
Build the search filter criteria by specifying items such as:
| Tenants | Select the related tenant from the drop-down list. |
| Campaign | Select the related campaign from the drop-down list. |
| Contact Name | Enter the name of the contact associated with the scheduled task. |
| Last Handling Agent | Select the agent who dealt with this contact previously. |
| Next Targeted Agent | Select the agent scheduled to deal with the contact next. |
| Schedule State | Status of the scheduled task. |
| Schedule Type | Type of the scheduled task. |
| Scheduled Task Start Date | Start date of the scheduled task. |
| Start Time | Start time of the scheduled task. Enter the exact time or a later interval in order to find the scheduled task in question. |
| Preference Type | Choose the distribution that has been selected for the scheduled task. |
List of Schedule Types
| Unspecified | Schedule type not specified. |
| Requested from Agent | Schedule is requested by the customer while talking to an agent. It is scheduled by the agent manually. Scheduling details are partially specified by the customer. |
| Requested in Queue | Schedule is requested by the customer while waiting in a queue. It is scheduled by the system automatically. Scheduling details are specified by system administrators. |
| Requested on Web | Schedule is requested by the customer over the webchat site or any other integration using the Contact Expert web service or REST API. It is scheduled by the system automatically. Scheduling details are specified by system administrators. |
| Scheduled by Agent | Schedule is requested by the agent without interacting with the customer. It is scheduled by the agent manually. Scheduling details are specified by the agent. |
| Scheduled by User | Already existing scheduled task is modified by a user using the CE Portal (or other bespoke interface in the name of an API user using the Management Services). Scheduling details are specified by the API user. |
| Scheduled by Import Process | Loaded from an external source. It is scheduled by the system automatically. Scheduling details are specified by the import process. |
| Lost Request | Generated for a request lost in a queue (for example a hot call). It is scheduled by the system automatically. Scheduling details are specified by system administrators. |
| Requested in IVR | Requested by the customer while interacting with the IVR. It is scheduled by the IVR manually. Scheduling details are partially specified by the customer. |
List of Schedule States
| Scheduled | This state indicates that a callback request is planned to be processed at a certain time in the future, which time has not come yet. |
| Due | This state indicates that a planned callback task is expected to be processed. It has passed the schedule time, but it has not passed value specified as the Maximum Average Delay of Scheduled Tasks within the Thresholds. |
| Delayed | This state indicates that a planned callback task is behind its schedule time. It has passed the value specified as the Maximum Average Delay of Scheduled Tasks within the Thresholds. |
| Expired | Delivery of the scheduled task was unsuccessful, and it cannot be delivered again. |
| Closed | The scheduled task is closed. Either the agent closed it in agreement with the customer, or it is closed by the system automatically after its expiration. This state is not visible on the CE Portal. |
List of Preference Types
| Anyone | If selected, the task can be delivered to any of the agents available at that time. |
| Prefer me | If selected, the task can be delivered to any of the agents available at that time, but you are the preferred one. This means if you are available at the scheduled time, you will get the task, otherwise another agent will get it. |
| Only me | If selected, the task can be delivered only to you. If the task cannot be delivered until it expires, it will not be delivered at all. |
| Other | If selected, the task will be delivered to another agent you specify. |
If the amount of the search query is still above 1000, click to Load More button at the bottom of the page to list another 1000 records.

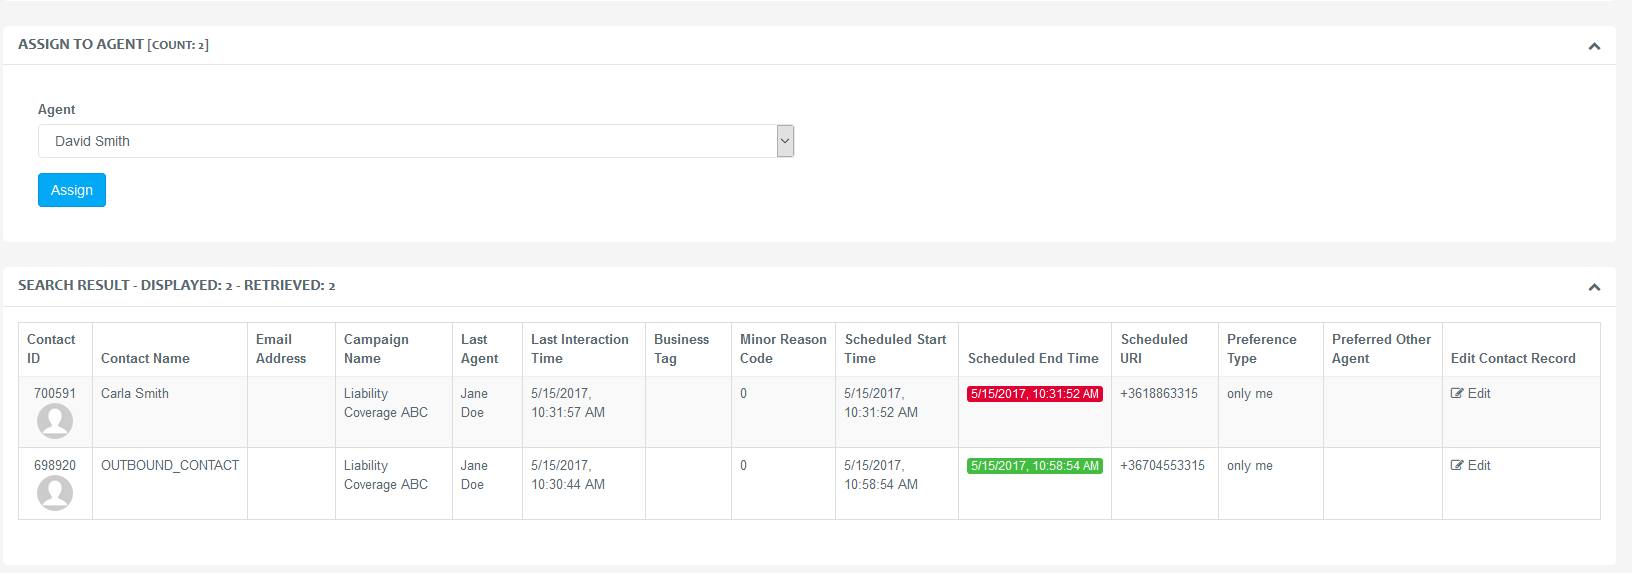
Modification of Assignment
It is possible to change the assignment of the scheduled task to another agent.
Task Rescheduling
Navigate to ****Operations→Tasks*****→*Scheduled Tasks menu with a user account granted with the sufficient permissions.
Build the search criteria by specifying the filter parameters to list the designated task(s) only.
It is important to select the Next targeted agent from the drop-down list.
Click the Search button to see the list of records meeting the criteria.
Choose an operator from the Assign to Agent section and click Assign.
After a successful assignment, the task will disappear automatically from the list.

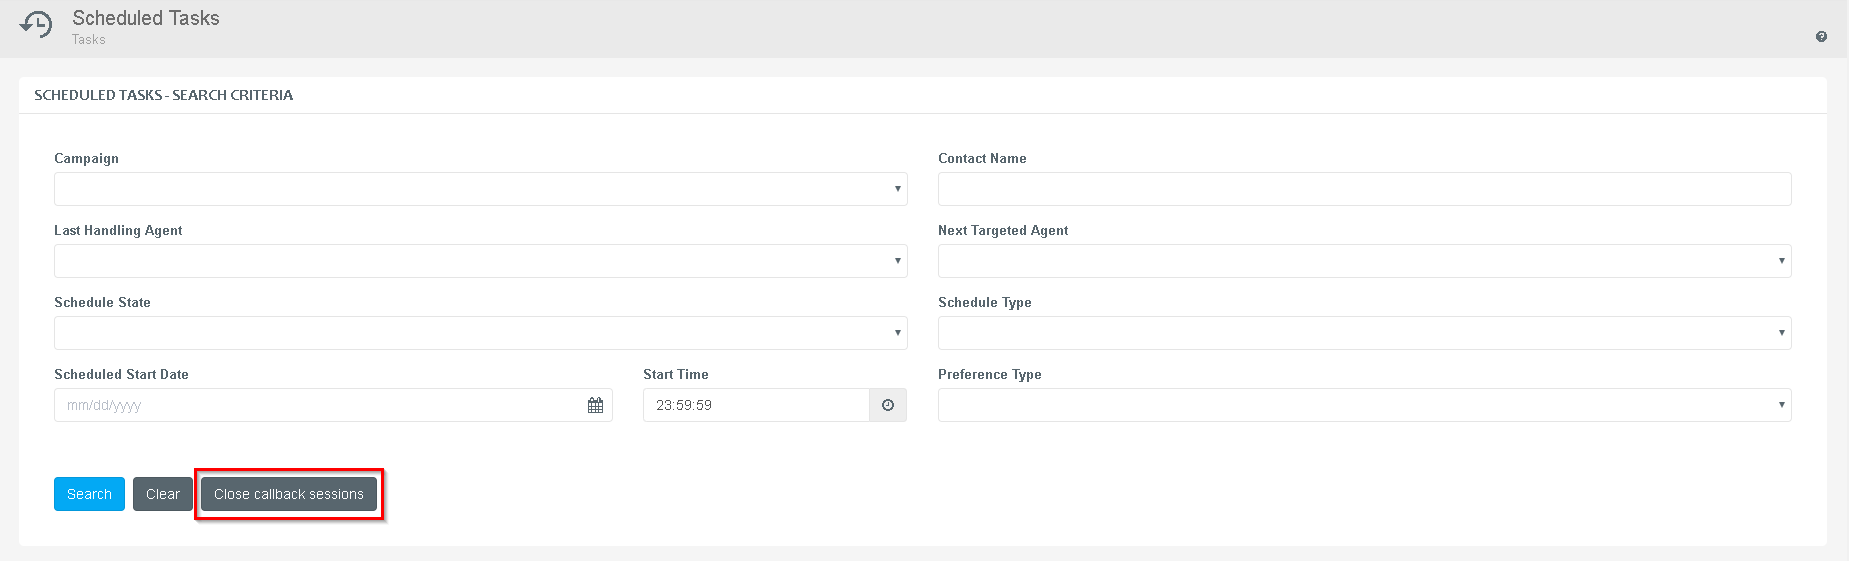
Close Callback Sessions
Use this button to delete all sessions that are in Callback state.
Navigate to Operations→Customers→Contact Status Change .
Perform a contact search with the relevant requirements.
Click the Close callback sessions button that appears if the search produced any result.
Managing Contact Lists
System administrators can control the activities to be performed for the contact list associated with a specific campaign.
Refer to the Contact Management of the Designing Campaigns chapter for detailed description.
- Navigate to **********Operations*******→Workflows→Queues &
Campaigns.
*** Click Edit on the preferred campaign.
Go to the Contact Management tab.
Modify the settings of the selected campaign.
Click **Submit **to save the modifications to the database.
Depending on the settings the following combinations of actions will be executed automatically at the scheduled time:
| Export | Exports existing contact records from the campaign and uploads the result to the specified FTP directory. |
| Import | Downloads an import file from the specified FTP folder, deletes existing contact records from the campaign, then imports the new ones. |
| Merge | Performs an import without deleting existing contact records. |
| Export & Import | Performs an export first, then performs an import. |
| Export & Merge | Performs an export first, then performs a merge. |
| Delete | Performs a deletion process. |
Specific Settings of the Contact Manager Service
The service is launched at the scheduled start time and performs the following activities:
If Export is selected, all existing contact records are written to a local file named according to the following format. Data fields in the export file are separated as specified.
[campaign id].export.[yyyymmddHHMMSS]
The system connects to the specified FTP server and authenticates using the specified credentials.
The local export file is uploaded to the specified export directory together with a log file which contains some statistical information about the export activity performed (start and finish time, number of exported contact records, etc.).
- If Import is selected, the specified import file is downloaded to a local working directory. If the import file name includes $rdatetime$ then CE will look for the file having the most recent time-stamp in the format yyyymmddhhMMss.
- If required, existing contact records are deleted from the campaign.
- Contact records are imported from the import file.
- A log file containing statistical information (start and finish time, number of contact records imported, number of problematic contact records, etc.) is uploaded to the specified export directory.
Whilst this service is executing the campaign is placed to a special state that disables changes. The background activities performed by the Contact Manager Service are controlled by a local configuration file which only Deployment Administrators can access:
[CE Root Folder]\Service\ContactManager\ContactManagerService.ini
The following table contains the name and description of the configuration parameters:
| Category | Parameter | Description |
|---|---|---|
| Database | QueryTimeout | SQL query timeout in seconds. This value is relevant when trying to remove large contacts lists from database. |
| Preference | CreateFooter UploadStatistics | 0/1 value which specifies whether insert footers (with data field names) to export files or not. 0/1 values which specifies whether upload a log file (with statistical information for each activity performed) to the FTP server. |
| Export | BriefFieldCollection | A comma separated list specifying which data fields to export when a brief (partial) export is performed. |
Contact List Folders on the CE Core Host
The following folders located under the ManagementSvc folder on the CE Core Host can contain contact lists, or list specific information at various stages of the Contact Manager Service operation:
| ContactListFileCache | This is a temporary storage of contact list files appearing here for short periods of time, e.g. when a user wishes to download a list exported from a campaign via the CE Portal. |
| Upload | This is a default target location for scheduled contact list export operations when no Export Directory was set on the FTP server. Exported contact lists will not appear here if a target FTP path is set and is accessible. |
Import Contact Records
Contact Expert Portal allows campaign managers to load multiple contacts into the campaign from external data files.
Navigate to Operations→Workflows→Queues & Campaigns .
Select Edit for the particular campaign.
Click MORE ACTIONS→Import Contact Records to import data files.
Specify the properties described below.
Click Submit to save the modifications to the database.
Specify the following on the Scheduling Parameters tab:
| Scheduled Time | Date and time when the import should be scheduled for. |
| Comment | Any comment associated with the import process. |
| Field Separator | Field separator used in the external data file. The following field separators are supported:
|
| Import File has Header | Specify if the text import file contains any headers |
| Import File | Select import file, as this is rarely generated manually. Contact Expert supports both ANSI and UNICODE encoded files. Import file needs to follow the format and type of the fields defined for the campaign. |
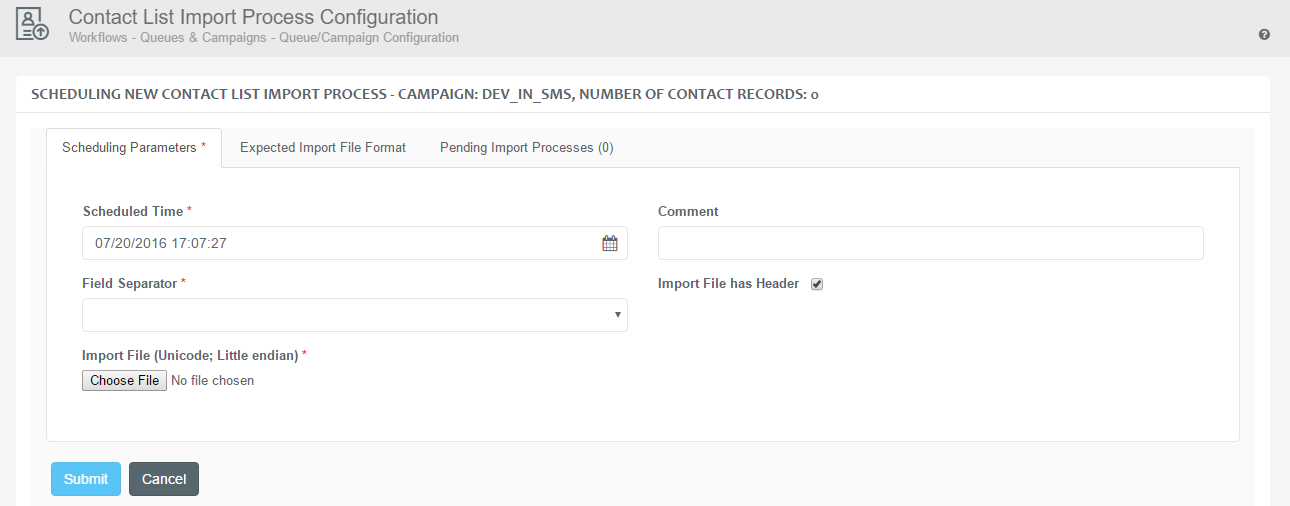
Expected Import File Format: An overview of how the system expects the external data file format to be shown.
Pending Import Processes : Submitting the import file results in a process being scheduled; external data files scheduled for import on the given campaign are listed here.
Result of a scheduled import process can be tracked in the Contact List Processes menu.
Export Contact Records
Contact Expert Portal allows campaign managers to export multiple contacts from a campaign to external data files.
Navigate to Operations→Workflows→Queues & Campaigns.
Click **Edit ** for the particular campaign.
Click MORE ACTIONS→Export Contact Records to export data files.
Specify the properties described below.
Click **Submit **to save the modifications to the database.
Specify the following on the Scheduling Parameters tab:
| Scheduling Time | Date and time when the export should be scheduled for. |
| Comment | Any comment associated with the export process. |
| Field Separator | Field separator used in the external data file. The following field separators are supported:
|
| Create Header | Specify any headers should be generated. |
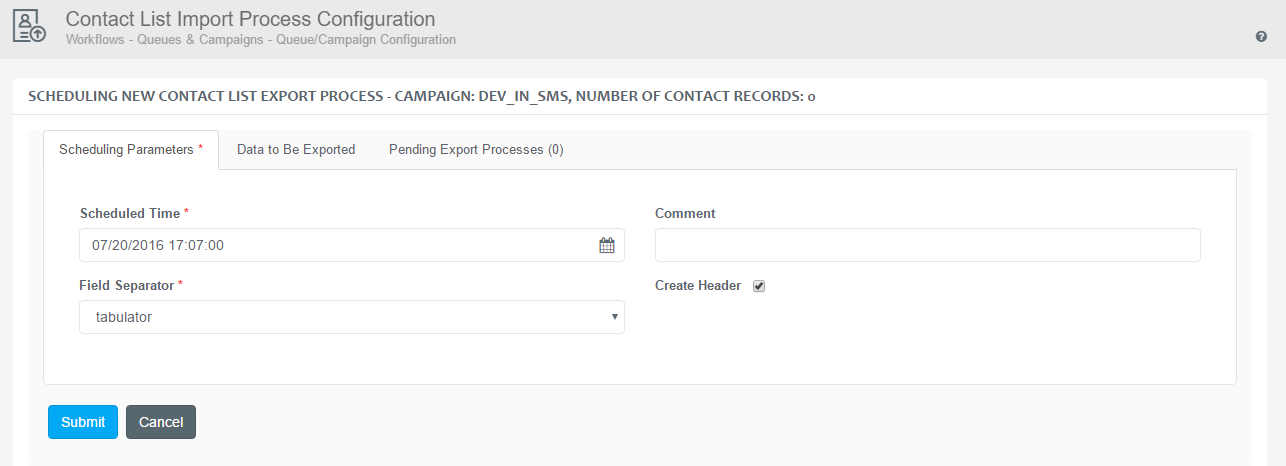
Data To Be Exported : Contact Expert Portal allows campaign managers to decide which CRDS fields are included in the export. The campaign manager can select/deselect each standard and CRDS field associated with the campaign.
Pending Export Process : Submitting the export request results in a process being scheduled; export processes for the given campaign are listed here.
Result of a scheduled export process can be tracked in the Contact List Processes menu, from where the export file can be downloaded.
Delete Contact Records
Contact Expert Portal allows campaign managers to bulk delete contacts from a campaign.
Navigate to Operations→Workflows→Queues & Campaigns.
Select Edit for the particular campaign.
Click MORE ACTIONS→Delete Contact Records to delete data files.
Specify the properties described below.
Click Submit to save the modifications to the database.
Specify the following on the Scheduling Parameters tab:
| Scheduled Time | Date and time when the delete process should be scheduled for. |
| Comment | Any comment associated with the deletion process. |
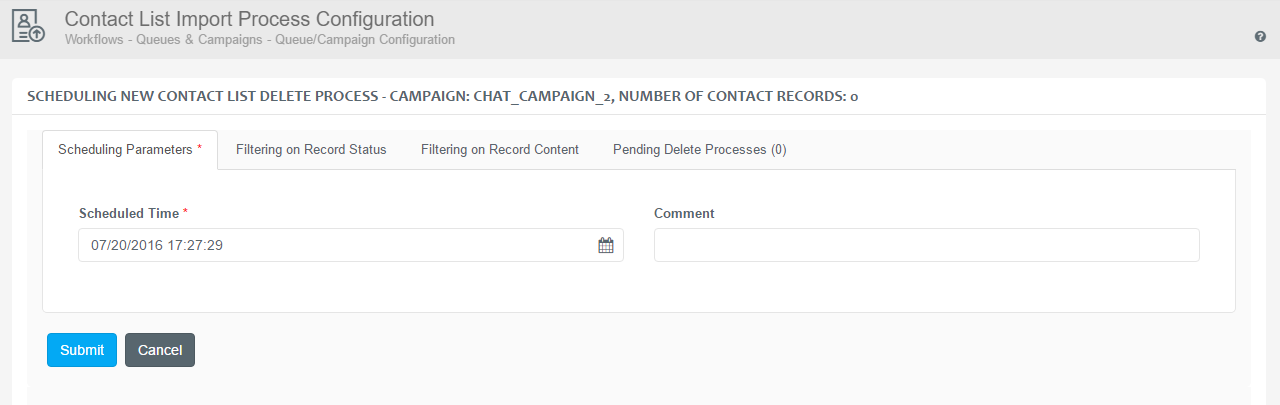
Filtering on Record Status
| Record Status | Select the state of records to be deleted. (e.g. Closed, Inactive, Postponed, etc.) |
| Major Reason Code | Major Reason Code assigned by the system (e.g. Call Disconnected, Routing failed, Agent cannot serve the request, Suspended, etc.) |
| Minor Reason Code | Minor Reason Code assigned by the system (e.g. Abandoned in queue, Callback in queue, Queue size limit, etc.) |
Filtering on Record Content : Specify any additional filters to the target contact records using CRDS field contents associated to the campaign.
Pending Delete Process: Submitting the delete request results in a process being scheduled; delete processes for the given campaign are listed here.
Result of a scheduled delete process can be tracked in the Contact List Processes menu.
Edit Contact Record Structure
Read more about this function on the following chapter: Contact Record Structure.