Installing CE Agent Client Application
Contact Expert v6.1 for Skype for Business Server
Installing Contact Expert Agent Client Application
Important
Before starting the installation of Contact Expert Agent Client Application, please make sure all Contact Expert Prerequisites are already installed on the target computer.
Selecting the appropriate installation method
Contact Expert Agent Client Application MSI installer supports the following installation methods:
- Local installation (standalone)
- Remote installation using Group Policy (GPO)
- Remote installation using System Center Configuration Manager (SCCM)
Both manual and silent installation mode is available in all above cases.
Standalone installation is recommended to install the application on a single computer. However, remote installation could be a better choice in case of multiple computers. Manual installation is the option where the entire install process is controlled by the user through the installer GUI, while silent installation means the process does not require any user interaction thus no GUI is displayed.
If you have selected the method best suits your needs, please proceed with the corresponding section.
Manual Installation
Standalone Installation
Follow these steps to install Contact Expert Agent Client Application
Log in to the Agent PC with local administrator privileges.
Make sure the Skype for Business client application is not running.
It is important to close the Skype for Business client. A simple sign out is not enough. Failing to exit from the Skype for Business client application will generate problems with the Contact Expert Agent Client application that will require the complete uninstallation and reinstallation of the application.
Launch "CE\CE_Agent.Net\setup.bat" from the Contact Expert installation media.
The installer must be run with Administrator privileges, the supplied .BAT file makes sure this and any other requirements are met. Thus please ensure that you run the included batch file instead of running the MSI installer directly.
If you run the MSI directly, the installation will fail.
Accept the license agreement, enter a user name and a company name and select the "Anyone who uses this computer" option.
Accept the default installation path (C:\Geomant\CE).
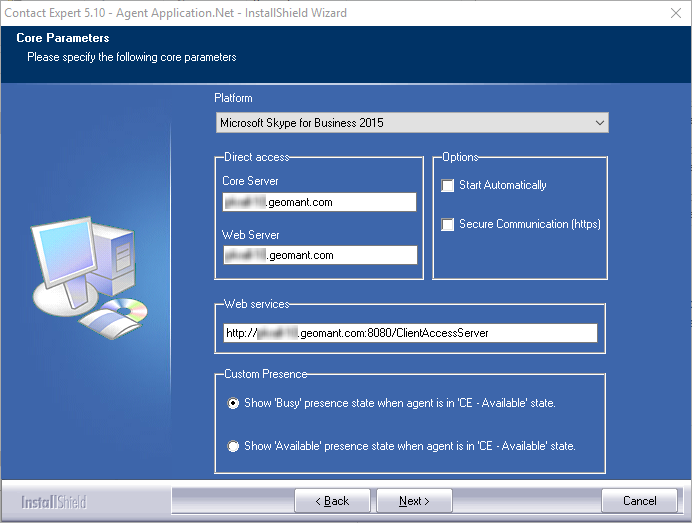
Specify the installation parameters on the Core Parameters screen as per the instructions below, then click Next:
- Platform: select the default platform (Microsoft Skype for
Business 2015).***
*** - Protocol: select the protocol which satisfies your requirements (find the explanations below).
- Default Port: accept the default value (19960).
- Platform: select the default platform (Microsoft Skype for
Business 2015).***
    Make sure the local Windows firewall does not block inbound
    connections to this TCP port.

4.  ***Direct Access***:
    1.  ***Core Server***: enter the internal FQDN of the CE Core
        Host here.
    2.  Web Server: enter the internal FQDN of the CE Core Host
        here.
5.  Options:
    1.  ***Start Automatically***: check this if you want the agent
        application to start up automatically after a user signs
        into Windows, otherwise leave this unchecked.
    2.  Secure Communication (HTTPS): check if HTTPS is required,
        otherwise leave unchecked.
    3.  Dynamic Port Selection: check this if you are deploying the
        agent application on a computer which might be used by
        multiple users at the same time, otherwise leave this
        unchecked.
6.  Web Services: enter the URL of the Client Access Server here
    (see the explanations below).
7.  Custom Presence: select the preferred Skype for Business
    presence state to be in use by default whenever the agent is
    free to take a CE task (in 'CE - Available' state). The
    following options are available for selection:
    1.  Show Busy presence state when the agent is in CE - Available
        state.
    2.  Show Available presence state when the agent is in CE -
        Available state.

        CE is setting the SfB presence state of the agent to
        ***Busy*** automatically whenever a CE task is loaded for
        the agent. It is not a customer changeable setting.
- Click Next and wait for the install wizard to finish the installation.
Network Architecture Scenarios
The Protocol and Web Services parameter values depend on the way the agent PCs running the CE Agent Application are connected to the CE server(s). Use the following table to find out which settings fit your network architecture:
| Connectivity Scenario | Client Access Server URL |
|---|---|
|
http://[CE Core Host Internal FQDN]:8080/ClientAccessServer |
|
http://[Reverse Proxy External FQDN]:[External CAS Port]/ClientAccessServer |
Silent Installation
Standalone Installation
The Agent Client Application MSI installer can be run silently from the command line by passing the /qn or /qn+ parameter to msiexec. You can also specify Contact Expert specific parameters to be passed to the installer in order to configure the application. All these parameters are optional. However, if a parameter is not specified, the installer will use its default value during the configuration.
By default, if you perform a manual standalone installation, setup.bat executes the following command to install the application:
start msiexec.exe /i "%~dp0%~n0.msi";
The following example demonstrates how to install the Agent Client Application in silent mode in a Microsoft Skype for Business 2015 environment using SOAP to communicate with the CE Core Server:
start msiexec.exe /i "%~dp0%~n0.msi" /qn PLATFORM=SFB2015 PROTOCOL=SOAP CORESERVER=cecorehost.yourdomain.com WEBSERVER=cecorehost.yourdomain.com WEBSERVICES=http://cecorehost.yourdomain.com:8080/ClientAccessServer ALLUSERS=TRUE
The below table contains all Contact Expert specific command line parameters with their descriptions and default values:
| Setting (as displayed on the GUI) | Parameter Name | Default Value | Valid Values |
|---|---|---|---|
| Platform | PLATFORM | SFB2015 | [ AVAYA | LYNC2010 | LYNC2013 | SFB2015 ] |
| Default Port | DEFAULTPORT | 19960 | numbers |
| Core Server | CORESERVER | [local computer FQDN] |
string |
| Web Server | WEBSERVER | [local computer FQDN] | strings |
| Start Automatically | AUTOSTART | FALSE | [ TRUE | FALSE ] |
| Secure Communication (HTTPS) | HTTPS | FALSE | [ TRUE | FALSE ] |
| Dynamic Port Selection | DYNAMICPORT | TRUE | [ TRUE | FALSE ] |
| Web Services | WEBSERVICES | http://[localcomputer FQDN]:8080/ClientAccessServer | strings |
| Install into all user profiles | ALLUSERS | TRUE | [ TRUE | FALSE ] |
More detailed information and examples can be found in the "CE\CE_Agent.Net\setup.bat" located on the Contact Expert installation media.
To run the Agent Client Application MSI installer silently with the specified command line parameters
Open a Command Prompt window as Administrator.
Change the current path to the "CE\CE_Agent.Net"folder located on the Contact Expert installation media.
Execute the following command:
start msiexec.exe /i "%~dp0%~n0.msi"; /qn [CE_PARAM1=VALUE1] [CE_PARAM2=VALUE2] ...
Group Policy Installation
Note that this description is merely an example. If you already know how to perform a Group Policy install, you should do it your way.
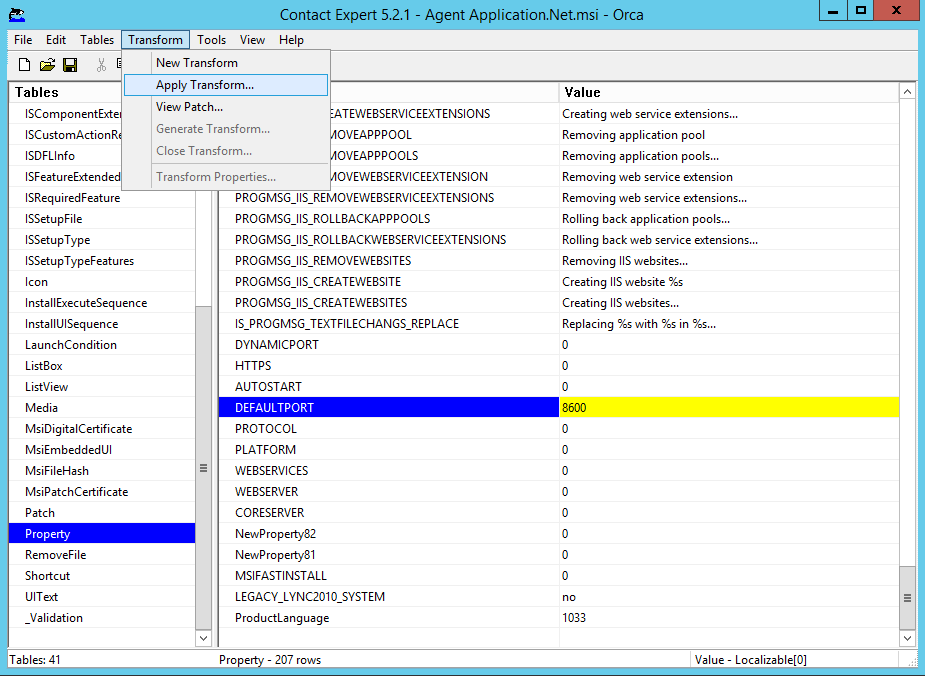
To specify custom parameters for a Group Policy based MSI silent installation, the installer must be transformed by Microsoft's Orca tool. (Note that you can also use other similar software to create the necessary .mst transformation file.) Orca is a part of Windows SDK Components for Windows Installer Developers tool set which is included in the Windows Software Development Kit (SDK).
See the table in the Silent Installation section for the list of Contact Expert specific custom parameters.
To generate the transformation file
- Install Windows SDK. The installer can be found here.
- After the setup has completed, navigate to "...Microsoft SDKs\Windowsv7.0Bin" and run Orca.msi."
- Start Orca. Drag and drop the Agent Client Application MSI installer onto it. It will open automatically.
- Click Transform→New Transform.
Choose Property from the Tables view.
Scroll down to the bottom of the list, and modify the properties if you want to change their default value. The table in the Silent Installation section shows the default and possible values for every property (the "0" in the property table will never be used).
When you are done, click Transform→Generate Transform... and save the .mst file.
Follow these steps to install Contact Expert Agent Client Application from Group Policy
Create a shared folder for the MSI installer on a computer that is accessible from the Domain Controller and from each client PC you would like to install the software on. Authenticated Users must be given at least Read permission on this folder.
Copy the .mst file generated by Orca to the shared folder just created.
Log on to your Domain Controller and open Group Policy Management.
Create a new GPO (Group Policy Object). You can add the object to an existing computer group or to the domain settings by right clicking on one of them and selecting "Create a GPO in this domain, and Link it here...". Choose a relevant name.
Right click on the newly created object and click Edit.
In the opened window, navigate to the Computer Configuration →*Policies →Software Settings →Software installation* node. Right click on it and select New →*Package. Copy the ***Network Path** of the shared folder created at the first step of the address bar, hit Enter and choose the MSI installer file, then click Open.
If you specify the URL using an IP address, FQDN or absolute path, the installation might fail.
After selecting the installer, choose Advanced option for the deployment method. A new window will pop up.
Click Add... on the Modifications tab and choose the .mst file you have generated. Grant Read permission for the Authenticated Users group on the Security tab, then click OK, but do not close the Group Policy Management Editor window yet.
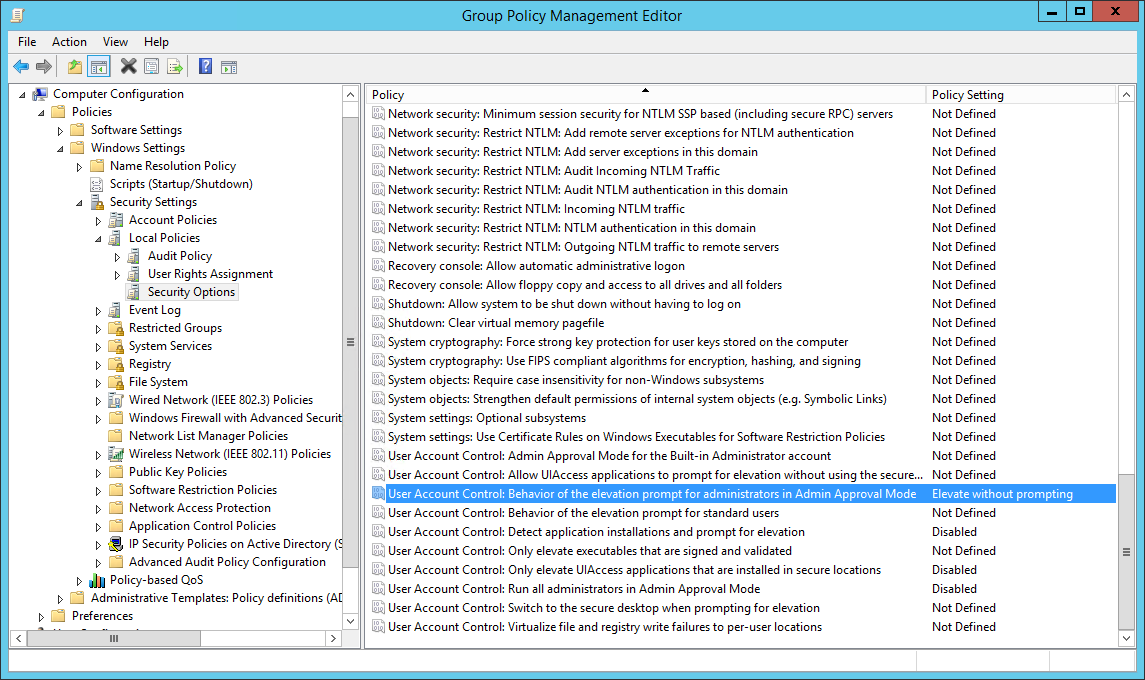
Navigate to Computer Configuration →*Policies →Windows Settings →Security Settings →Local Policies →Security Options*. Find the below policies on the right pane and apply the following settings:
Policy Setting User Account Control: Behavior of the elevation prompt for administrators in Admin Approval Mode Elevate without prompting User Account Control: Detect application installations and prompt for elevation Disabled User Account Control: Only elevate UIAccess applications that are installed in secure locations Disabled Navigate to Computer Configuration→Policies→Administrative Templates→System→Group Policy. Find the below policy on the right pane and apply the following setting:
Policy Setting Allow asynchronous user Group Policy processing when logging on through Remote Desktop Services Disabled Navigate to Computer Configuration→Policies→Administrative Templates→System→Logon. Find the below policy on the right pane and apply the following setting:
Policy Setting Always wait for the network at computer startup and logon Enabled After completing the steps above, the group policy must be refreshed on the client computers. By default, it will automatically refresh within 120 minutes or at the next computer restart. To force a PC to update the group policy immediately, log on to the PC, open a Command Prompt window as Administrator and execute the following command:
gpupdate /forceAt the next PC restart, the Agent Client Application will be installed automatically (before the login screen will appear).
System Center Configuration Manager Installation
This type of installation requires strong SCCM knowledge. Also, the below guide assumes you have a properly installed and configured SCCM environment.
Follow these steps to install Contact Expert Agent Client Application from System Center Configuration Manager
Make sure you have a fully functional SCCM server and all the client PCs are connected to it.
Choose your favorite type of collection and include the necessary resources.
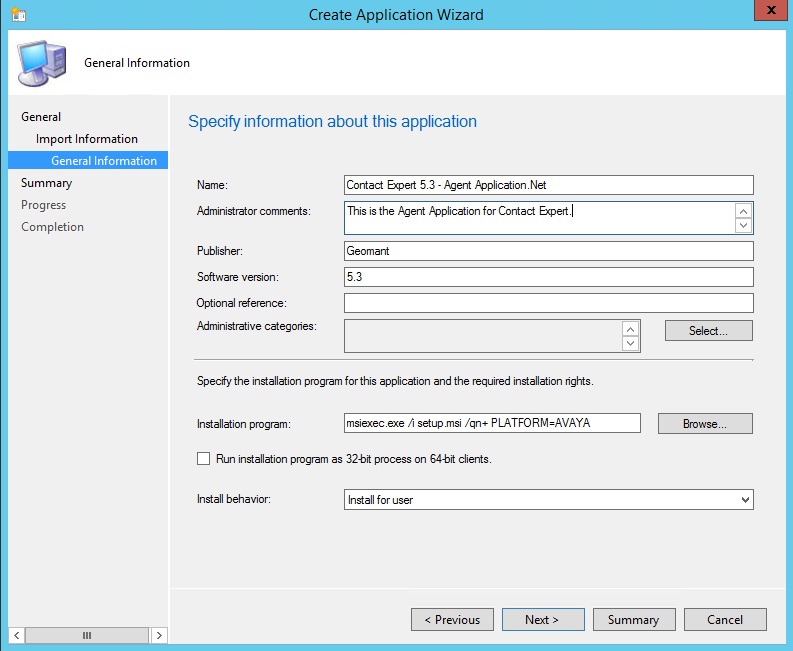
Create a new application in the Software Library. Choose the Windows Installer (*.msi file) option for type and locate the installer file on your network. This folder must be shared for the clients with read permission granted.
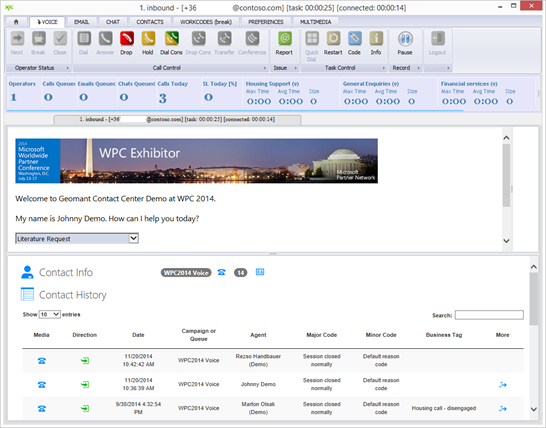
Agent Client Application can be configured through the command line during the installation. The screenshot shows an example command line entry in SCCM for silent install including a Contact Expert specific configuration parameter. To change multiple values, just specify all the desired parameters and their value assignments (e.g. "msiexec.exe /i setup.msi /qn PLATFORM=SFB2015 PROTOCOL=SOAP DEFAULTPORT=8080"). The table in the Silent Installation section lists the names of these properties and their valid values.
Complete the wizard and do not forget to distribute and deploy the application.
Verifying the Installation
Testing Skype for Business Presence Propagation
Follow these steps to test the presence synchronisation between Skype for Business and Contact Expert
As administrator, log out of the Agent PC and log back in using a Windows account associated with an agent.
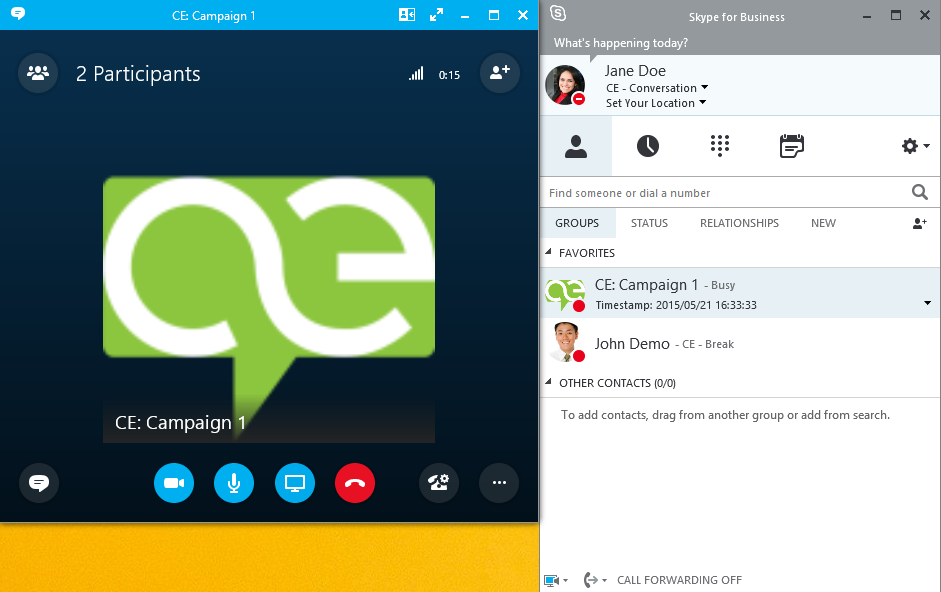
Log in to the Skype for Business client manually first and make sure that the list of custom Contact Expert presence statuses (e.g. "CE - Available") appear.
Find and open the CE Tools shortcut on the desktop and run CE Agent Application.Net.
Click the Voice →Login button on the Home tab of the menu bar. Make sure that "Skype for Business" login mode is selected then click the green check-mark to log in the Agent Application.
After logged in, change your agent status to a passive state (break) then change back to active in the Agent Application (click Operator Status →Break button on the Voice tab once then again). Check that your presence shown in the Skype for Business client follows this change through ("CE - Available"→"CE - Break"→"CE - Available").


Verifying Announcements and Queue Music
Make sure the agent account you used to log in to the agent client application has a skill assigned to a working campaign and that there are no other agents in "CE - Available" state for this particular skill or campaign.
While logged in to the agent client application, change your agent status to a passive state (break).
Use the Skype for Business client on a different agent PC or use the mobile edition of Skype for Business client on any mobile device to dial the Skype for Business endpoint URI of the campaign already set up.
Verify that you hear the TTS announcements and/or the queuing music. Your test call must be waiting in the appropriate voice queue as no agent is available assigned to the campaign.
While on the call, check that the Skype for Business endpoint of the campaign has the proper status displayed.
Taking the Call
Without hanging up the test call, change the agent state to active on the agent PC you logged in to the agent client application.
Verify that the call rings at this agent and pick up the call.
While on the call, use the other agent PC to ensure that the statuses of the Skype for Business endpoints of the campaign and the recording service reflect the ongoing call.
In order to verify the status of the entire system, please follow the Basic Install Deployment Checklists.
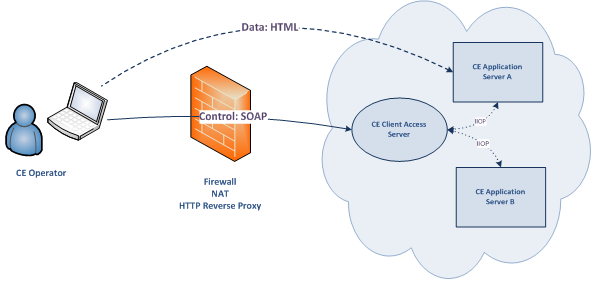
Configuring the Reverse Proxy
A reverse proxy service is required in the customers' DMZ in case at least one agent workstation resides outside of the corporate network. This is the third option listed in the above Agent PC connectivity scenario table. In this case, Contact Expert Agent Client Application establishes 2 different communication channels:
- Control channel: a SOAP-based communication channel between the agent client application and Contact Expert Client Access Server (CAS). This channel is primarily used to expose softphone functionalities.
- Data channel: a HTML-based data channel between the agent client application and the Internet Information Services (IIS) web server running on CE Core Host. This channel is primarily used to download/upload tasks and contact history.
The following diagram shows the described architecture:
 {.image-center}
Please note that the corporate firewall must be configured to enable both HTML-based and SOAP-based traffic back and forth between the external agent workstations and the CE Core Hosts.
The Contact Expert installation package does not contain a HTTP reverse proxy, because there are many third party solutions available and customers usually employed one already.
Software such as Microsoft Threat Management Gateway (TMG) firewall, Microsoft Internet Information Services with Application Request Routing (IIS ARR) and free suites such as Nginx, pfSense, etc. are all available for this purpose.
To implement the URL mappings needed by the CE Agent Application located outside of the corporate intranet:
Navigate to the Application Servers form in the CE portal and configure the Public Web URL and Private Web URL values. You can add custom ports to these with a colon, e.g.: "http://public.cehost.com:6789"
Decide which Application Server FQDNs the system should use when constructing the Agent Policy URLs. These are the tags shown in the Agent Policy URLs, such as "{domain_HttpAddress}". The options available are:
domain_PrivateHttpAddress
The Private Web URL will be used from the Application Server resource domain_PublicHttpAddress The Public Web URL will be used from the Application Server resource domain_HttpAddress
The system will use the URL tags – either the domain_PrivateHttpAddress or the domain_PublicHttpAddress – defined in the CAS web.xml configuration file In the reverse proxy of choice, configure an external FQDN with a unique port and an internal FQDN for every URL the Agent Policy resource defines. E.g:
External URL Internal URL https://[Reverse Proxy External FQDN]:[External Port]/CEAgent/... http://[CE Core Host Internal FQDN]/CEAgent/... FQDN and port pairs in the External URL column above should match the Public Web URL property in the Application Servers resource set up in step 1 above.
Repeat this to cover every URL in the Agent Policy.
Finally, add the CAS FQDN to the reverse proxy URL mapping configuration. Make sure the internal URL provided points to the internal application server FQDN with the port configured for the CAS (Tomcat). The default internal port is 8080.
The base part of the CAS FQDN specified as the external URL in the
reverse proxy should match the **Web Services** parameter specified
during the installation of Contact Expert Agent Application.
Customizing the Configuration File of Contact Expert Agent Client Application
To learn all the possible options in the configuration, please read the following article: How to configure Contact Expert Agent Client Application).
These settings are all preset by the installer wizard, however you can change/refine their values at any time as needed. If a given setting is missing from the configuration file, the application uses its default value.