Setup a Facebook page for Buzzeasy Chat
Creating a Facebook Page
- Create a new Facebook Page or go to an existing Page. If you have you can list the pages at the following link
- Open the Facebook Page's About page and then copy and save the Page ID.
Creating Facebook App
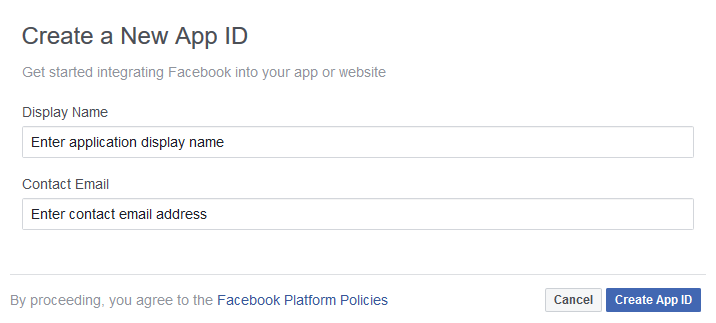
- Create a new Facebook App by navigating to https://developers.facebook.com/apps
- Enter the name of your app and the contact email then click the Create New Facebook App ID button.

- In the left pane of the next displayed window, expand Settings and click Basic.
- In the right pane, copy and save the App ID and App Secret.
- In the left pane, under Settings, click Advanced
- In the right pane, set Allow API Access to App Settings slider to Yes.
Enable messenger
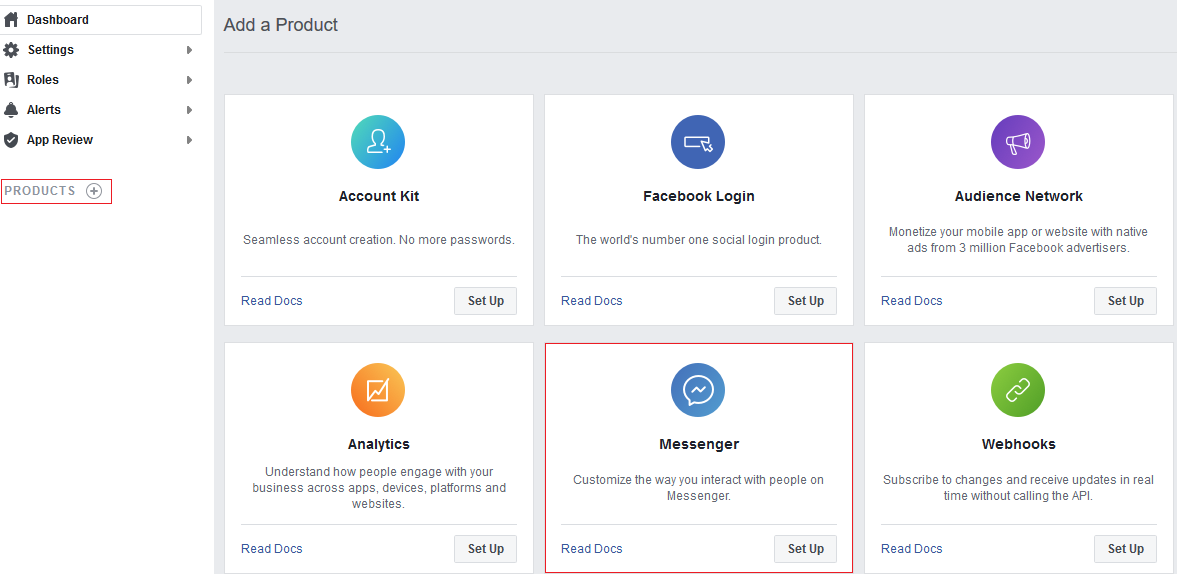
- In the right pane, scroll down and in the Messenger box, click the Set Up button. The Messenger entry is displayed under the PRODUCTS section in the left pane.

Generate access token
- Click in Messenger under Products and open Settings
- Go to Access Tokens part and click on Add or remove Pages button to select the created page. After you select the page it asks for allowance on conversations in Messenger. Select yes and finish linking.

- The selected pages has been added to the pages. Generate a new token with Generate Token button on the right side.
- Copy and save the the Page access Token.
Buzzeasy channel
Important
This tasks belong to Geomant.
- Create a new Buzzeasy channel or use an existing one. When provisioning state is completed open Azure Portal.
- On the Azure Portal search for the channel ID and open that Bot Channels Registration that has the channel ID in it's name.
- Open Channels and click to 'Facebook'
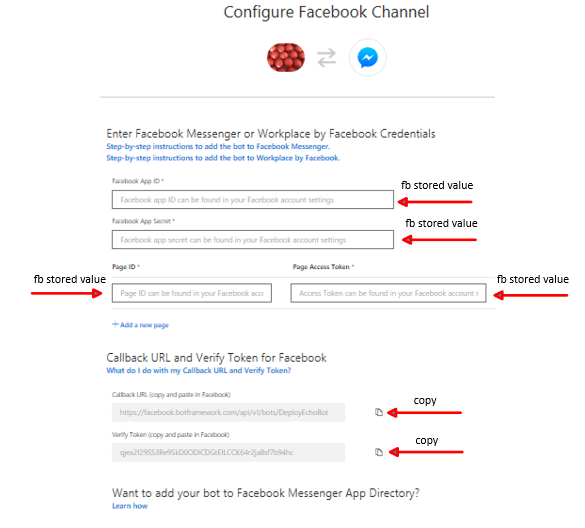
- Copy and paste the Facebook stored values to the right place and copy the CallbackURL and Verify Token.

- Click the Save button
Enable Webhook
- Click the 'Subscribe to Event' button and enter the CallbackURL and Verify Token.
- Click the 'Add or Remove Pages' button and add the selected Facebook page with the following 4 fields enabled:
- messages
- messaging_postbacks
- messaging_optins
- message_deliveries
- Click the 'Verify and Save' button
Submit the App for review
- At a minimum, you must provide the following basic information in the app console under Settings > Basic:
- App Icon
- Privacy Policy URL
- Category
- Business Use
- To receive messages from users, you must enable messaging for your Page. To do this, do the following:
- Go to Page Settings > General.
- In the 'Messages' section, click the 'Edit' button.
- Select the 'Allow people to contact my Page privately by showing the Message button' checkbox.
- Click 'Save Changes'
- Put Your app in Development Mode
- In the 'App Review for Messenger' section of the Messenger settings for your app, click the 'Add to Submission' button for each permission your app requires. Added permissions will appear in the 'Current Submission' section below.
- Submit the application. You must provide:
- Accept the Terms and conditions
- Category of your App
- Step by step documentation on how the App works, like:
```
- Go to that particular Facebook page and send a message
- When it asks for your name enter a dummy value
- Then you will be connected with an agent in the application
- The conversation channel is establishes ```
- Upload a short video about how the application works
- Wait while Facebook validates the application
- When validation is done set the App status to Live
References
| Facebook reference | Microsoft reference |
|---|---|
| developers.facebook.com | docs.microsoft.com |