How to create a custom bot in Buzzeasy
This article has been setup for any custom development required to build a custom bot dialog within Buzzeasy. Buzzeasy BYOB (Bring Your Own Bot) feature allows bespoke development to be part of the customer workflow. The target audience of this is aimed for any development using the following;
- Visual Studio
- C#
Note
You can directly connect to the Bot Proxy API, description is available here: Buzzeasy Bot Proxy API
Step-by-step guide
- Download the Visual Studio Template provided by Buzzeasy. This can be found at https://buzzeasychatfiles2.blob.core.windows.net/chatbuilder/BuzzeasyBotBuilder.zip
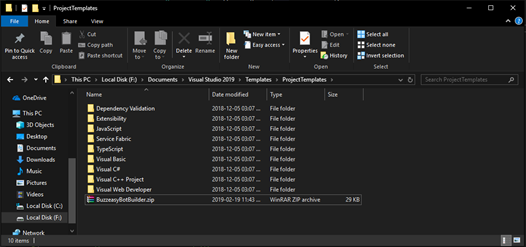
- Once downloaded, copy the zip file into the following location:
Documents\Visual Studio<Version>\Templates\ProjectTemplates

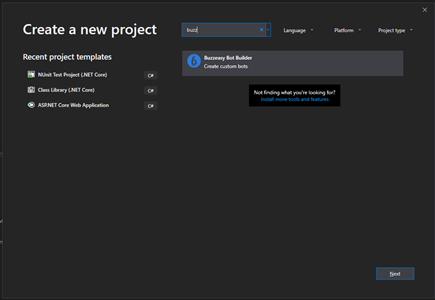
- Start Visual Studio and create a new project using the newly
imported template

- Once the project has been created, an Azure storage account will need ot be created in Azure. This can be done by following this link: https://docs.microsoft.com/en-us/azure/storage/common/storage-quickstart-create-account?tabs=azure-portal
- Upon creation of the storage account, please save the connection string as this will be needed.
- Open the web.config file within the new project and paste the connection string into the TableStoreConnectionString
- By default the project set to use the Bot Framework Emulator But you
can change it by
- Open the WebApiConfig.cs
- Go to the region "Buzzeasy Bot Builder"
- Uncomment this region if you want to enable connection to Buzzeasy Platform
- If the emulator is required, simply comment this region for debugging
Develop your chatboat as per a standard Microsoft Bot Framework V3.0 bot. Samples can be found https://github.com/Microsoft/BotBuilder-V3/tree/master/CSharp/Samples
Once the chatbot dialog has been completed, then it is time to register the bot within the buzzeasy portal
- Navigate to https://portal.buzzeasy.com
- Login with credentials provided
- Navigate to Chats -> Bots
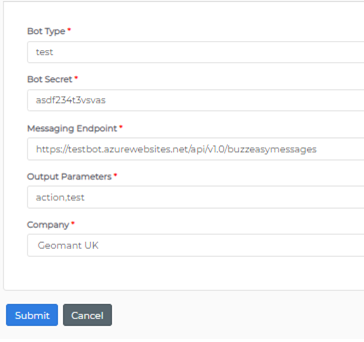
- Create a new bot registration
- Enter name of bot in bot type field. This name will be shown within the workflow routing
- Generate a secret
- Past the url of the messaging endpoint where your bot is hosted. An example of this will be like this: https://{yourbot}.azurewebsites.net/api/v1.0/buzzeasymessages
- save the secret as this will be needed be entered in the web.config file of the project
- Set the output parameters. This will be the parameters that
will be returned by your custom bot when you send a bot
finished event to Buzzeasy

- Paste the secret into the AppSecret field within the web.config of the project
- Your bot has now been successfully registered and is ready to be added to workflow
How to send data from Custom Bot to the workflow
If you want to send data back to Buzzeasy when the bot dialog has finished, you can pass any data in the BotFinished event within the additional data dictionary:
You can use the proxy client if you have one:

(If you use our template you can get an instance in the dialogs by add the IProxyClient to the constructor and resolve from the scope)

Or you can Post the BotFinished event to the https://<ServiceUrl>/<ConversationId>/finished URL
You can use this data in the workflow:
- Add the key to the Output Parameters on the Portal/Chat/Bots page

- Add a new event
- Set the Event Type to BotFinished
- Add a new condition
- And you can choose the key in the Condition

Workflow routing setup can be configured and instructions are available here: Workflows